- 浏览: 2101540 次
- 性别:

- 来自: 深圳
-

文章分类
最新评论
-
wahahachuang5:
web实时推送技术使用越来越广泛,但是自己开发又太麻烦了,我觉 ...
细说websocket - php篇 -
wahahachuang8:
挺好的,学习了
细说websocket - php篇 -
jacking124:
学习了!支持你,继续
初窥Linux 之 我最常用的20条命令 -
aliahhqcheng:
应该是可以实现的,没有看过源码。你可以参考下:http://w ...
Jackson 框架,轻易转换JSON
Android中SQLite应用详解
上次我向大家介绍了SQLite的基本信息和使用过程,相信朋友们对SQLite已经有所了解了,那今天呢,我就和大家分享一下在Android中如何使用SQLite。
现在的主流移动设备像Android、iPhone等都使用SQLite作为复杂数据的存储引擎,在我们为移动设备开发应用程序时,也许就要使用到SQLite来存储我们大量的数据,所以我们就需要掌握移动设备上的SQLite开发技巧。对于Android平台来说,系统内置了丰富的API来供开发人员操作SQLite,我们可以轻松的完成对数据的存取。
下面就向大家介绍一下SQLite常用的操作方法,为了方便,我将代码写在了Activity的onCreate中:
- @Override
- protectedvoidonCreate(BundlesavedInstanceState){
- super.onCreate(savedInstanceState);
- //打开或创建test.db数据库
- SQLiteDatabasedb=openOrCreateDatabase("test.db",Context.MODE_PRIVATE,null);
- db.execSQL("DROPTABLEIFEXISTSperson");
- //创建person表
- db.execSQL("CREATETABLEperson(_idINTEGERPRIMARYKEYAUTOINCREMENT,nameVARCHAR,ageSMALLINT)");
- Personperson=newPerson();
- person.name="john";
- person.age=30;
- //插入数据
- db.execSQL("INSERTINTOpersonVALUES(NULL,?,?)",newObject[]{person.name,person.age});
- person.name="david";
- person.age=33;
- //ContentValues以键值对的形式存放数据
- ContentValuescv=newContentValues();
- cv.put("name",person.name);
- cv.put("age",person.age);
- //插入ContentValues中的数据
- db.insert("person",null,cv);
- cv=newContentValues();
- cv.put("age",35);
- //更新数据
- db.update("person",cv,"name=?",newString[]{"john"});
- Cursorc=db.rawQuery("SELECT*FROMpersonWHEREage>=?",newString[]{"33"});
- while(c.moveToNext()){
- int_id=c.getInt(c.getColumnIndex("_id"));
- Stringname=c.getString(c.getColumnIndex("name"));
- intage=c.getInt(c.getColumnIndex("age"));
- Log.i("db","_id=>"+_id+",name=>"+name+",age=>"+age);
- }
- c.close();
- //删除数据
- db.delete("person","age<?",newString[]{"35"});
- //关闭当前数据库
- db.close();
- //删除test.db数据库
- //deleteDatabase("test.db");
- }

上面的代码中基本上囊括了大部分的数据库操作;对于添加、更新和删除来说,我们都可以使用
- db.executeSQL(Stringsql);
- db.executeSQL(Stringsql,Object[]bindArgs);//sql语句中使用占位符,然后第二个参数是实际的参数集
- db.insert(Stringtable,StringnullColumnHack,ContentValuesvalues);
- db.update(Stringtable,Contentvaluesvalues,StringwhereClause,StringwhereArgs);
- db.delete(Stringtable,StringwhereClause,StringwhereArgs);
下面来说说查询操作。查询操作相对于上面的几种操作要复杂些,因为我们经常要面对着各种各样的查询条件,所以系统也考虑到这种复杂性,为我们提供了较为丰富的查询形式:
- db.rawQuery(Stringsql,String[]selectionArgs);
- db.query(Stringtable,String[]columns,Stringselection,String[]selectionArgs,StringgroupBy,Stringhaving,StringorderBy);
- db.query(Stringtable,String[]columns,Stringselection,String[]selectionArgs,StringgroupBy,Stringhaving,StringorderBy,Stringlimit);
- db.query(Stringdistinct,Stringtable,String[]columns,Stringselection,String[]selectionArgs,StringgroupBy,Stringhaving,StringorderBy,Stringlimit);
最后,他们同时返回一个Cursor对象,代表数据集的游标,有点类似于JavaSE中的ResultSet。
下面是Cursor对象的常用方法:
- c.move(intoffset);//以当前位置为参考,移动到指定行
- c.moveToFirst();//移动到第一行
- c.moveToLast();//移动到最后一行
- c.moveToPosition(intposition);//移动到指定行
- c.moveToPrevious();//移动到前一行
- c.moveToNext();//移动到下一行
- c.isFirst();//是否指向第一条
- c.isLast();//是否指向最后一条
- c.isBeforeFirst();//是否指向第一条之前
- c.isAfterLast();//是否指向最后一条之后
- c.isNull(intcolumnIndex);//指定列是否为空(列基数为0)
- c.isClosed();//游标是否已关闭
- c.getCount();//总数据项数
- c.getPosition();//返回当前游标所指向的行数
- c.getColumnIndex(StringcolumnName);//返回某列名对应的列索引值
- c.getString(intcolumnIndex);//返回当前行指定列的值
在上面的代码示例中,已经用到了这几个常用方法中的一些,关于更多的信息,大家可以参考官方文档中的说明。
最后当我们完成了对数据库的操作后,记得调用SQLiteDatabase的close()方法释放数据库连接,否则容易出现SQLiteException。
上面就是SQLite的基本应用,但在实际开发中,为了能够更好的管理和维护数据库,我们会封装一个继承自SQLiteOpenHelper类的数据库操作类,然后以这个类为基础,再封装我们的业务逻辑方法。
下面,我们就以一个实例来讲解具体的用法,我们新建一个名为db的项目,结构如下:

其中DBHelper继承了SQLiteOpenHelper,作为维护和管理数据库的基类,DBManager是建立在DBHelper之上,封装了常用的业务方法,Person是我们的person表对应的JavaBean,MainActivity就是我们显示的界面。
下面我们先来看一下DBHelper:
- packagecom.scott.db;
- importandroid.content.Context;
- importandroid.database.sqlite.SQLiteDatabase;
- importandroid.database.sqlite.SQLiteOpenHelper;
- publicclassDBHelperextendsSQLiteOpenHelper{
- privatestaticfinalStringDATABASE_NAME="test.db";
- privatestaticfinalintDATABASE_VERSION=1;
- publicDBHelper(Contextcontext){
- //CursorFactory设置为null,使用默认值
- super(context,DATABASE_NAME,null,DATABASE_VERSION);
- }
- //数据库第一次被创建时onCreate会被调用
- @Override
- publicvoidonCreate(SQLiteDatabasedb){
- db.execSQL("CREATETABLEIFNOTEXISTSperson"+
- "(_idINTEGERPRIMARYKEYAUTOINCREMENT,nameVARCHAR,ageINTEGER,infoTEXT)");
- }
- //如果DATABASE_VERSION值被改为2,系统发现现有数据库版本不同,即会调用onUpgrade
- @Override
- publicvoidonUpgrade(SQLiteDatabasedb,intoldVersion,intnewVersion){
- db.execSQL("ALTERTABLEpersonADDCOLUMNotherSTRING");
- }
- }
为了方便我们面向对象的使用数据,我们建一个Person类,对应person表中的字段,如下:
- packagecom.scott.db;
- publicclassPerson{
- publicint_id;
- publicStringname;
- publicintage;
- publicStringinfo;
- publicPerson(){
- }
- publicPerson(Stringname,intage,Stringinfo){
- this.name=name;
- this.age=age;
- this.info=info;
- }
- }
- packagecom.scott.db;
- importjava.util.ArrayList;
- importjava.util.List;
- importandroid.content.ContentValues;
- importandroid.content.Context;
- importandroid.database.Cursor;
- importandroid.database.sqlite.SQLiteDatabase;
- publicclassDBManager{
- privateDBHelperhelper;
- privateSQLiteDatabasedb;
- publicDBManager(Contextcontext){
- helper=newDBHelper(context);
- //因为getWritableDatabase内部调用了mContext.openOrCreateDatabase(mName,0,mFactory);
- //所以要确保context已初始化,我们可以把实例化DBManager的步骤放在Activity的onCreate里
- db=helper.getWritableDatabase();
- }
- /**
- *addpersons
- *@parampersons
- */
- publicvoidadd(List<Person>persons){
- db.beginTransaction();//开始事务
- try{
- for(Personperson:persons){
- db.execSQL("INSERTINTOpersonVALUES(null,?,?,?)",newObject[]{person.name,person.age,person.info});
- }
- db.setTransactionSuccessful();//设置事务成功完成
- }finally{
- db.endTransaction();//结束事务
- }
- }
- /**
- *updateperson'sage
- *@paramperson
- */
- publicvoidupdateAge(Personperson){
- ContentValuescv=newContentValues();
- cv.put("age",person.age);
- db.update("person",cv,"name=?",newString[]{person.name});
- }
- /**
- *deleteoldperson
- *@paramperson
- */
- publicvoiddeleteOldPerson(Personperson){
- db.delete("person","age>=?",newString[]{String.valueOf(person.age)});
- }
- /**
- *queryallpersons,returnlist
- *@returnList<Person>
- */
- publicList<Person>query(){
- ArrayList<Person>persons=newArrayList<Person>();
- Cursorc=queryTheCursor();
- while(c.moveToNext()){
- Personperson=newPerson();
- person._id=c.getInt(c.getColumnIndex("_id"));
- person.name=c.getString(c.getColumnIndex("name"));
- person.age=c.getInt(c.getColumnIndex("age"));
- person.info=c.getString(c.getColumnIndex("info"));
- persons.add(person);
- }
- c.close();
- returnpersons;
- }
- /**
- *queryallpersons,returncursor
- *@returnCursor
- */
- publicCursorqueryTheCursor(){
- Cursorc=db.rawQuery("SELECT*FROMperson",null);
- returnc;
- }
- /**
- *closedatabase
- */
- publicvoidcloseDB(){
- db.close();
- }
- }
我们获取数据库实例时使用了getWritableDatabase()方法,也许朋友们会有疑问,在getWritableDatabase()和getReadableDatabase()中,你为什么选择前者作为整个应用的数据库实例呢?在这里我想和大家着重分析一下这一点。
我们来看一下SQLiteOpenHelper中的getReadableDatabase()方法:
- publicsynchronizedSQLiteDatabasegetReadableDatabase(){
- if(mDatabase!=null&&mDatabase.isOpen()){
- //如果发现mDatabase不为空并且已经打开则直接返回
- returnmDatabase;
- }
- if(mIsInitializing){
- //如果正在初始化则抛出异常
- thrownewIllegalStateException("getReadableDatabasecalledrecursively");
- }
- //开始实例化数据库mDatabase
- try{
- //注意这里是调用了getWritableDatabase()方法
- returngetWritableDatabase();
- }catch(SQLiteExceptione){
- if(mName==null)
- throwe;//Can'topenatempdatabaseread-only!
- Log.e(TAG,"Couldn'topen"+mName+"forwriting(willtryread-only):",e);
- }
- //如果无法以可读写模式打开数据库则以只读方式打开
- SQLiteDatabasedb=null;
- try{
- mIsInitializing=true;
- Stringpath=mContext.getDatabasePath(mName).getPath();//获取数据库路径
- //以只读方式打开数据库
- db=SQLiteDatabase.openDatabase(path,mFactory,SQLiteDatabase.OPEN_READONLY);
- if(db.getVersion()!=mNewVersion){
- thrownewSQLiteException("Can'tupgraderead-onlydatabasefromversion"+db.getVersion()+"to"
- +mNewVersion+":"+path);
- }
- onOpen(db);
- Log.w(TAG,"Opened"+mName+"inread-onlymode");
- mDatabase=db;//为mDatabase指定新打开的数据库
- returnmDatabase;//返回打开的数据库
- }finally{
- mIsInitializing=false;
- if(db!=null&&db!=mDatabase)
- db.close();
- }
- }
- publicsynchronizedSQLiteDatabasegetWritableDatabase(){
- if(mDatabase!=null&&mDatabase.isOpen()&&!mDatabase.isReadOnly()){
- //如果mDatabase不为空已打开并且不是只读模式则返回该实例
- returnmDatabase;
- }
- if(mIsInitializing){
- thrownewIllegalStateException("getWritableDatabasecalledrecursively");
- }
- //Ifwehavearead-onlydatabaseopen,someonecouldbeusingit
- //(thoughtheyshouldn't),whichwouldcausealocktobeheldon
- //thefile,andourattemptstoopenthedatabaseread-writewould
- //failwaitingforthefilelock.Topreventthat,weacquirethe
- //lockontheread-onlydatabase,whichshutsoutotherusers.
- booleansuccess=false;
- SQLiteDatabasedb=null;
- //如果mDatabase不为空则加锁阻止其他的操作
- if(mDatabase!=null)
- mDatabase.lock();
- try{
- mIsInitializing=true;
- if(mName==null){
- db=SQLiteDatabase.create(null);
- }else{
- //打开或创建数据库
- db=mContext.openOrCreateDatabase(mName,0,mFactory);
- }
- //获取数据库版本(如果刚创建的数据库,版本为0)
- intversion=db.getVersion();
- //比较版本(我们代码中的版本mNewVersion为1)
- if(version!=mNewVersion){
- db.beginTransaction();//开始事务
- try{
- if(version==0){
- //执行我们的onCreate方法
- onCreate(db);
- }else{
- //如果我们应用升级了mNewVersion为2,而原版本为1则执行onUpgrade方法
- onUpgrade(db,version,mNewVersion);
- }
- db.setVersion(mNewVersion);//设置最新版本
- db.setTransactionSuccessful();//设置事务成功
- }finally{
- db.endTransaction();//结束事务
- }
- }
- onOpen(db);
- success=true;
- returndb;//返回可读写模式的数据库实例
- }finally{
- mIsInitializing=false;
- if(success){
- //打开成功
- if(mDatabase!=null){
- //如果mDatabase有值则先关闭
- try{
- mDatabase.close();
- }catch(Exceptione){
- }
- mDatabase.unlock();//解锁
- }
- mDatabase=db;//赋值给mDatabase
- }else{
- //打开失败的情况:解锁、关闭
- if(mDatabase!=null)
- mDatabase.unlock();
- if(db!=null)
- db.close();
- }
- }
- }
看完上面的过程之后,大家或许就清楚了许多,如果不是在遇到磁盘空间已满等情况,getReadableDatabase()一般都会返回和getWritableDatabase()一样的数据库实例,所以我们在DBManager构造方法中使用getWritableDatabase()获取整个应用所使用的数据库实例是可行的。当然如果你真的担心这种情况会发生,那么你可以先用getWritableDatabase()获取数据实例,如果遇到异常,再试图用getReadableDatabase()获取实例,当然这个时候你获取的实例只能读不能写了。
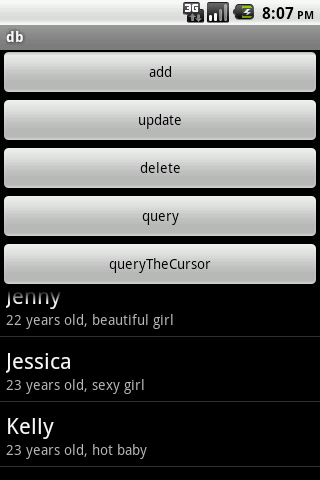
最后,让我们看一下如何使用这些数据操作方法来显示数据,下面是MainActivity.java的布局文件和代码:
- <?xmlversion="1.0"encoding="utf-8"?>
- <LinearLayoutxmlns:android="http://schemas.android.com/apk/res/android"
- android:orientation="vertical"
- android:layout_width="fill_parent"
- android:layout_height="fill_parent">
- <Button
- android:layout_width="fill_parent"
- android:layout_height="wrap_content"
- android:text="add"
- android:onClick="add"/>
- <Button
- android:layout_width="fill_parent"
- android:layout_height="wrap_content"
- android:text="update"
- android:onClick="update"/>
- <Button
- android:layout_width="fill_parent"
- android:layout_height="wrap_content"
- android:text="delete"
- android:onClick="delete"/>
- <Button
- android:layout_width="fill_parent"
- android:layout_height="wrap_content"
- android:text="query"
- android:onClick="query"/>
- <Button
- android:layout_width="fill_parent"
- android:layout_height="wrap_content"
- android:text="queryTheCursor"
- android:onClick="queryTheCursor"/>
- <ListView
- android:id="@+id/listView"
- android:layout_width="fill_parent"
- android:layout_height="wrap_content"/>
- </LinearLayout>
- packagecom.scott.db;
- importjava.util.ArrayList;
- importjava.util.HashMap;
- importjava.util.List;
- importjava.util.Map;
- importandroid.app.Activity;
- importandroid.database.Cursor;
- importandroid.database.CursorWrapper;
- importandroid.os.Bundle;
- importandroid.view.View;
- importandroid.widget.ListView;
- importandroid.widget.SimpleAdapter;
- importandroid.widget.SimpleCursorAdapter;
- publicclassMainActivityextendsActivity{
- privateDBManagermgr;
- privateListViewlistView;
- @Override
- publicvoidonCreate(BundlesavedInstanceState){
- super.onCreate(savedInstanceState);
- setContentView(R.layout.main);
- listView=(ListView)findViewById(R.id.listView);
- //初始化DBManager
- mgr=newDBManager(this);
- }
- @Override
- protectedvoidonDestroy(){
- super.onDestroy();
- //应用的最后一个Activity关闭时应释放DB
- mgr.closeDB();
- }
- publicvoidadd(Viewview){
- ArrayList<Person>persons=newArrayList<Person>();
- Personperson1=newPerson("Ella",22,"livelygirl");
- Personperson2=newPerson("Jenny",22,"beautifulgirl");
- Personperson3=newPerson("Jessica",23,"sexygirl");
- Personperson4=newPerson("Kelly",23,"hotbaby");
- Personperson5=newPerson("Jane",25,"aprettywoman");
- persons.add(person1);
- persons.add(person2);
- persons.add(person3);
- persons.add(person4);
- persons.add(person5);
- mgr.add(persons);
- }
- publicvoidupdate(Viewview){
- Personperson=newPerson();
- person.name="Jane";
- person.age=30;
- mgr.updateAge(person);
- }
- publicvoiddelete(Viewview){
- Personperson=newPerson();
- person.age=30;
- mgr.deleteOldPerson(person);
- }
- publicvoidquery(Viewview){
- List<Person>persons=mgr.query();
- ArrayList<Map<String,String>>list=newArrayList<Map<String,String>>();
- for(Personperson:persons){
- HashMap<String,String>map=newHashMap<String,String>();
- map.put("name",person.name);
- map.put("info",person.age+"yearsold,"+person.info);
- list.add(map);
- }
- SimpleAdapteradapter=newSimpleAdapter(this,list,android.R.layout.simple_list_item_2,
- newString[]{"name","info"},newint[]{android.R.id.text1,android.R.id.text2});
- listView.setAdapter(adapter);
- }
- publicvoidqueryTheCursor(Viewview){
- Cursorc=mgr.queryTheCursor();
- startManagingCursor(c);//托付给activity根据自己的生命周期去管理Cursor的生命周期
- CursorWrappercursorWrapper=newCursorWrapper(c){
- @Override
- publicStringgetString(intcolumnIndex){
- //将简介前加上年龄
- if(getColumnName(columnIndex).equals("info")){
- intage=getInt(getColumnIndex("age"));
- returnage+"yearsold,"+super.getString(columnIndex);
- }
- returnsuper.getString(columnIndex);
- }
- };
- //确保查询结果中有"_id"列
- SimpleCursorAdapteradapter=newSimpleCursorAdapter(this,android.R.layout.simple_list_item_2,
- cursorWrapper,newString[]{"name","info"},newint[]{android.R.id.text1,android.R.id.text2});
- ListViewlistView=(ListView)findViewById(R.id.listView);
- listView.setAdapter(adapter);
- }
- }
如果手动去管理Cursor的话会非常的麻烦,还有一定的风险,处理不当的话运行期间就会出现异常,幸好Activity为我们提供了startManagingCursor(Cursor cursor)方法,它会根据Activity的生命周期去管理当前的Cursor对象,下面是该方法的说明:
- /**
- *Thismethodallowstheactivitytotakecareofmanagingthegiven
- *{@linkCursor}'slifecycleforyoubasedontheactivity'slifecycle.
- *Thatis,whentheactivityisstoppeditwillautomaticallycall
- *{@linkCursor#deactivate}onthegivenCursor,andwhenitislaterrestarted
- *itwillcall{@linkCursor#requery}foryou.Whentheactivityis
- *destroyed,allmanagedCursorswillbeclosedautomatically.
- *
- *@paramcTheCursortobemanaged.
- *
- *@see#managedQuery(android.net.Uri,String[],String,String[],String)
- *@see#stopManagingCursor
- */
如何包装Cursor:我们会使用到CursorWrapper对象去包装我们的Cursor对象,实现我们需要的数据转换工作,这个CursorWrapper实际上是实现了Cursor接口。我们查询获取到的Cursor其实是Cursor的引用,而系统实际返回给我们的必然是Cursor接口的一个实现类的对象实例,我们用CursorWrapper包装这个实例,然后再使用SimpleCursorAdapter将结果显示到列表上。
Cursor结果集需要注意些什么:一个最需要注意的是,在我们的结果集中必须要包含一个“_id”的列,否则SimpleCursorAdapter就会翻脸不认人,为什么一定要这样呢?因为这源于SQLite的规范,主键以“_id”为标准。解决办法有三:第一,建表时根据规范去做;第二,查询时用别名,例如:SELECT id AS _id FROM person;第三,在CursorWrapper里做文章:
- CursorWrappercursorWrapper=newCursorWrapper(c){
- @Override
- publicintgetColumnIndexOrThrow(StringcolumnName)throwsIllegalArgumentException{
- if(columnName.equals("_id")){
- returnsuper.getColumnIndex("id");
- }
- returnsuper.getColumnIndexOrThrow(columnName);
- }
- };
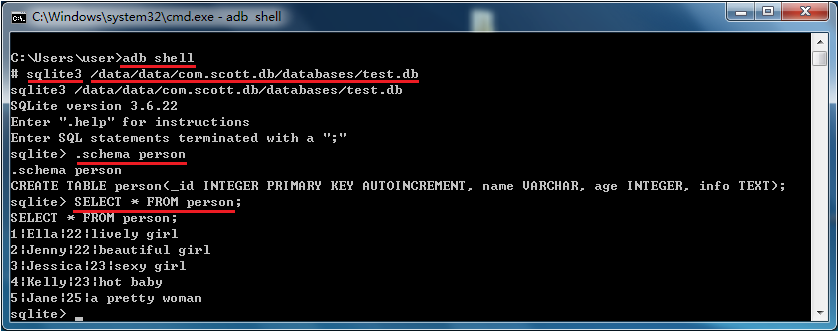
最后我们来看一下结果如何:


发表评论

相关推荐
android之SQLite数据库开发详解: Android 开发中使用 SQLite 数据库 简介: SQLite 是一款非常流行的嵌入式数据库,它支持 SQL 查询,并且只用很少的内存。Android 在运行时集成了 SQLite,所以每个 Android 应用...
Android中SQLite 使用方法详解 现在的主流移动设备像android、iPhone等都使用SQLite作为复杂数据的存储引擎,在我们为移动设备开发应用程序时,也许就要使用到SQLite来存储我们大量的数据,所以我们就需要掌握移动...
《Android应用开发详解》 作者:郭宏志 编著 内容简介 本书分为三个部分,包括基础篇、技术篇和应用篇。由浅入深地讲述了Android应用开发的方方面面。 第一篇 基础篇 第1章 Android概述 Android概述,讲述了...
在Android中使用SQLite数据库的入门指南,打算分下面几部分与大家一起分享, 1、什么是SQLite 2、Android中使用SQLite 一、什么是SQLite SQLite是一款开源的、轻量级的、嵌入式的、关系型数据库。它在2000年由...
应用程序初始化时需要批量的向sqlite中插入大量数据,单独的使用for+Insert方法导致应用响应缓慢,因为 sqlite插入数据的时候默认一条语句就是一个事务,有多少条数据就有多少次磁盘操作。我的应用初始5000条记录也...
做Android应用,不可避免的会与SQLite打交道。随着应用的不断升级,原有的数据库结构可能已经不再适应新的功能,这时候,就需要对SQLite数据库的结构进行升级了。 SQLite提供了ALTER TABLE命令,允许用户重命名或...
此资源(7zip压缩)包括: 1.SQLite权威指南 ...8.嵌入式数据库在SQLite中的应用 9.SQLite数据库文件格式全面分析 10.Android的SQLite使用教程 等等.. 下载一个不用去下载其他的了,资料很全面,谢谢下载!
ContentProvider是android的四大组件之一,同时与...android支持的Sqlite是不支持跨进程、跨应用访问的,因此,ContentProvider应运而生,为我们提供了可以跨进程、跨应用,并且可以屏蔽一些重要数据的访问机制
《Android应用开发揭秘》全部实例源代码,配合《Android应用开发揭秘》使用 前言 第一部分 准备篇 第1章 Android开发简介 1.1 Android基本概念 1.1.1 Android简介 1.1.2 Android的系统构架 1.1.3 ...
1.3 Android应用程序构成 1.3.1 活动(Activity) 1.3.2 意图(Intent) 1.3.3 服务(Service) 1.3.4 内容提供器(ContentProvider) 1.4 Android网上资源 第2章 搭建Android开发环境 2.1 Android开发环境要求 2.2 ...
杨丰盛,Android应用开发先驱,对Android有深入研究,实战经验极其丰富。精通Java、C、C++等语言,专注于移动通信软件开发,在机顶盒软件开发和MTK平台软件开发方面有非常深厚的积累。2007年获得中国软件行业协会...
底层Linux内核只提供基本功能,其他的应用软件则由各公司自行开发,部分程序以Java编写。 什么是SQLite: SQLite,是一款轻型的数据库,是遵守ACID的关联式数据库管理系统,它的设计目标是嵌入式的,而且目前...
最重要的是还全面介绍了如何利用原生的C,C++(NDK)和Python、Lua等脚本语言(AndroidScriptingEnvironment)来开发Android应用,《Android应用开发揭秘》实战性强,书中的每个知识点都有配精心设计的示例,尤为...
包括以下文档 : sqlite3使用详解.pdf SQLite教程.pdf 嵌入式数据库在sqlite3中的应用.pdf SQLite数据库文件格式全面分析.pdf android-database.pdf SQLite入门与分析.pdf