本章节翻译自《Beginning-Android-4-Application-Development》,如有翻译不当的地方,敬请指出。
原书购买地址http://www.amazon.com/Beginning-Android-4-Application-Development/dp/1118199545/
TableLayout可以把视图views组织成“行”或“列”。可以使用<TableRow>元素指定表格中的一行。每一行又可以包含一个或多个视图。每行中的每个视图组成了表格的一个元素。每列的宽度,取决于这一列中宽度最大的视图view。
观察main.xml中的代码:
- <?xmlversion="1.0"encoding="utf-8"?>
- <TableLayoutxmlns:android="http://schemas.android.com/apk/res/android"
- android:layout_width="fill_parent"
- android:layout_height="fill_parent">
- <TableRow>
- <TextView
- android:text="UserName:"
- android:width="120dp"/>
- <EditText
- android:id="@+id/txtUserName"
- android:width="200dp"/>
- </TableRow>
- <TableRow>
- <TextViewandroid:text="Password:"/>
- <EditText
- android:id="@+id/txtUserName"
- android:password="true"/>
- </TableRow>
- <TableRow>
- <TextView/>
- <CheckBox
- android:id="@+id/chkRememberPassword"
- android:layout_width="fill_parent"
- android:layout_height="wrap_content"
- android:text="RememberPassword"/>
- </TableRow>
- <TableRow>
- <Button
- android:id="@+id/buttonSignIn"
- android:text="LogIn"/>
- </TableRow>
- </TableLayout>
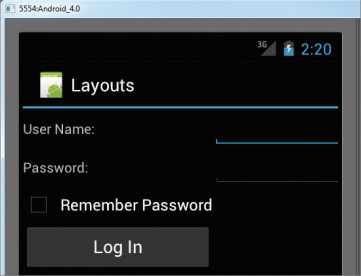
模拟器上的效果图:

以上的例子,TableLayout中有2列,4行。在“Password” TextView视图的正下方,是一个空的<TextView>元素。如果不这么做的话,“Remember Password” CheckBox就会出现在“Password”TextView视图的下面,就像这样:
分享到:


相关推荐
主要为大家详细介绍了Android开发之TableLayout表格布局,表格布局模型是以行列的形式管理子控件,对TableLayout表格布局感兴趣的小伙伴们可以参考一下
Android移动应用开发表格布局TableLayout的特点.pdf 学习资料 复习资料 教学资源
Android移动应用开发表格布局TableLayout的常用属性.pdf 学习资料 复习资料 教学资源
用Android Studio 2.3.3做的表格布局例子,主要用到<TableLayout>、标签,还有android:shrinkColumns="0,1,2"、android:layout_column="0"等设置。
Tablelayout类以行和列的形式对控件进行管理,每一行为一个TableRow对象,或一个View控件。当为TableRow对象时,可在TableRow下添加子控件,默认情况下,每个子控件占据一列。 当为View时,该View将独占一行
表格布局的标签是TableLayout,TableLayout继承了LinearLayout。所以它依然是一个线性布局。 前言: 1、TableLayout简介 2、TableLayout行列数的确定 3、TableLayout可设置的属性详解 4、一个包含4个TableLayout布局...
Android使用TableLayout动态布局实例: http://blog.csdn.net/lk_blog/article/details/7436380
android 利用TableLayout自动生成表格
android中利用tablelayout实现表格效果
本文实例为大家分享了Android表格布局TableLayout的具体代码,供大家参考,具体内容如下 1.TableLayout TableLayout表格布局模型以行列的形式管理子控件,每一行为一个TableRow的对象, 当然也可以使一个View的...
在本文里我们给大家分享了关于TableLayout(表格布局)的相关基础知识点内容,需要的朋友们学习下。
Android中使用TableLayout布局设计办公电话一览表的代码清单.pdf 学习资料 复习资料 教学资源
一、表格布局 TableLayout 表格布局TableLayout以行列的形式管理子元素,每一行是一个TableRow布局对象,当然也可以是普通的View对象,TableRow离每放一个元素就是一列,总列数由列数最多的那一行决定。 我们看一...
Android应用开发
android固定头部和左侧表格实现,可以实现纵向合并,不含TableLayout等布局,简单易懂