- 浏览: 2100606 次
- 性别:

- 来自: 深圳
-

文章分类
最新评论
-
wahahachuang5:
web实时推送技术使用越来越广泛,但是自己开发又太麻烦了,我觉 ...
细说websocket - php篇 -
wahahachuang8:
挺好的,学习了
细说websocket - php篇 -
jacking124:
学习了!支持你,继续
初窥Linux 之 我最常用的20条命令 -
aliahhqcheng:
应该是可以实现的,没有看过源码。你可以参考下:http://w ...
Jackson 框架,轻易转换JSON
Android应用程序启动过程源代码分析
前文简要介绍了Android应用程序的Activity的启动过程。在Android系统中,应用程序是由Activity组成的,因此,应用程序的启动过程实际上就是应用程序中的默认Activity的启动过程,本文将详细分析应用程序框架层的源代码,了解Android应用程序的启动过程。
在上一篇文章Android应用程序的Activity启动过程简要介绍和学习计划中,我们举例子说明了启动Android应用程序中的Activity的两种情景,其中,在手机屏幕中点击应用程序图标的情景就会引发Android应用程序中的默认Activity的启动,从而把应用程序启动起来。这种启动方式的特点是会启动一个新的进程来加载相应的Activity。这里,我们继续以这个例子为例来说明Android应用程序的启动过程,即MainActivity的启动过程。
MainActivity的启动过程如下图所示:
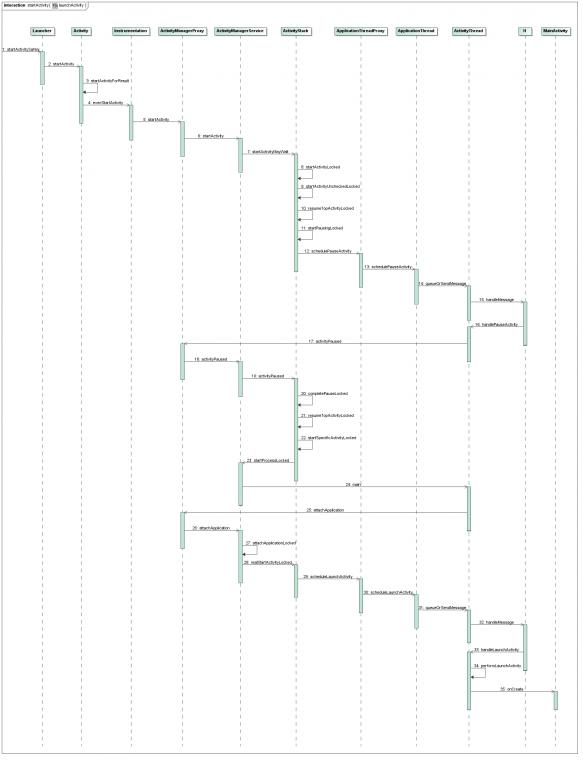
下面详细分析每一步是如何实现的。
Step 1. Launcher.startActivitySafely
在Android系统中,应用程序是由Launcher启动起来的,其实,Launcher本身也是一个应用程序,其它的应用程序安装后,就会Launcher的界面上出现一个相应的图标,点击这个图标时,Launcher就会对应的应用程序启动起来。
Launcher的源代码工程在packages/apps/Launcher2目录下,负责启动其它应用程序的源代码实现在src/com/android/launcher2/Launcher.java文件中:
/**
* Default launcher application.
*/
public final class Launcher extends Activity
		implements View.OnClickListener, OnLongClickListener, LauncherModel.Callbacks, AllAppsView.Watcher {

	......

	/**
	* Launches the intent referred by the clicked shortcut.
	*
	* @param v The view representing the clicked shortcut.
	*/
	public void onClick(View v) {
		Object tag = v.getTag();
		if (tag instanceof ShortcutInfo) {
			// Open shortcut
			final Intent intent = ((ShortcutInfo) tag).intent;
			int[] pos = new int[2];
			v.getLocationOnScreen(pos);
			intent.setSourceBounds(new Rect(pos[0], pos[1],
				pos[0] + v.getWidth(), pos[1] + v.getHeight()));
			startActivitySafely(intent, tag);
		} else if (tag instanceof FolderInfo) {
			......
		} else if (v == mHandleView) {
			......
		}
	}

	void startActivitySafely(Intent intent, Object tag) {
		intent.addFlags(Intent.FLAG_ACTIVITY_NEW_TASK);
		try {
			startActivity(intent);
		} catch (ActivityNotFoundException e) {
			......
		} catch (SecurityException e) {
			......
		}
	}

	......

} 回忆一下前面一篇文章Android应用程序的Activity启动过程简要介绍和学习计划说到的应用程序Activity,它的默认Activity是MainActivity,这里是AndroidManifest.xml文件中配置的:
<activity android:name=".MainActivity"
      android:label="@string/app_name">
       <intent-filter>
        <action android:name="android.intent.action.MAIN" />
        <category android:name="android.intent.category.LAUNCHER" />
    </intent-filter>
</activity>
因此,这里的intent包含的信息为:action = "android.intent.action.Main",category="android.intent.category.LAUNCHER", cmp="shy.luo.activity/.MainActivity",表示它要启动的Activity为shy.luo.activity.MainActivity。Intent.FLAG_ACTIVITY_NEW_TASK表示要在一个新的Task中启动这个Activity,注意,Task是Android系统中的概念,它不同于进程Process的概念。简单地说,一个Task是一系列Activity的集合,这个集合是以堆栈的形式来组织的,遵循后进先出的原则。事实上,Task是一个非常复杂的概念,有兴趣的读者可以到官网http://developer.android.com/guide/topics/manifest/activity-element.html查看相关的资料。这里,我们只要知道,这个MainActivity要在一个新的Task中启动就可以了。
Step 2. Activity.startActivity
在Step 1中,我们看到,Launcher继承于Activity类,而Activity类实现了startActivity函数,因此,这里就调用了Activity.startActivity函数,它实现在frameworks/base/core/java/android/app/Activity.java文件中:
public class Activity extends ContextThemeWrapper
		implements LayoutInflater.Factory,
		Window.Callback, KeyEvent.Callback,
		OnCreateContextMenuListener, ComponentCallbacks {

	......

	@Override
	public void startActivity(Intent intent) {
		startActivityForResult(intent, -1);
	}

	......

}
这个函数实现很简单,它调用startActivityForResult来进一步处理,第二个参数传入-1表示不需要这个Actvity结束后的返回结果。
Step 3.Activity.startActivityForResult
这个函数也是实现在frameworks/base/core/java/android/app/Activity.java文件中:
public class Activity extends ContextThemeWrapper
		implements LayoutInflater.Factory,
		Window.Callback, KeyEvent.Callback,
		OnCreateContextMenuListener, ComponentCallbacks {

	......

	public void startActivityForResult(Intent intent, int requestCode) {
		if (mParent == null) {
			Instrumentation.ActivityResult ar =
				mInstrumentation.execStartActivity(
				this, mMainThread.getApplicationThread(), mToken, this,
				intent, requestCode);
			......
		} else {
			......
		}


	......

}
这里的mInstrumentation是Activity类的成员变量,它的类型是Intrumentation,定义在frameworks/base/core/java/android/app/Instrumentation.java文件中,它用来监控应用程序和系统的交互。
这里的mMainThread也是Activity类的成员变量,它的类型是ActivityThread,它代表的是应用程序的主线程,我们在Android系统在新进程中启动自定义服务过程(startService)的原理分析一文中已经介绍过了。这里通过mMainThread.getApplicationThread获得它里面的ApplicationThread成员变量,它是一个Binder对象,后面我们会看到,ActivityManagerService会使用它来和ActivityThread来进行进程间通信。这里我们需注意的是,这里的mMainThread代表的是Launcher应用程序运行的进程。
这里的mToken也是Activity类的成员变量,它是一个Binder对象的远程接口。
Step 4. Instrumentation.execStartActivity
这个函数定义在frameworks/base/core/java/android/app/Instrumentation.java文件中:
public class Instrumentation {

	......

	public ActivityResult execStartActivity(
	Context who, IBinder contextThread, IBinder token, Activity target,
	Intent intent, int requestCode) {
		IApplicationThread whoThread = (IApplicationThread) contextThread;
		if (mActivityMonitors != null) {
			......
		}
		try {
			int result = ActivityManagerNative.getDefault()
				.startActivity(whoThread, intent,
				intent.resolveTypeIfNeeded(who.getContentResolver()),
				null, 0, token, target != null ? target.mEmbeddedID : null,
				requestCode, false, false);
			......
		} catch (RemoteException e) {
		}
		return null;
	}

	......

} 这里的ActivityManagerNative.getDefault返回ActivityManagerService的远程接口,即ActivityManagerProxy接口,具体可以参考Android系统在新进程中启动自定义服务过程(startService)的原理分析一文。
这里的intent.resolveTypeIfNeeded返回这个intent的MIME类型,在这个例子中,没有AndroidManifest.xml设置MainActivity的MIME类型,因此,这里返回null。
这里的target不为null,但是target.mEmbddedID为null,我们不用关注。
Step 5. ActivityManagerProxy.startActivity
这个函数定义在frameworks/base/core/java/android/app/ActivityManagerNative.java文件中:
class ActivityManagerProxy implements IActivityManager
{

	......

	public int startActivity(IApplicationThread caller, Intent intent,
			String resolvedType, Uri[] grantedUriPermissions, int grantedMode,
			IBinder resultTo, String resultWho,
			int requestCode, boolean onlyIfNeeded,
			boolean debug) throws RemoteException {
		Parcel data = Parcel.obtain();
		Parcel reply = Parcel.obtain();
		data.writeInterfaceToken(IActivityManager.descriptor);
		data.writeStrongBinder(caller != null ? caller.asBinder() : null);
		intent.writeToParcel(data, 0);
		data.writeString(resolvedType);
		data.writeTypedArray(grantedUriPermissions, 0);
		data.writeInt(grantedMode);
		data.writeStrongBinder(resultTo);
		data.writeString(resultWho);
		data.writeInt(requestCode);
		data.writeInt(onlyIfNeeded ? 1 : 0);
		data.writeInt(debug ? 1 : 0);
		mRemote.transact(START_ACTIVITY_TRANSACTION, data, reply, 0);
		reply.readException();
		int result = reply.readInt();
		reply.recycle();
		data.recycle();
		return result;
	}

	......

}
这里的参数比较多,我们先整理一下。从上面的调用可以知道,这里的参数resolvedType、grantedUriPermissions和resultWho均为null;参数caller为ApplicationThread类型的Binder实体;参数resultTo为一个Binder实体的远程接口,我们先不关注它;参数grantedMode为0,我们也先不关注它;参数requestCode为-1;参数onlyIfNeeded和debug均空false。
Step 6. ActivityManagerService.startActivity
上一步Step 5通过Binder驱动程序就进入到ActivityManagerService的startActivity函数来了,它定义在frameworks/base/services/java/com/android/server/am/ActivityManagerService.java文件中:
public final class ActivityManagerService extends ActivityManagerNative
		implements Watchdog.Monitor, BatteryStatsImpl.BatteryCallback {

	......

	public final int startActivity(IApplicationThread caller,
			Intent intent, String resolvedType, Uri[] grantedUriPermissions,
			int grantedMode, IBinder resultTo,
			String resultWho, int requestCode, boolean onlyIfNeeded,
			boolean debug) {
		return mMainStack.startActivityMayWait(caller, intent, resolvedType,
			grantedUriPermissions, grantedMode, resultTo, resultWho,
			requestCode, onlyIfNeeded, debug, null, null);
	}


	......

} 这里只是简单地将操作转发给成员变量mMainStack的startActivityMayWait函数,这里的mMainStack的类型为ActivityStack。Step 7.ActivityStack.startActivityMayWait
这个函数定义在frameworks/base/services/java/com/android/server/am/ActivityStack.java文件中:
public class ActivityStack {

	......

	final int startActivityMayWait(IApplicationThread caller,
			Intent intent, String resolvedType, Uri[] grantedUriPermissions,
			int grantedMode, IBinder resultTo,
			String resultWho, int requestCode, boolean onlyIfNeeded,
			boolean debug, WaitResult outResult, Configuration config) {

		......

		boolean componentSpecified = intent.getComponent() != null;

		// Don't modify the client's object!
		intent = new Intent(intent);

		// Collect information about the target of the Intent.
		ActivityInfo aInfo;
		try {
			ResolveInfo rInfo =
				AppGlobals.getPackageManager().resolveIntent(
				intent, resolvedType,
				PackageManager.MATCH_DEFAULT_ONLY
				| ActivityManagerService.STOCK_PM_FLAGS);
			aInfo = rInfo != null ? rInfo.activityInfo : null;
		} catch (RemoteException e) {
			......
		}

		if (aInfo != null) {
			// Store the found target back into the intent, because now that
			// we have it we never want to do this again.  For example, if the
			// user navigates back to this point in the history, we should
			// always restart the exact same activity.
			intent.setComponent(new ComponentName(
				aInfo.applicationInfo.packageName, aInfo.name));
			......
		}

		synchronized (mService) {
			int callingPid;
			int callingUid;
			if (caller == null) {
				......
			} else {
				callingPid = callingUid = -1;
			}

			mConfigWillChange = config != null
				&& mService.mConfiguration.diff(config) != 0;

			......

			if (mMainStack && aInfo != null &&
				(aInfo.applicationInfo.flags&ApplicationInfo.FLAG_CANT_SAVE_STATE) != 0) {

		              ......

			}

			int res = startActivityLocked(caller, intent, resolvedType,
				grantedUriPermissions, grantedMode, aInfo,
				resultTo, resultWho, requestCode, callingPid, callingUid,
				onlyIfNeeded, componentSpecified);

			if (mConfigWillChange && mMainStack) {
				......
			}

			......

			if (outResult != null) {
				......
			}

			return res;
		}

	}

	......

}
注意,从Step 6传下来的参数outResult和config均为null,此外,表达式(aInfo.applicationInfo.flags&ApplicationInfo.FLAG_CANT_SAVE_STATE) != 0为false,因此,这里忽略了无关代码。
下面语句对参数intent的内容进行解析,得到MainActivity的相关信息,保存在aInfo变量中:
    ActivityInfo aInfo;
    try {
	ResolveInfo rInfo =
	AppGlobals.getPackageManager().resolveIntent(
		intent, resolvedType,
		PackageManager.MATCH_DEFAULT_ONLY
		| ActivityManagerService.STOCK_PM_FLAGS);
	aInfo = rInfo != null ? rInfo.activityInfo : null;
    } catch (RemoteException e) {
		......
    }
解析之后,得到的aInfo.applicationInfo.packageName的值为"shy.luo.activity",aInfo.name的值为"shy.luo.activity.MainActivity",这是在这个实例的配置文件AndroidManifest.xml里面配置的。
此外,函数开始的地方调用intent.getComponent()函数的返回值不为null,因此,这里的componentSpecified变量为true。
接下去就调用startActivityLocked进一步处理了。
Step 8. ActivityStack.startActivityLocked
这个函数定义在frameworks/base/services/java/com/android/server/am/ActivityStack.java文件中:
public class ActivityStack {

	......

	final int startActivityLocked(IApplicationThread caller,
		    Intent intent, String resolvedType,
		    Uri[] grantedUriPermissions,
		    int grantedMode, ActivityInfo aInfo, IBinder resultTo,
	            String resultWho, int requestCode,
		    int callingPid, int callingUid, boolean onlyIfNeeded,
		    boolean componentSpecified) {
	        int err = START_SUCCESS;

		ProcessRecord callerApp = null;
		if (caller != null) {
			callerApp = mService.getRecordForAppLocked(caller);
			if (callerApp != null) {
				callingPid = callerApp.pid;
				callingUid = callerApp.info.uid;
			} else {
				......
			}
		}

		......

		ActivityRecord sourceRecord = null;
		ActivityRecord resultRecord = null;
		if (resultTo != null) {
			int index = indexOfTokenLocked(resultTo);

			......

			if (index >= 0) {
				sourceRecord = (ActivityRecord)mHistory.get(index);
				if (requestCode >= 0 && !sourceRecord.finishing) {
					......
				}
			}
		}

		int launchFlags = intent.getFlags();

		if ((launchFlags&Intent.FLAG_ACTIVITY_FORWARD_RESULT) != 0
			&& sourceRecord != null) {
			......
		}

		if (err == START_SUCCESS && intent.getComponent() == null) {
			......
		}

		if (err == START_SUCCESS && aInfo == null) {
			......
		}

		if (err != START_SUCCESS) {
			......
		}

		......

		ActivityRecord r = new ActivityRecord(mService, this, callerApp, callingUid,
			intent, resolvedType, aInfo, mService.mConfiguration,
			resultRecord, resultWho, requestCode, componentSpecified);

		......

		return startActivityUncheckedLocked(r, sourceRecord,
			grantedUriPermissions, grantedMode, onlyIfNeeded, true);
	}


	......

}
从传进来的参数caller得到调用者的进程信息,并保存在callerApp变量中,这里就是Launcher应用程序的进程信息了。
前面说过,参数resultTo是Launcher这个Activity里面的一个Binder对象,通过它可以获得Launcher这个Activity的相关信息,保存在sourceRecord变量中。
再接下来,创建即将要启动的Activity的相关信息,并保存在r变量中:
ActivityRecord r = new ActivityRecord(mService, this, callerApp, callingUid,
	intent, resolvedType, aInfo, mService.mConfiguration,
	resultRecord, resultWho, requestCode, componentSpecified);
接着调用startActivityUncheckedLocked函数进行下一步操作。
Step 9. ActivityStack.startActivityUncheckedLocked
这个函数定义在frameworks/base/services/java/com/android/server/am/ActivityStack.java文件中:
public class ActivityStack {

	......

	final int startActivityUncheckedLocked(ActivityRecord r,
		ActivityRecord sourceRecord, Uri[] grantedUriPermissions,
		int grantedMode, boolean onlyIfNeeded, boolean doResume) {
		final Intent intent = r.intent;
		final int callingUid = r.launchedFromUid;

		int launchFlags = intent.getFlags();

		// We'll invoke onUserLeaving before onPause only if the launching
		// activity did not explicitly state that this is an automated launch.
		mUserLeaving = (launchFlags&Intent.FLAG_ACTIVITY_NO_USER_ACTION) == 0;

		......

		ActivityRecord notTop = (launchFlags&Intent.FLAG_ACTIVITY_PREVIOUS_IS_TOP)
			!= 0 ? r : null;

		// If the onlyIfNeeded flag is set, then we can do this if the activity
		// being launched is the same as the one making the call...  or, as
		// a special case, if we do not know the caller then we count the
		// current top activity as the caller.
		if (onlyIfNeeded) {
			......
		}

		if (sourceRecord == null) {
			......
		} else if (sourceRecord.launchMode == ActivityInfo.LAUNCH_SINGLE_INSTANCE) {
			......
		} else if (r.launchMode == ActivityInfo.LAUNCH_SINGLE_INSTANCE
			|| r.launchMode == ActivityInfo.LAUNCH_SINGLE_TASK) {
			......
		}

		if (r.resultTo != null && (launchFlags&Intent.FLAG_ACTIVITY_NEW_TASK) != 0) {
			......
		}

		boolean addingToTask = false;
		if (((launchFlags&Intent.FLAG_ACTIVITY_NEW_TASK) != 0 &&
			(launchFlags&Intent.FLAG_ACTIVITY_MULTIPLE_TASK) == 0)
			|| r.launchMode == ActivityInfo.LAUNCH_SINGLE_TASK
			|| r.launchMode == ActivityInfo.LAUNCH_SINGLE_INSTANCE) {
				// If bring to front is requested, and no result is requested, and
				// we can find a task that was started with this same
				// component, then instead of launching bring that one to the front.
				if (r.resultTo == null) {
					// See if there is a task to bring to the front.  If this is
					// a SINGLE_INSTANCE activity, there can be one and only one
					// instance of it in the history, and it is always in its own
					// unique task, so we do a special search.
					ActivityRecord taskTop = r.launchMode != ActivityInfo.LAUNCH_SINGLE_INSTANCE
						? findTaskLocked(intent, r.info)
						: findActivityLocked(intent, r.info);
					if (taskTop != null) {
						......
					}
				}
		}

		......

		if (r.packageName != null) {
			// If the activity being launched is the same as the one currently
			// at the top, then we need to check if it should only be launched
			// once.
			ActivityRecord top = topRunningNonDelayedActivityLocked(notTop);
			if (top != null && r.resultTo == null) {
				if (top.realActivity.equals(r.realActivity)) {
					......
				}
			}

		} else {
			......
		}

		boolean newTask = false;

		// Should this be considered a new task?
		if (r.resultTo == null && !addingToTask
			&& (launchFlags&Intent.FLAG_ACTIVITY_NEW_TASK) != 0) {
				// todo: should do better management of integers.
				mService.mCurTask++;
				if (mService.mCurTask <= 0) {
					mService.mCurTask = 1;
				}
				r.task = new TaskRecord(mService.mCurTask, r.info, intent,
					(r.info.flags&ActivityInfo.FLAG_CLEAR_TASK_ON_LAUNCH) != 0);
				......
				newTask = true;
				if (mMainStack) {
					mService.addRecentTaskLocked(r.task);
				}

		} else if (sourceRecord != null) {
			......
		} else {
			......
		}

		......

		startActivityLocked(r, newTask, doResume);
		return START_SUCCESS;
	}

	......

}
函数首先获得intent的标志值,保存在launchFlags变量中。
这个intent的标志值的位Intent.FLAG_ACTIVITY_NO_USER_ACTION没有置位,因此 ,成员变量mUserLeaving的值为true。
这个intent的标志值的位Intent.FLAG_ACTIVITY_PREVIOUS_IS_TOP也没有置位,因此,变量notTop的值为null。
由于在这个例子的AndroidManifest.xml文件中,MainActivity没有配置launchMode属值,因此,这里的r.launchMode为默认值0,表示以标准(Standard,或者称为ActivityInfo.LAUNCH_MULTIPLE)的方式来启动这个Activity。Activity的启动方式有四种,其余三种分别是ActivityInfo.LAUNCH_SINGLE_INSTANCE、ActivityInfo.LAUNCH_SINGLE_TASK和ActivityInfo.LAUNCH_SINGLE_TOP,具体可以参考官方网站http://developer.android.com/reference/android/content/pm/ActivityInfo.html。
传进来的参数r.resultTo为null,表示Launcher不需要等这个即将要启动的MainActivity的执行结果。
由于这个intent的标志值的位Intent.FLAG_ACTIVITY_NEW_TASK被置位,而且Intent.FLAG_ACTIVITY_MULTIPLE_TASK没有置位,因此,下面的if语句会被执行:
    if (((launchFlags&Intent.FLAG_ACTIVITY_NEW_TASK) != 0 &&
	(launchFlags&Intent.FLAG_ACTIVITY_MULTIPLE_TASK) == 0)
	|| r.launchMode == ActivityInfo.LAUNCH_SINGLE_TASK
	|| r.launchMode == ActivityInfo.LAUNCH_SINGLE_INSTANCE) {
		// If bring to front is requested, and no result is requested, and
		// we can find a task that was started with this same
		// component, then instead of launching bring that one to the front.
		if (r.resultTo == null) {
			// See if there is a task to bring to the front.  If this is
			// a SINGLE_INSTANCE activity, there can be one and only one
			// instance of it in the history, and it is always in its own
			// unique task, so we do a special search.
			ActivityRecord taskTop = r.launchMode != ActivityInfo.LAUNCH_SINGLE_INSTANCE
				? findTaskLocked(intent, r.info)
				: findActivityLocked(intent, r.info);
			if (taskTop != null) {
				......
			}
		}
    }
这段代码的逻辑是查看一下,当前有没有Task可以用来执行这个Activity。由于r.launchMode的值不为ActivityInfo.LAUNCH_SINGLE_INSTANCE,因此,它通过findTaskLocked函数来查找存不存这样的Task,这里返回的结果是null,即taskTop为null,因此,需要创建一个新的Task来启动这个Activity。
接着往下看:
    if (r.packageName != null) {
	// If the activity being launched is the same as the one currently
	// at the top, then we need to check if it should only be launched
	// once.
	ActivityRecord top = topRunningNonDelayedActivityLocked(notTop);
	if (top != null && r.resultTo == null) {
		if (top.realActivity.equals(r.realActivity)) {
			......
		}
	}

} 这段代码的逻辑是看一下,当前在堆栈顶端的Activity是否就是即将要启动的Activity,有些情况下,如果即将要启动的Activity就在堆栈的顶端,那么,就不会重新启动这个Activity的别一个实例了,具体可以参考官方网站http://developer.android.com/reference/android/content/pm/ActivityInfo.html。现在处理堆栈顶端的Activity是Launcher,与我们即将要启动的MainActivity不是同一个Activity,因此,这里不用进一步处理上述介绍的情况。
执行到这里,我们知道,要在一个新的Task里面来启动这个Activity了,于是新创建一个Task:
   if (r.resultTo == null && !addingToTask
	&& (launchFlags&Intent.FLAG_ACTIVITY_NEW_TASK) != 0) {
	// todo: should do better management of integers.
	mService.mCurTask++;
	if (mService.mCurTask <= 0) {
		mService.mCurTask = 1;
	}
	r.task = new TaskRecord(mService.mCurTask, r.info, intent,
		(r.info.flags&ActivityInfo.FLAG_CLEAR_TASK_ON_LAUNCH) != 0);
	......
	newTask = true;
	if (mMainStack) {
		mService.addRecentTaskLocked(r.task);
	}

    }
新建的Task保存在r.task域中,同时,添加到mService中去,这里的mService就是ActivityManagerService了。
最后就进入startActivityLocked(r, newTask, doResume)进一步处理了。这个函数定义在frameworks/base/services/java/com/android/server/am/ActivityStack.java文件中:
public class ActivityStack {

	......

	private final void startActivityLocked(ActivityRecord r, boolean newTask,
			boolean doResume) {
		final int NH = mHistory.size();

		int addPos = -1;

		if (!newTask) {
			......
		}

		// Place a new activity at top of stack, so it is next to interact
		// with the user.
		if (addPos < 0) {
			addPos = NH;
		}

		// If we are not placing the new activity frontmost, we do not want
		// to deliver the onUserLeaving callback to the actual frontmost
		// activity
		if (addPos < NH) {
			......
		}

		// Slot the activity into the history stack and proceed
		mHistory.add(addPos, r);
		r.inHistory = true;
		r.frontOfTask = newTask;
		r.task.numActivities++;
		if (NH > 0) {
			// We want to show the starting preview window if we are
			// switching to a new task, or the next activity's process is
			// not currently running.
			......
		} else {
			// If this is the first activity, don't do any fancy animations,
			// because there is nothing for it to animate on top of.
			......
		}

		......

		if (doResume) {
			resumeTopActivityLocked(null);
		}
	}

	......

}
这里的NH表示当前系统中历史任务的个数,这里肯定是大于0,因为Launcher已经跑起来了。当NH>0时,并且现在要切换新任务时,要做一些任务切的界面操作,这段代码我们就不看了,这里不会影响到下面启Activity的过程,有兴趣的读取可以自己研究一下。
这里传进来的参数doResume为true,于是调用resumeTopActivityLocked进一步操作。
Step 10. Activity.resumeTopActivityLocked
这个函数定义在frameworks/base/services/java/com/android/server/am/ActivityStack.java文件中:
public class ActivityStack {

	......

	/**
	* Ensure that the top activity in the stack is resumed.
	*
	* @param prev The previously resumed activity, for when in the process
	* of pausing; can be null to call from elsewhere.
	*
	* @return Returns true if something is being resumed, or false if
	* nothing happened.
	*/
	final boolean resumeTopActivityLocked(ActivityRecord prev) {
		// Find the first activity that is not finishing.
		ActivityRecord next = topRunningActivityLocked(null);

		// Remember how we'll process this pause/resume situation, and ensure
		// that the state is reset however we wind up proceeding.
		final boolean userLeaving = mUserLeaving;
		mUserLeaving = false;

		if (next == null) {
			......
		}

		next.delayedResume = false;

		// If the top activity is the resumed one, nothing to do.
		if (mResumedActivity == next && next.state == ActivityState.RESUMED) {
			......
		}

		// If we are sleeping, and there is no resumed activity, and the top
		// activity is paused, well that is the state we want.
		if ((mService.mSleeping || mService.mShuttingDown)
			&& mLastPausedActivity == next && next.state == ActivityState.PAUSED) {
			......
		}

		......

		// If we are currently pausing an activity, then don't do anything
		// until that is done.
		if (mPausingActivity != null) {
			......
		}

		......

		// We need to start pausing the current activity so the top one
		// can be resumed...
		if (mResumedActivity != null) {
			......
			startPausingLocked(userLeaving, false);
			return true;
		}

		......
	}

	......

}
函数先通过调用topRunningActivityLocked函数获得堆栈顶端的Activity,这里就是MainActivity了,这是在上面的Step 9设置好的,保存在next变量中。
接下来把mUserLeaving的保存在本地变量userLeaving中,然后重新设置为false,在上面的Step 9中,mUserLeaving的值为true,因此,这里的userLeaving为true。
这里的mResumedActivity为Launcher,因为Launcher是当前正被执行的Activity。
当我们处理休眠状态时,mLastPausedActivity保存堆栈顶端的Activity,因为当前不是休眠状态,所以mLastPausedActivity为null。
有了这些信息之后,下面的语句就容易理解了:
    // If the top activity is the resumed one, nothing to do.
    if (mResumedActivity == next && next.state == ActivityState.RESUMED) {
	......
    }

    // If we are sleeping, and there is no resumed activity, and the top
    // activity is paused, well that is the state we want.
    if ((mService.mSleeping || mService.mShuttingDown)
	&& mLastPausedActivity == next && next.state == ActivityState.PAUSED) {
	......
    }
它首先看要启动的Activity是否就是当前处理Resumed状态的Activity,如果是的话,那就什么都不用做,直接返回就可以了;否则再看一下系统当前是否休眠状态,如果是的话,再看看要启动的Activity是否就是当前处于堆栈顶端的Activity,如果是的话,也是什么都不用做。
上面两个条件都不满足,因此,在继续往下执行之前,首先要把当处于Resumed状态的Activity推入Paused状态,然后才可以启动新的Activity。但是在将当前这个Resumed状态的Activity推入Paused状态之前,首先要看一下当前是否有Activity正在进入Pausing状态,如果有的话,当前这个Resumed状态的Activity就要稍后才能进入Paused状态了,这样就保证了所有需要进入Paused状态的Activity串行处理。
这里没有处于Pausing状态的Activity,即mPausingActivity为null,而且mResumedActivity也不为null,于是就调用startPausingLocked函数把Launcher推入Paused状态去了。
Step 11. ActivityStack.startPausingLocked
这个函数定义在frameworks/base/services/java/com/android/server/am/ActivityStack.java文件中:
public class ActivityStack {

	......

	private final void startPausingLocked(boolean userLeaving, boolean uiSleeping) {
		if (mPausingActivity != null) {
			......
		}
		ActivityRecord prev = mResumedActivity;
		if (prev == null) {
			......
		}
		......
		mResumedActivity = null;
		mPausingActivity = prev;
		mLastPausedActivity = prev;
		prev.state = ActivityState.PAUSING;
		......

		if (prev.app != null && prev.app.thread != null) {
			......
			try {
				......
				prev.app.thread.schedulePauseActivity(prev, prev.finishing, userLeaving,
					prev.configChangeFlags);
				......
			} catch (Exception e) {
				......
			}
		} else {
			......
		}

		......

	}

	......

}
函数首先把mResumedActivity保存在本地变量prev中。在上一步Step 10中,说到mResumedActivity就是Launcher,因此,这里把Launcher进程中的ApplicationThread对象取出来,通过它来通知Launcher这个Activity它要进入Paused状态了。当然,这里的prev.app.thread是一个ApplicationThread对象的远程接口,通过调用这个远程接口的schedulePauseActivity来通知Launcher进入Paused状态。
参数prev.finishing表示prev所代表的Activity是否正在等待结束的Activity列表中,由于Laucher这个Activity还没结束,所以这里为false;参数prev.configChangeFlags表示哪些config发生了变化,这里我们不关心它的值。
Step 12.ApplicationThreadProxy.schedulePauseActivity
这个函数定义在frameworks/base/core/java/android/app/ApplicationThreadNative.java文件中:
class ApplicationThreadProxy implements IApplicationThread {

	......

	public final void schedulePauseActivity(IBinder token, boolean finished,
	boolean userLeaving, int configChanges) throws RemoteException {
		Parcel data = Parcel.obtain();
		data.writeInterfaceToken(IApplicationThread.descriptor);
		data.writeStrongBinder(token);
		data.writeInt(finished ? 1 : 0);
		data.writeInt(userLeaving ? 1 :0);
		data.writeInt(configChanges);
		mRemote.transact(SCHEDULE_PAUSE_ACTIVITY_TRANSACTION, data, null,
			IBinder.FLAG_ONEWAY);
		data.recycle();
	}

	......

}
这个函数通过Binder进程间通信机制进入到ApplicationThread.schedulePauseActivity函数中。
Step 13. ApplicationThread.schedulePauseActivity
这个函数定义在frameworks/base/core/java/android/app/ActivityThread.java文件中,它是ActivityThread的内部类:
public final class ActivityThread {

	......

	private final class ApplicationThread extends ApplicationThreadNative {

		......

		public final void schedulePauseActivity(IBinder token, boolean finished,
				boolean userLeaving, int configChanges) {
			queueOrSendMessage(
				finished ? H.PAUSE_ACTIVITY_FINISHING : H.PAUSE_ACTIVITY,
				token,
				(userLeaving ? 1 : 0),
				configChanges);
		}

		......

	}

	......

}
这里调用的函数queueOrSendMessage是ActivityThread类的成员函数。
上面说到,这里的finished值为false,因此,queueOrSendMessage的第一个参数值为H.PAUSE_ACTIVITY,表示要暂停token所代表的Activity,即Launcher。
Step 14. ActivityThread.queueOrSendMessage
这个函数定义在frameworks/base/core/java/android/app/ActivityThread.java文件中:
public final class ActivityThread {

	......

	private final void queueOrSendMessage(int what, Object obj, int arg1) {
		queueOrSendMessage(what, obj, arg1, 0);
	}

	private final void queueOrSendMessage(int what, Object obj, int arg1, int arg2) {
		synchronized (this) {
			......
			Message msg = Message.obtain();
			msg.what = what;
			msg.obj = obj;
			msg.arg1 = arg1;
			msg.arg2 = arg2;
			mH.sendMessage(msg);
		}
	}

	......

}
这里首先将相关信息组装成一个msg,然后通过mH成员变量发送出去,mH的类型是H,继承于Handler类,是ActivityThread的内部类,因此,这个消息最后由H.handleMessage来处理。
Step 15. H.handleMessage
这个函数定义在frameworks/base/core/java/android/app/ActivityThread.java文件中:
public final class ActivityThread {

	......

	private final class H extends Handler {

		......

		public void handleMessage(Message msg) {
			......
			switch (msg.what) {

			......

			case PAUSE_ACTIVITY:
				handlePauseActivity((IBinder)msg.obj, false, msg.arg1 != 0, msg.arg2);
				maybeSnapshot();
				break;

			......

			}
		......

	}

	......

}
这里调用ActivityThread.handlePauseActivity进一步操作,msg.obj是一个ActivityRecord对象的引用,它代表的是Launcher这个Activity。
Step 16.ActivityThread.handlePauseActivity
这个函数定义在frameworks/base/core/java/android/app/ActivityThread.java文件中:
public final class ActivityThread {

	......

	private final void handlePauseActivity(IBinder token, boolean finished,
			boolean userLeaving, int configChanges) {

		ActivityClientRecord r = mActivities.get(token);
		if (r != null) {
			//Slog.v(TAG, "userLeaving=" + userLeaving + " handling pause of " + r);
			if (userLeaving) {
				performUserLeavingActivity(r);
			}

			r.activity.mConfigChangeFlags |= configChanges;
			Bundle state = performPauseActivity(token, finished, true);

			// Make sure any pending writes are now committed.
			QueuedWork.waitToFinish();

			// Tell the activity manager we have paused.
			try {
				ActivityManagerNative.getDefault().activityPaused(token, state);
			} catch (RemoteException ex) {
			}
		}
	}

	......

}
函数首先将Binder引用token转换成ActivityRecord的远程接口ActivityClientRecord,然后做了三个事情:1. 如果userLeaving为true,则通过调用performUserLeavingActivity函数来调用Activity.onUserLeaveHint通知Activity,用户要离开它了;2. 调用performPauseActivity函数来调用Activity.onPause函数,我们知道,在Activity的生命周期中,当它要让位于其它的Activity时,系统就会调用它的onPause函数;3. 它通知ActivityManagerService,这个Activity已经进入Paused状态了,ActivityManagerService现在可以完成未竟的事情,即启动MainActivity了。
Step 17. ActivityManagerProxy.activityPaused
这个函数定义在frameworks/base/core/java/android/app/ActivityManagerNative.java文件中:
class ActivityManagerProxy implements IActivityManager
{
	......

	public void activityPaused(IBinder token, Bundle state) throws RemoteException
	{
		Parcel data = Parcel.obtain();
		Parcel reply = Parcel.obtain();
		data.writeInterfaceToken(IActivityManager.descriptor);
		data.writeStrongBinder(token);
		data.writeBundle(state);
		mRemote.transact(ACTIVITY_PAUSED_TRANSACTION, data, reply, 0);
		reply.readException();
		data.recycle();
		reply.recycle();
	}

	......

}
这里通过Binder进程间通信机制就进入到ActivityManagerService.activityPaused函数中去了。
Step 18.ActivityManagerService.activityPaused
这个函数定义在frameworks/base/services/java/com/android/server/am/ActivityManagerService.java文件中:
public final class ActivityManagerService extends ActivityManagerNative
			implements Watchdog.Monitor, BatteryStatsImpl.BatteryCallback {
	......

	public final void activityPaused(IBinder token, Bundle icicle) {

		......

		final long origId = Binder.clearCallingIdentity();
		mMainStack.activityPaused(token, icicle, false);

		......
	}

	......

}
这里,又再次进入到ActivityStack类中,执行activityPaused函数。
Step 19.ActivityStack.activityPaused
这个函数定义在frameworks/base/services/java/com/android/server/am/ActivityStack.java文件中:
public class ActivityStack {

	......

	final void activityPaused(IBinder token, Bundle icicle, boolean timeout) {

		......

		ActivityRecord r = null;

		synchronized (mService) {
			int index = indexOfTokenLocked(token);
			if (index >= 0) {
				r = (ActivityRecord)mHistory.get(index);
				if (!timeout) {
					r.icicle = icicle;
					r.haveState = true;
				}
				mHandler.removeMessages(PAUSE_TIMEOUT_MSG, r);
				if (mPausingActivity == r) {
					r.state = ActivityState.PAUSED;
					completePauseLocked();
				} else {
					......
				}
			}
		}
	}

	......

}
这里通过参数token在mHistory列表中得到ActivityRecord,从上面我们知道,这个ActivityRecord代表的是Launcher这个Activity,而我们在Step 11中,把Launcher这个Activity的信息保存在mPausingActivity中,因此,这里mPausingActivity等于r,于是,执行completePauseLocked操作。
Step 20.ActivityStack.completePauseLocked
这个函数定义在frameworks/base/services/java/com/android/server/am/ActivityStack.java文件中:
public class ActivityStack {

	......

	private final void completePauseLocked() {
		ActivityRecord prev = mPausingActivity;

		......

		if (prev != null) {

			......

			mPausingActivity = null;
		}

		if (!mService.mSleeping && !mService.mShuttingDown) {
			resumeTopActivityLocked(prev);
		} else {
			......
		}

		......
	}

	......

}
函数首先把mPausingActivity变量清空,因为现在不需要它了,然后调用resumeTopActivityLokced进一步操作,它传入的参数即为代表Launcher这个Activity的ActivityRecord。
Step 21.ActivityStack.resumeTopActivityLokced
这个函数定义在frameworks/base/services/java/com/android/server/am/ActivityStack.java文件中:
public class ActivityStack {

	......

	final boolean resumeTopActivityLocked(ActivityRecord prev) {
		......

		// Find the first activity that is not finishing.
		ActivityRecord next = topRunningActivityLocked(null);

		// Remember how we'll process this pause/resume situation, and ensure
		// that the state is reset however we wind up proceeding.
		final boolean userLeaving = mUserLeaving;
		mUserLeaving = false;

		......

		next.delayedResume = false;

		// If the top activity is the resumed one, nothing to do.
		if (mResumedActivity == next && next.state == ActivityState.RESUMED) {
			......
			return false;
		}

		// If we are sleeping, and there is no resumed activity, and the top
		// activity is paused, well that is the state we want.
		if ((mService.mSleeping || mService.mShuttingDown)
			&& mLastPausedActivity == next && next.state == ActivityState.PAUSED) {
			......
			return false;
		}

		.......


		// We need to start pausing the current activity so the top one
		// can be resumed...
		if (mResumedActivity != null) {
			......
			return true;
		}

		......


		if (next.app != null && next.app.thread != null) {
			......

		} else {
			......
			startSpecificActivityLocked(next, true, true);
		}

		return true;
	}


	......

}
通过上面的Step 9,我们知道,当前在堆栈顶端的Activity为我们即将要启动的MainActivity,这里通过调用topRunningActivityLocked将它取回来,保存在next变量中。之前最后一个Resumed状态的Activity,即Launcher,到了这里已经处于Paused状态了,因此,mResumedActivity为null。最后一个处于Paused状态的Activity为Launcher,因此,这里的mLastPausedActivity就为Launcher。前面我们为MainActivity创建了ActivityRecord后,它的app域一直保持为null。有了这些信息后,上面这段代码就容易理解了,它最终调用startSpecificActivityLocked进行下一步操作。
Step 22. ActivityStack.startSpecificActivityLocked
这个函数定义在frameworks/base/services/java/com/android/server/am/ActivityStack.java文件中:
public class ActivityStack {

	......

	private final void startSpecificActivityLocked(ActivityRecord r,
			boolean andResume, boolean checkConfig) {
		// Is this activity's application already running?
		ProcessRecord app = mService.getProcessRecordLocked(r.processName,
			r.info.applicationInfo.uid);

		......

		if (app != null && app.thread != null) {
			try {
				realStartActivityLocked(r, app, andResume, checkConfig);
				return;
			} catch (RemoteException e) {
				......
			}
		}

		mService.startProcessLocked(r.processName, r.info.applicationInfo, true, 0,
			"activity", r.intent.getComponent(), false);
	}


	......

} 注意,这里由于是第一次启动应用程序的Activity,所以下面语句:ProcessRecord app = mService.getProcessRecordLocked(r.processName, r.info.applicationInfo.uid);取回来的app为null。在Activity应用程序中的AndroidManifest.xml配置文件中,我们没有指定Application标签的process属性,系统就会默认使用package的名称,这里就是"shy.luo.activity"了。每一个应用程序都有自己的uid,因此,这里uid + process的组合就可以为每一个应用程序创建一个ProcessRecord。当然,我们可以配置两个应用程序具有相同的uid和package,或者在AndroidManifest.xml配置文件的application标签或者activity标签中显式指定相同的process属性值,这样,不同的应用程序也可以在同一个进程中启动。
函数最终执行ActivityManagerService.startProcessLocked函数进行下一步操作。
Step 23.ActivityManagerService.startProcessLocked
这个函数定义在frameworks/base/services/java/com/android/server/am/ActivityManagerService.java文件中:
public final class ActivityManagerService extends ActivityManagerNative
		implements Watchdog.Monitor, BatteryStatsImpl.BatteryCallback {

	......

	final ProcessRecord startProcessLocked(String processName,
			ApplicationInfo info, boolean knownToBeDead, int intentFlags,
			String hostingType, ComponentName hostingName, boolean allowWhileBooting) {

		ProcessRecord app = getProcessRecordLocked(processName, info.uid);

		......

		String hostingNameStr = hostingName != null
			? hostingName.flattenToShortString() : null;

		......

		if (app == null) {
			app = new ProcessRecordLocked(null, info, processName);
			mProcessNames.put(processName, info.uid, app);
		} else {
			// If this is a new package in the process, add the package to the list
			app.addPackage(info.packageName);
		}

		......

		startProcessLocked(app, hostingType, hostingNameStr);
		return (app.pid != 0) ? app : null;
	}

	......

}
这里再次检查是否已经有以process + uid命名的进程存在,在我们这个情景中,返回值app为null,因此,后面会创建一个ProcessRecord,并存保存在成员变量mProcessNames中,最后,调用另一个startProcessLocked函数进一步操作:
public final class ActivityManagerService extends ActivityManagerNative
		implements Watchdog.Monitor, BatteryStatsImpl.BatteryCallback {

	......

	private final void startProcessLocked(ProcessRecord app,
				String hostingType, String hostingNameStr) {

		......

		try {
			int uid = app.info.uid;
			int[] gids = null;
			try {
				gids = mContext.getPackageManager().getPackageGids(
					app.info.packageName);
			} catch (PackageManager.NameNotFoundException e) {
				......
			}

			......

			int debugFlags = 0;

			......

			int pid = Process.start("android.app.ActivityThread",
				mSimpleProcessManagement ? app.processName : null, uid, uid,
				gids, debugFlags, null);

			......

		} catch (RuntimeException e) {

			......

		}
	}

	......

}
这里主要是调用Process.start接口来创建一个新的进程,新的进程会导入android.app.ActivityThread类,并且执行它的main函数,这就是为什么我们前面说每一个应用程序都有一个ActivityThread实例来对应的原因。
Step 24. ActivityThread.main
这个函数定义在frameworks/base/core/java/android/app/ActivityThread.java文件中:
public final class ActivityThread {

	......

	private final void attach(boolean system) {
		......

		mSystemThread = system;
		if (!system) {

			......

			IActivityManager mgr = ActivityManagerNative.getDefault();
			try {
				mgr.attachApplication(mAppThread);
			} catch (RemoteException ex) {
			}
		} else {

			......

		}
	}

	......

	public static final void main(String[] args) {

		.......

		ActivityThread thread = new ActivityThread();
		thread.attach(false);

		......

		Looper.loop();

		.......

		thread.detach();

		......
	}
}
这个函数在进程中创建一个ActivityThread实例,然后调用它的attach函数,接着就进入消息循环了,直到最后进程退出。
函数attach最终调用了ActivityManagerService的远程接口ActivityManagerProxy的attachApplication函数,传入的参数是mAppThread,这是一个ApplicationThread类型的Binder对象,它的作用是用来进行进程间通信的。
Step 25.ActivityManagerProxy.attachApplication
这个函数定义在frameworks/base/core/java/android/app/ActivityManagerNative.java文件中:
class ActivityManagerProxy implements IActivityManager
{
	......

	public void attachApplication(IApplicationThread app) throws RemoteException
	{
		Parcel data = Parcel.obtain();
		Parcel reply = Parcel.obtain();
		data.writeInterfaceToken(IActivityManager.descriptor);
		data.writeStrongBinder(app.asBinder());
		mRemote.transact(ATTACH_APPLICATION_TRANSACTION, data, reply, 0);
		reply.readException();
		data.recycle();
		reply.recycle();
	}

	......

}
这里通过Binder驱动程序,最后进入ActivityManagerService的attachApplication函数中。
Step 26.ActivityManagerService.attachApplication
这个函数定义在frameworks/base/services/java/com/android/server/am/ActivityManagerService.java文件中:
public final class ActivityManagerService extends ActivityManagerNative
		implements Watchdog.Monitor, BatteryStatsImpl.BatteryCallback {

	......

	public final void attachApplication(IApplicationThread thread) {
		synchronized (this) {
			int callingPid = Binder.getCallingPid();
			final long origId = Binder.clearCallingIdentity();
			attachApplicationLocked(thread, callingPid);
			Binder.restoreCallingIdentity(origId);
		}
	}

	......

}
这里将操作转发给attachApplicationLocked函数。
Step 27.ActivityManagerService.attachApplicationLocked
这个函数定义在frameworks/base/services/java/com/android/server/am/ActivityManagerService.java文件中:
public final class ActivityManagerService extends ActivityManagerNative
		implements Watchdog.Monitor, BatteryStatsImpl.BatteryCallback {

	......

	private final boolean attachApplicationLocked(IApplicationThread thread,
			int pid) {
		// Find the application record that is being attached...  either via
		// the pid if we are running in multiple processes, or just pull the
		// next app record if we are emulating process with anonymous threads.
		ProcessRecord app;
		if (pid != MY_PID && pid >= 0) {
			synchronized (mPidsSelfLocked) {
				app = mPidsSelfLocked.get(pid);
			}
		} else if (mStartingProcesses.size() > 0) {
			......
		} else {
			......
		}

		if (app == null) {
			......
			return false;
		}

		......

		String processName = app.processName;
		try {
			thread.asBinder().linkToDeath(new AppDeathRecipient(
				app, pid, thread), 0);
		} catch (RemoteException e) {
			......
			return false;
		}

		......

		app.thread = thread;
		app.curAdj = app.setAdj = -100;
		app.curSchedGroup = Process.THREAD_GROUP_DEFAULT;
		app.setSchedGroup = Process.THREAD_GROUP_BG_NONINTERACTIVE;
		app.forcingToForeground = null;
		app.foregroundServices = false;
		app.debugging = false;

		......

		boolean normalMode = mProcessesReady || isAllowedWhileBooting(app.info);

		......

		boolean badApp = false;
		boolean didSomething = false;

		// See if the top visible activity is waiting to run in this process...
		ActivityRecord hr = mMainStack.topRunningActivityLocked(null);
		if (hr != null && normalMode) {
			if (hr.app == null && app.info.uid == hr.info.applicationInfo.uid
				&& processName.equals(hr.processName)) {
					try {
						if (mMainStack.realStartActivityLocked(hr, app, true, true)) {
							didSomething = true;
						}
					} catch (Exception e) {
						......
					}
			} else {
				......
			}
		}

		......

		return true;
	}

	......

}
在前面的Step 23中,已经创建了一个ProcessRecord,这里首先通过pid将它取回来,放在app变量中,然后对app的其它成员进行初始化,最后调用mMainStack.realStartActivityLocked执行真正的Activity启动操作。这里要启动的Activity通过调用mMainStack.topRunningActivityLocked(null)从堆栈顶端取回来,这时候在堆栈顶端的Activity就是MainActivity了。
Step 28. ActivityStack.realStartActivityLocked
这个函数定义在frameworks/base/services/java/com/android/server/am/ActivityStack.java文件中:
public class ActivityStack {

	......

	final boolean realStartActivityLocked(ActivityRecord r,
			ProcessRecord app, boolean andResume, boolean checkConfig)
			throws RemoteException {

		......

		r.app = app;

		......

		int idx = app.activities.indexOf(r);
		if (idx < 0) {
			app.activities.add(r);
		}

		......

		try {
			......

			List<ResultInfo> results = null;
			List<Intent> newIntents = null;
			if (andResume) {
				results = r.results;
				newIntents = r.newIntents;
			}

			......

			app.thread.scheduleLaunchActivity(new Intent(r.intent), r,
				System.identityHashCode(r),
				r.info, r.icicle, results, newIntents, !andResume,
				mService.isNextTransitionForward());

			......

		} catch (RemoteException e) {
			......
		}

		......

		return true;
	}

	......

}
这里最终通过app.thread进入到ApplicationThreadProxy的scheduleLaunchActivity函数中,注意,这里的第二个参数r,是一个ActivityRecord类型的Binder对象,用来作来这个Activity的token值。
Step 29.ApplicationThreadProxy.scheduleLaunchActivity
这个函数定义在frameworks/base/core/java/android/app/ApplicationThreadNative.java文件中:
class ApplicationThreadProxy implements IApplicationThread {

	......

	public final void scheduleLaunchActivity(Intent intent, IBinder token, int ident,
			ActivityInfo info, Bundle state, List<ResultInfo> pendingResults,
			List<Intent> pendingNewIntents, boolean notResumed, boolean isForward)
			throws RemoteException {
		Parcel data = Parcel.obtain();
		data.writeInterfaceToken(IApplicationThread.descriptor);
		intent.writeToParcel(data, 0);
		data.writeStrongBinder(token);
		data.writeInt(ident);
		info.writeToParcel(data, 0);
		data.writeBundle(state);
		data.writeTypedList(pendingResults);
		data.writeTypedList(pendingNewIntents);
		data.writeInt(notResumed ? 1 : 0);
		data.writeInt(isForward ? 1 : 0);
		mRemote.transact(SCHEDULE_LAUNCH_ACTIVITY_TRANSACTION, data, null,
			IBinder.FLAG_ONEWAY);
		data.recycle();
	}

	......

}
这个函数最终通过Binder驱动程序进入到ApplicationThread的scheduleLaunchActivity函数中。
Step 30.ApplicationThread.scheduleLaunchActivity
这个函数定义在frameworks/base/core/java/android/app/ActivityThread.java文件中:
public final class ActivityThread {

	......

	private final class ApplicationThread extends ApplicationThreadNative {

		......

		// we use token to identify this activity without having to send the
		// activity itself back to the activity manager. (matters more with ipc)
		public final void scheduleLaunchActivity(Intent intent, IBinder token, int ident,
				ActivityInfo info, Bundle state, List<ResultInfo> pendingResults,
				List<Intent> pendingNewIntents, boolean notResumed, boolean isForward) {
			ActivityClientRecord r = new ActivityClientRecord();

			r.token = token;
			r.ident = ident;
			r.intent = intent;
			r.activityInfo = info;
			r.state = state;

			r.pendingResults = pendingResults;
			r.pendingIntents = pendingNewIntents;

			r.startsNotResumed = notResumed;
			r.isForward = isForward;

			queueOrSendMessage(H.LAUNCH_ACTIVITY, r);
		}

		......

	}

	......
}
函数首先创建一个ActivityClientRecord实例,并且初始化它的成员变量,然后调用ActivityThread类的queueOrSendMessage函数进一步处理。
Step 31.ActivityThread.queueOrSendMessage
这个函数定义在frameworks/base/core/java/android/app/ActivityThread.java文件中:
public final class ActivityThread {

	......

	private final class ApplicationThread extends ApplicationThreadNative {

		......

		// if the thread hasn't started yet, we don't have the handler, so just
		// save the messages until we're ready.
		private final void queueOrSendMessage(int what, Object obj) {
			queueOrSendMessage(what, obj, 0, 0);
		}

		......

		private final void queueOrSendMessage(int what, Object obj, int arg1, int arg2) {
			synchronized (this) {
				......
				Message msg = Message.obtain();
				msg.what = what;
				msg.obj = obj;
				msg.arg1 = arg1;
				msg.arg2 = arg2;
				mH.sendMessage(msg);
			}
		}

		......

	}

	......
}
函数把消息内容放在msg中,然后通过mH把消息分发出去,这里的成员变量mH我们在前面已经见过,消息分发出去后,最后会调用H类的handleMessage函数。
Step 32. H.handleMessage
这个函数定义在frameworks/base/core/java/android/app/ActivityThread.java文件中:
public final class ActivityThread {

	......

	private final class H extends Handler {

		......

		public void handleMessage(Message msg) {
			......
			switch (msg.what) {
			case LAUNCH_ACTIVITY: {
				ActivityClientRecord r = (ActivityClientRecord)msg.obj;

				r.packageInfo = getPackageInfoNoCheck(
					r.activityInfo.applicationInfo);
				handleLaunchActivity(r, null);
			} break;
			......
			}

		......

	}

	......
}
这里最后调用ActivityThread类的handleLaunchActivity函数进一步处理。
Step 33.ActivityThread.handleLaunchActivity
这个函数定义在frameworks/base/core/java/android/app/ActivityThread.java文件中:
public final class ActivityThread {

	......

	private final void handleLaunchActivity(ActivityClientRecord r, Intent customIntent) {
		......

		Activity a = performLaunchActivity(r, customIntent);

		if (a != null) {
			r.createdConfig = new Configuration(mConfiguration);
			Bundle oldState = r.state;
			handleResumeActivity(r.token, false, r.isForward);

			......
		} else {
			......
		}
	}

	......
}
这里首先调用performLaunchActivity函数来加载这个Activity类,即shy.luo.activity.MainActivity,然后调用它的onCreate函数,最后回到handleLaunchActivity函数时,再调用handleResumeActivity函数来使这个Activity进入Resumed状态,即会调用这个Activity的onResume函数,这是遵循Activity的生命周期的。
Step 34.ActivityThread.performLaunchActivity
这个函数定义在frameworks/base/core/java/android/app/ActivityThread.java文件中:
public final class ActivityThread {

	......

	private final Activity performLaunchActivity(ActivityClientRecord r, Intent customIntent) {

		ActivityInfo aInfo = r.activityInfo;
		if (r.packageInfo == null) {
			r.packageInfo = getPackageInfo(aInfo.applicationInfo,
				Context.CONTEXT_INCLUDE_CODE);
		}

		ComponentName component = r.intent.getComponent();
		if (component == null) {
			component = r.intent.resolveActivity(
				mInitialApplication.getPackageManager());
			r.intent.setComponent(component);
		}

		if (r.activityInfo.targetActivity != null) {
			component = new ComponentName(r.activityInfo.packageName,
				r.activityInfo.targetActivity);
		}

		Activity activity = null;
		try {
			java.lang.ClassLoader cl = r.packageInfo.getClassLoader();
			activity = mInstrumentation.newActivity(
				cl, component.getClassName(), r.intent);
			r.intent.setExtrasClassLoader(cl);
			if (r.state != null) {
				r.state.setClassLoader(cl);
			}
		} catch (Exception e) {
			......
		}

		try {
			Application app = r.packageInfo.makeApplication(false, mInstrumentation);

			......

			if (activity != null) {
				ContextImpl appContext = new ContextImpl();
				appContext.init(r.packageInfo, r.token, this);
				appContext.setOuterContext(activity);
				CharSequence title = r.activityInfo.loadLabel(appContext.getPackageManager());
				Configuration config = new Configuration(mConfiguration);
				......
				activity.attach(appContext, this, getInstrumentation(), r.token,
					r.ident, app, r.intent, r.activityInfo, title, r.parent,
					r.embeddedID, r.lastNonConfigurationInstance,
					r.lastNonConfigurationChildInstances, config);

				if (customIntent != null) {
					activity.mIntent = customIntent;
				}
				r.lastNonConfigurationInstance = null;
				r.lastNonConfigurationChildInstances = null;
				activity.mStartedActivity = false;
				int theme = r.activityInfo.getThemeResource();
				if (theme != 0) {
					activity.setTheme(theme);
				}

				activity.mCalled = false;
				mInstrumentation.callActivityOnCreate(activity, r.state);
				......
				r.activity = activity;
				r.stopped = true;
				if (!r.activity.mFinished) {
					activity.performStart();
					r.stopped = false;
				}
				if (!r.activity.mFinished) {
					if (r.state != null) {
						mInstrumentation.callActivityOnRestoreInstanceState(activity, r.state);
					}
				}
				if (!r.activity.mFinished) {
					activity.mCalled = false;
					mInstrumentation.callActivityOnPostCreate(activity, r.state);
					if (!activity.mCalled) {
						throw new SuperNotCalledException(
							"Activity " + r.intent.getComponent().toShortString() +
							" did not call through to super.onPostCreate()");
					}
				}
			}
			r.paused = true;

			mActivities.put(r.token, r);

		} catch (SuperNotCalledException e) {
			......

		} catch (Exception e) {
			......
		}

		return activity;
	}

	......
}
函数前面是收集要启动的Activity的相关信息,主要package和component信息:
   ActivityInfo aInfo = r.activityInfo;
   if (r.packageInfo == null) {
        r.packageInfo = getPackageInfo(aInfo.applicationInfo,
                Context.CONTEXT_INCLUDE_CODE);
   }

   ComponentName component = r.intent.getComponent();
   if (component == null) {
       component = r.intent.resolveActivity(
           mInitialApplication.getPackageManager());
       r.intent.setComponent(component);
   }

   if (r.activityInfo.targetActivity != null) {
       component = new ComponentName(r.activityInfo.packageName,
               r.activityInfo.targetActivity);
   }
然后通过ClassLoader将shy.luo.activity.MainActivity类加载进来:
   Activity activity = null;
   try {
	java.lang.ClassLoader cl = r.packageInfo.getClassLoader();
	activity = mInstrumentation.newActivity(
		cl, component.getClassName(), r.intent);
	r.intent.setExtrasClassLoader(cl);
	if (r.state != null) {
		r.state.setClassLoader(cl);
	}
   } catch (Exception e) {
	......
   }
接下来是创建Application对象,这是根据AndroidManifest.xml配置文件中的Application标签的信息来创建的:
Application app = r.packageInfo.makeApplication(false, mInstrumentation);后面的代码主要创建Activity的上下文信息,并通过attach方法将这些上下文信息设置到MainActivity中去:
   activity.attach(appContext, this, getInstrumentation(), r.token,
	r.ident, app, r.intent, r.activityInfo, title, r.parent,
	r.embeddedID, r.lastNonConfigurationInstance,
	r.lastNonConfigurationChildInstances, config);
最后还要调用MainActivity的onCreate函数:
mInstrumentation.callActivityOnCreate(activity, r.state);这里不是直接调用MainActivity的onCreate函数,而是通过mInstrumentation的callActivityOnCreate函数来间接调用,前面我们说过,mInstrumentation在这里的作用是监控Activity与系统的交互操作,相当于是系统运行日志。
Step 35. MainActivity.onCreate
这个函数定义在packages/experimental/Activity/src/shy/luo/activity/MainActivity.java文件中,这是我们自定义的app工程文件:
public class MainActivity extends Activity  implements OnClickListener {

	......

	@Override
	public void onCreate(Bundle savedInstanceState) {
		......

		Log.i(LOG_TAG, "Main Activity Created.");
	}

	......

}
这样,MainActivity就启动起来了,整个应用程序也启动起来了。
整个应用程序的启动过程要执行很多步骤,但是整体来看,主要分为以下五个阶段:
一. Step1 - Step 11:Launcher通过Binder进程间通信机制通知ActivityManagerService,它要启动一个Activity;
二. Step 12 - Step 16:ActivityManagerService通过Binder进程间通信机制通知Launcher进入Paused状态;
三. Step 17 - Step 24:Launcher通过Binder进程间通信机制通知ActivityManagerService,它已经准备就绪进入Paused状态,于是ActivityManagerService就创建一个新的进程,用来启动一个ActivityThread实例,即将要启动的Activity就是在这个ActivityThread实例中运行;
四. Step 25 - Step 27:ActivityThread通过Binder进程间通信机制将一个ApplicationThread类型的Binder对象传递给ActivityManagerService,以便以后ActivityManagerService能够通过这个Binder对象和它进行通信;
五. Step 28 - Step 35:ActivityManagerService通过Binder进程间通信机制通知ActivityThread,现在一切准备就绪,它可以真正执行Activity的启动操作了。
这里不少地方涉及到了Binder进程间通信机制,相关资料请参考Android进程间通信(IPC)机制Binder简要介绍和学习计划一文。
这样,应用程序的启动过程就介绍完了,它实质上是启动应用程序的默认Activity,在下一篇文章中,我们将介绍在应用程序内部启动另一个Activity的过程,即新的Activity与启动它的Activity将会在同一个进程(Process)和任务(Task)运行,敬请关注。
老罗的新浪微博:http://weibo.com/shengyangluo,欢迎关注!


发表评论

相关推荐
老罗android之旅,UML流程图(自己画的...Android应用程序进程启动过程的源代码分析uml.jpg,Android应用程序内部启动Activity过程(startActivity)的源代码分析 UML.jpg,Android应用程序启动过程源代码分析UML.jpg)
Android应用程序进程启动过程的源代码分析.pdf
第12章 Android应用程序进程的启动过程 12.1 应用程序进程的创建过程 12.2 Binder线程池的启动过程 12.3 消息循环的创建过程 第13章 Android应用程序的消息处理机制 13.1 创建线程消息队列 13.2 线程...
在组织上,《Android系统源代码情景分析(含CD光盘1张)》将上述内容划分为初识Android系统、Android专用驱动系统和Android应用程序框架三大篇。初识Android系统篇介绍了参考书籍、基础知识以及实验环境搭建;...
第12章 Android应用程序进程的启动过程 12.1 应用程序进程的创建过程 12.2 Binder线程池的启动过程 12.3 消息循环的创建过程 第13章 Android应用程序的消息处理机制 13.1 创建线程消息队列 13.2 线程消息循环...
Android 应用项目开发源码 参考和学习使用
Android应用源码之 程序启动界面Demo.zip
3.1 Android应用程序的组成部分 43 3.2 程序清单简介 44 3.3 使用清单编辑器 47 3.4 Android应用程序生命周期 48 3.5 理解应用程序的优先级和进程状态 49 3.6 分离资源 50 3.6.1 创建资源 50 3.6.2 使用资源...
Android 程序启动界面源码.zip项目安卓应用源码下载Android 程序启动界面源码.zip项目安卓应用源码下载 1.适合学生毕业设计研究参考 2.适合个人学习研究参考 3.适合公司开发项目技术参考
Android实例源码-应用启动应用退出&网络判断类安卓源代码(12例) 3G和wifi的切换监听 android 在线更新示例代码 android程序的自动更新 和 基于GPS定位的轨迹存储 app更新,实现service下载 ViewPager+Fragment侧滑...
Android 音乐播放器 秒表源码 日历源码Android应用源码 27个合集.zip Android 音乐播放器(晴天播放)源码.rar Android录音程序源码.rar Android抽屉效果Demo源码.rar Android瀑布流DEMO源码.rar Android秒表源码....
Android应用源码之 程序启动界面Demo.zip项目安卓应用源码下载Android应用源码之 程序启动界面Demo.zip项目安卓应用源码下载 1.适合学生毕业设计研究参考 2.适合个人学习研究参考 3.适合公司开发项目技术参考
Android应用源码之程序启动界面Demo(动态)
Android应用源码之程序启动界面Demo(动态).zip项目安卓应用源码下载Android应用源码之程序启动界面Demo(动态).zip项目安卓应用源码下载 1.适合学生毕业设计研究参考 2.适合个人学习研究参考 3.适合公司开发项目...
Android 开发应用源码 参考学习使用
Android系统源代码情景分析光盘资料 目录 第1篇初识Android系统 第1章 准备知识................................................................ 2 1.1 Linux内核参考书籍......................................