- жөҸи§Ҳ: 2099509 ж¬Ў
- жҖ§еҲ«:

- жқҘиҮӘ: ж·ұеңі
-

ж–Үз« еҲҶзұ»
- е…ЁйғЁеҚҡе®ў (5124)
- Linux (32)
- jaxws-webservice (7)
- Struts (5)
- webservice (2)
- Hibernate (6)
- Oracle (9)
- uva (1)
- иЎҢдёҡзғӯж–Ү (10)
- java и®ҫи®ЎжЁЎејҸ (7)
- junit (3)
- Spring MVC (1)
- Android (44)
- Spring (4)
- hadoopеӨ§ж•°жҚ® (15)
- xml (3)
- йҖҡеҗ‘жһ¶жһ„еёҲзҡ„йҒ“и·Ҝ (8)
- .net (4)
- Json (2)
- mysql (1)
- SQL (1)
- Tomcat (1)
- еӨ§ж•°жҚ® (1)
зӨҫеҢәзүҲеқ—
- жҲ‘зҡ„иө„и®Ҝ ( 0)
- жҲ‘зҡ„и®әеқӣ ( 0)
- жҲ‘зҡ„й—®зӯ” ( 0)
еӯҳжЎЈеҲҶзұ»
- 2017-01 ( 5)
- 2016-12 ( 132)
- 2016-11 ( 17)
- жӣҙеӨҡеӯҳжЎЈ...
жңҖж–°иҜ„и®ә
-
wahahachuang5пјҡ
webе®һж—¶жҺЁйҖҒжҠҖжңҜдҪҝз”Ёи¶ҠжқҘи¶Ҡе№ҝжіӣпјҢдҪҶжҳҜиҮӘе·ұејҖеҸ‘еҸҲеӨӘйә»зғҰдәҶпјҢжҲ‘и§ү ...
з»ҶиҜҙwebsocket - phpзҜҮ -
wahahachuang8пјҡ
жҢәеҘҪзҡ„пјҢеӯҰд№ дәҶ
з»ҶиҜҙwebsocket - phpзҜҮ -
jacking124пјҡ
еӯҰд№ дәҶпјҒж”ҜжҢҒдҪ пјҢ继з»ӯ
еҲқзӘҘLinux д№Ӣ жҲ‘жңҖеёёз”Ёзҡ„20жқЎе‘Ҫд»Ө -
aliahhqchengпјҡ
еә”иҜҘжҳҜеҸҜд»Ҙе®һзҺ°зҡ„пјҢжІЎжңүзңӢиҝҮжәҗз ҒгҖӮдҪ еҸҜд»ҘеҸӮиҖғдёӢпјҡhttp://w ...
Jackson жЎҶжһ¶пјҢиҪ»жҳ“иҪ¬жҚўJSON
Androidзі»з»ҹиҝӣзЁӢй—ҙйҖҡдҝЎBinderжңәеҲ¶еңЁеә”з”ЁзЁӢеәҸжЎҶжһ¶еұӮзҡ„JavaжҺҘеҸЈжәҗд»Јз ҒеҲҶжһҗ
еңЁеүҚйқўеҮ зҜҮж–Үз« дёӯпјҢжҲ‘们иҜҰз»Ҷд»Ӣз»ҚдәҶAndroidзі»з»ҹиҝӣзЁӢй—ҙйҖҡдҝЎжңәеҲ¶Binderзҡ„еҺҹзҗҶпјҢ并且ж·ұе…ҘеҲҶжһҗдәҶзі»з»ҹжҸҗдҫӣзҡ„BinderиҝҗиЎҢеә“е’Ңй©ұеҠЁзЁӢеәҸзҡ„жәҗд»Јз ҒгҖӮз»Ҷеҝғзҡ„иҜ»иҖ…дјҡеҸ‘зҺ°пјҢиҝҷеҮ зҜҮж–Үз« еҲҶжһҗзҡ„BinderжҺҘеҸЈйғҪжҳҜеҹәдәҺC/C++иҜӯиЁҖжқҘе®һзҺ°зҡ„пјҢдҪҶжҳҜжҲ‘们еңЁзј–еҶҷеә”з”ЁзЁӢеәҸйғҪжҳҜеҹәдәҺJavaиҜӯиЁҖзҡ„пјҢйӮЈд№ҲпјҢжҲ‘们еҰӮдҪ•дҪҝз”ЁJavaиҜӯиЁҖжқҘдҪҝз”Ёзі»з»ҹзҡ„BinderжңәеҲ¶жқҘиҝӣиЎҢиҝӣзЁӢй—ҙйҖҡдҝЎе‘ўпјҹиҝҷе°ұжҳҜжң¬ж–ҮиҰҒд»Ӣз»Қзҡ„Androidзі»з»ҹеә”з”ЁзЁӢеәҸжЎҶжһ¶еұӮзҡ„з”ЁJavaиҜӯиЁҖжқҘе®һзҺ°зҡ„BinderжҺҘеҸЈдәҶгҖӮ
зҶҹжӮүAndroidзі»з»ҹзҡ„иҜ»иҖ…пјҢеә”иҜҘиғҪжғіеҲ°еә”з”ЁзЁӢеәҸжЎҶжһ¶дёӯзҡ„еҹәдәҺJavaиҜӯиЁҖзҡ„BinderжҺҘеҸЈжҳҜйҖҡиҝҮJNIжқҘи°ғз”ЁеҹәдәҺC/C++иҜӯиЁҖзҡ„BinderиҝҗиЎҢеә“жқҘдёәJavaеә”з”ЁзЁӢеәҸжҸҗдҫӣиҝӣзЁӢй—ҙйҖҡдҝЎжңҚеҠЎзҡ„дәҶгҖӮJNIеңЁAndroidзі»з»ҹдёӯз”Ёеҫ—зӣёеҪ“жҷ®йҒҚпјҢSDKдёӯзҡ„JavaжҺҘеҸЈAPIеҫҲеӨҡеҸӘжҳҜз®ҖеҚ•ең°йҖҡиҝҮJNIжқҘи°ғз”Ёеә•еұӮзҡ„C/C++иҝҗиЎҢеә“д»ҺиҖҢдёәеә”з”ЁзЁӢеәҸжңҚеҠЎзҡ„гҖӮ
иҝҷйҮҢпјҢжҲ‘们д»Қ然жҳҜйҖҡиҝҮе…·дҪ“зҡ„дҫӢеӯҗжқҘиҜҙжҳҺBinderжңәеҲ¶еңЁеә”з”ЁзЁӢеәҸжЎҶжһ¶еұӮдёӯзҡ„JavaжҺҘеҸЈпјҢдё»иҰҒе°ұжҳҜService ManagerгҖҒServerе’ҢClientиҝҷдёүдёӘи§’иүІзҡ„е®һзҺ°дәҶгҖӮйҖҡеёёпјҢеңЁеә”з”ЁзЁӢеәҸдёӯпјҢжҲ‘们йғҪжҳҜжҠҠServerе®һзҺ°дёәServiceзҡ„еҪўејҸпјҢ并且йҖҡиҝҮIServiceManager.addServiceжҺҘеҸЈжқҘжҠҠиҝҷдёӘServiceж·»еҠ еҲ°Service ManagerпјҢClientд№ҹжҳҜйҖҡиҝҮIServiceManager.getServiceжҺҘеҸЈжқҘиҺ·еҫ—ServiceжҺҘеҸЈпјҢжҺҘзқҖе°ұеҸҜд»ҘдҪҝз”ЁиҝҷдёӘServiceжҸҗдҫӣзҡ„еҠҹиғҪдәҶпјҢиҝҷдёӘдёҺиҝҗиЎҢж—¶еә“зҡ„BinderжҺҘеҸЈжҳҜдёҖиҮҙзҡ„гҖӮ
еүҚйқўжҲ‘们еӯҰд№ Android硬件жҠҪиұЎеұӮж—¶пјҢжӣҫз»ҸеңЁеә”з”ЁзЁӢеәҸжЎҶжһ¶еұӮдёӯжҸҗдҫӣдәҶдёҖдёӘ硬件и®ҝй—®жңҚеҠЎHelloServiceпјҢиҝҷдёӘServiceиҝҗиЎҢеңЁдёҖдёӘзӢ¬з«Ӣзҡ„иҝӣзЁӢдёӯе……еҪ“Serverзҡ„и§’иүІпјҢдҪҝз”ЁиҝҷдёӘServiceзҡ„ClientиҝҗиЎҢеңЁеҸҰдёҖдёӘиҝӣзЁӢдёӯпјҢе®ғ们д№Ӣй—ҙе°ұжҳҜйҖҡиҝҮBinderжңәеҲ¶жқҘйҖҡдҝЎзҡ„дәҶгҖӮиҝҷйҮҢпјҢжҲ‘们е°ұдҪҝз”ЁHelloServiceиҝҷдёӘдҫӢеӯҗжқҘеҲҶжһҗAndroidзі»з»ҹиҝӣзЁӢй—ҙйҖҡдҝЎBinderжңәеҲ¶еңЁеә”з”ЁзЁӢеәҸжЎҶжһ¶еұӮзҡ„JavaжҺҘеҸЈжәҗд»Јз ҒгҖӮжүҖд»ҘеёҢжңӣиҜ»иҖ…еңЁйҳ…иҜ»дёӢйқўзҡ„еҶ…е®№д№ӢеүҚпјҢе…ҲдәҶи§ЈдёҖдёӢеүҚйқўеңЁUbuntuдёҠдёәAndroidзі»з»ҹзҡ„Application FrameworksеұӮеўһеҠ 硬件и®ҝй—®жңҚеҠЎиҝҷзҜҮж–Үз« гҖӮ
иҝҷзҜҮж–Үз« йҖҡиҝҮдә”дёӘжғ…жҷҜжқҘеӯҰд№ Androidзі»з»ҹиҝӣзЁӢй—ҙйҖҡдҝЎBinderжңәеҲ¶еңЁеә”з”ЁзЁӢеәҸжЎҶжһ¶еұӮзҡ„JavaжҺҘеҸЈпјҡ1. иҺ·еҸ–Service Managerзҡ„JavaиҝңзЁӢжҺҘеҸЈзҡ„иҝҮзЁӢпјӣ2. HelloServiceжҺҘеҸЈзҡ„е®ҡд№үпјӣ3. HelloServiceзҡ„еҗҜеҠЁиҝҮзЁӢпјӣ4. ClientиҺ·еҸ–HelloServiceзҡ„JavaиҝңзЁӢжҺҘеҸЈзҡ„иҝҮзЁӢпјӣ5.ClientйҖҡиҝҮHelloServiceзҡ„JavaиҝңзЁӢжҺҘеҸЈжқҘдҪҝз”ЁHelloServiceжҸҗдҫӣзҡ„жңҚеҠЎзҡ„иҝҮзЁӢгҖӮ
дёҖ. иҺ·еҸ–Service Managerзҡ„JavaиҝңзЁӢжҺҘеҸЈ
жҲ‘们иҰҒиҺ·еҸ–зҡ„Service Managerзҡ„JavaиҝңзЁӢжҺҘеҸЈжҳҜдёҖдёӘServiceManagerProxyеҜ№иұЎзҡ„IServiceManagerжҺҘеҸЈгҖӮжҲ‘们зҺ°еңЁе°ұжқҘзңӢзңӢServiceManagerProxyзұ»жҳҜй•ҝд»Җд№Ҳж ·еӯҗзҡ„пјҡ
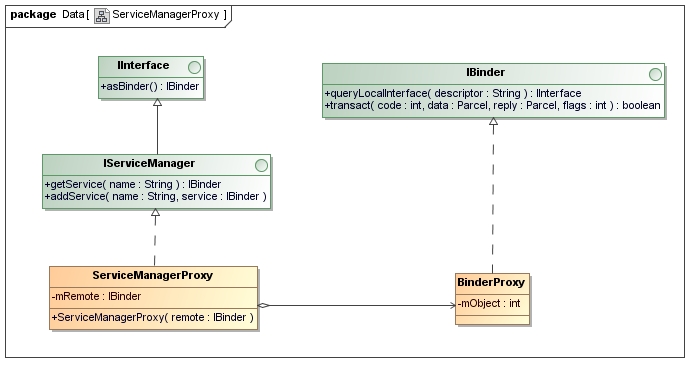
иҝҷйҮҢеҸҜд»ҘзңӢеҮәпјҢServiceManagerProxyзұ»е®һзҺ°дәҶIServiceManagerжҺҘеҸЈпјҢIServiceManagerжҸҗдҫӣдәҶgetServiceе’ҢaddServiceдёӨдёӘжҲҗе‘ҳеҮҪж•°жқҘз®ЎзҗҶзі»з»ҹдёӯзҡ„ServiceгҖӮд»ҺServiceManagerProxyзұ»зҡ„жһ„йҖ еҮҪж•°еҸҜд»ҘзңӢеҮәпјҢе®ғйңҖиҰҒдёҖдёӘBinderProxyеҜ№иұЎзҡ„IBinderжҺҘеҸЈжқҘдҪңдёәеҸӮж•°гҖӮеӣ жӯӨпјҢиҰҒиҺ·еҸ–Service Managerзҡ„JavaиҝңзЁӢжҺҘеҸЈServiceManagerProxyпјҢйҰ–е…ҲиҰҒжңүдёҖдёӘBinderProxyеҜ№иұЎгҖӮдёӢйқўе°ҶдјҡзңӢеҲ°иҝҷдёӘBinderProxyеҜ№иұЎжҳҜеҰӮдҪ•иҺ·еҫ—зҡ„гҖӮ
еҶҚжқҘзңӢдёҖдёӢжҳҜйҖҡиҝҮд»Җд№Ҳи·Ҝеҫ„жқҘиҺ·еҸ–Service Managerзҡ„JavaиҝңзЁӢжҺҘеҸЈServiceManagerProxyзҡ„гҖӮиҝҷдёӘдё»и§’е°ұжҳҜServiceManagerдәҶпјҢжҲ‘们д№ҹе…ҲзңӢдёҖдёӢServiceManagerжҳҜй•ҝд»Җд№Ҳж ·еӯҗзҡ„пјҡ

ServiceManagerзұ»жңүдёҖдёӘйқҷжҖҒжҲҗе‘ҳеҮҪж•°getIServiceManagerпјҢе®ғзҡ„дҪңз”Ёе°ұжҳҜз”ЁжқҘиҺ·еҸ–Service Managerзҡ„JavaиҝңзЁӢжҺҘеҸЈдәҶпјҢиҖҢиҝҷдёӘеҮҪж•°еҸҲжҳҜйҖҡиҝҮServiceManagerNativeжқҘиҺ·еҸ–Service Managerзҡ„JavaиҝңзЁӢжҺҘеҸЈзҡ„гҖӮ
жҺҘдёӢжқҘпјҢжҲ‘们е°ұзңӢдёҖдёӢServiceManager.getIServiceManagerиҝҷдёӘеҮҪж•°зҡ„е®һзҺ°пјҢиҝҷдёӘеҮҪж•°е®ҡд№үеңЁframeworks/base/core/java/android/os/ServiceManager.javaж–Ү件дёӯпјҡ
public final class ServiceManager {
	......
	private static IServiceManager sServiceManager;
	......
	private static IServiceManager getIServiceManager() {
		if (sServiceManager != null) {
			return sServiceManager;
		}

		// Find the service manager
		sServiceManager = ServiceManagerNative.asInterface(BinderInternal.getContextObject());
		return sServiceManager;
	}
	......
}
еҰӮжһңе…¶йқҷжҖҒжҲҗе‘ҳеҸҳйҮҸsServiceManagerе°ҡжңӘеҲӣе»әпјҢйӮЈд№Ҳе°ұи°ғз”ЁServiceManagerNative.asInterfaceеҮҪж•°жқҘеҲӣе»әгҖӮеңЁи°ғз”ЁServiceManagerNative.asInterfaceеҮҪж•°д№ӢеүҚпјҢйҰ–е…ҲиҰҒйҖҡиҝҮBinderInternal.getContextObjectеҮҪж•°жқҘиҺ·еҫ—дёҖдёӘBinderProxyеҜ№иұЎгҖӮ
жҲ‘们жқҘзңӢдёҖдёӢBinderInternal.getContextObjectзҡ„е®һзҺ°пјҢиҝҷдёӘеҮҪж•°е®ҡд№үеңЁframeworks/base/core/java/com/android/internal/os/BinderInternal.javaж–Ү件дёӯпјҡ
public class BinderInternal {
	......
	/**
	* Return the global "context object" of the system.  This is usually
	* an implementation of IServiceManager, which you can use to find
	* other services.
	*/
	public static final native IBinder getContextObject();

	......
}
иҝҷйҮҢеҸҜд»ҘзңӢеҮәпјҢBinderInternal.getContextObjectжҳҜдёҖдёӘJNIж–№жі•пјҢе®ғе®һзҺ°еңЁframeworks/base/core/jni/android_util_Binder.cppж–Ү件дёӯпјҡ
static jobject android_os_BinderInternal_getContextObject(JNIEnv* env, jobject clazz)
{
    sp<IBinder> b = ProcessState::self()->getContextObject(NULL);
    return javaObjectForIBinder(env, b);
}
иҝҷйҮҢзңӢеҲ°жҲ‘们зҶҹжӮүзҡ„ProcessState::self()->getContextObjectеҮҪж•°пјҢе…·дҪ“еҸҜд»ҘеҸӮиҖғжө…и°ҲAndroidзі»з»ҹиҝӣзЁӢй—ҙйҖҡдҝЎпјҲIPCпјүжңәеҲ¶Binderдёӯзҡ„Serverе’ҢClientиҺ·еҫ—Service ManagerжҺҘеҸЈд№Ӣи·ҜдёҖж–ҮгҖӮProcessState::self()->getContextObjectеҮҪж•°иҝ”еӣһдёҖдёӘBpBinderеҜ№иұЎпјҢе®ғзҡ„еҸҘжҹ„еҖјжҳҜ0пјҢеҚідёӢйқўиҜӯеҸҘпјҡ
sp<IBinder> b = ProcessState::self()->getContextObject(NULL);зӣёеҪ“дәҺжҳҜпјҡ
sp<IBinder> b = new BpBinder(0);жҺҘзқҖи°ғз”ЁjavaObjectForIBinderжҠҠиҝҷдёӘBpBinderеҜ№иұЎиҪ¬жҚўжҲҗдёҖдёӘBinderProxyеҜ№иұЎпјҡ
jobject javaObjectForIBinder(JNIEnv* env, const sp<IBinder>& val)
{
    if (val == NULL) return NULL;

    if (val->checkSubclass(&gBinderOffsets)) {
        // One of our own!
        jobject object = static_cast<JavaBBinder*>(val.get())->object();
        //printf("objectForBinder %p: it's our own %p!\n", val.get(), object);
        return object;
    }

    // For the rest of the function we will hold this lock, to serialize
    // looking/creation of Java proxies for native Binder proxies.
    AutoMutex _l(mProxyLock);

    // Someone else's...  do we know about it?
    jobject object = (jobject)val->findObject(&gBinderProxyOffsets);
    if (object != NULL) {
        jobject res = env->CallObjectMethod(object, gWeakReferenceOffsets.mGet);
        if (res != NULL) {
            LOGV("objectForBinder %p: found existing %p!\n", val.get(), res);
            return res;
        }
        LOGV("Proxy object %p of IBinder %p no longer in working set!!!", object, val.get());
        android_atomic_dec(&gNumProxyRefs);
        val->detachObject(&gBinderProxyOffsets);
        env->DeleteGlobalRef(object);
    }

    object = env->NewObject(gBinderProxyOffsets.mClass, gBinderProxyOffsets.mConstructor);
    if (object != NULL) {
        LOGV("objectForBinder %p: created new %p!\n", val.get(), object);
        // The proxy holds a reference to the native object.
        env->SetIntField(object, gBinderProxyOffsets.mObject, (int)val.get());
        val->incStrong(object);

        // The native object needs to hold a weak reference back to the
        // proxy, so we can retrieve the same proxy if it is still active.
        jobject refObject = env->NewGlobalRef(
                env->GetObjectField(object, gBinderProxyOffsets.mSelf));
        val->attachObject(&gBinderProxyOffsets, refObject,
                jnienv_to_javavm(env), proxy_cleanup);

        // Note that a new object reference has been created.
        android_atomic_inc(&gNumProxyRefs);
        incRefsCreated(env);
    }

    return object;
}
еңЁд»Ӣз»ҚиҝҷдёӘеҮҪж•°д№ӢеүҚпјҢе…ҲжқҘзңӢдёӨдёӘеҸҳйҮҸgBinderOffsetsе’ҢgBinderProxyOffsetsзҡ„е®ҡд№үгҖӮ
е…ҲзңӢgBinderOffsetsзҡ„е®ҡд№үпјҡ
static struct bindernative_offsets_t
{
    // Class state.
    jclass mClass;
    jmethodID mExecTransact;

    // Object state.
    jfieldID mObject;

} gBinderOffsets;
з®ҖеҚ•жқҘиҜҙпјҢgBinderOffsetsеҸҳйҮҸжҳҜз”ЁжқҘи®°еҪ•дёҠйқўз¬¬дәҢдёӘзұ»еӣҫдёӯзҡ„Binderзұ»зҡ„зӣёе…ідҝЎжҒҜзҡ„пјҢе®ғжҳҜеңЁжіЁеҶҢBinderзұ»зҡ„JNIж–№жі•зҡ„int_register_android_os_BinderеҮҪж•°еҲқе§ӢеҢ–зҡ„пјҡ
const char* const kBinderPathName = "android/os/Binder";

static int int_register_android_os_Binder(JNIEnv* env)
{
    jclass clazz;

    clazz = env->FindClass(kBinderPathName);
    LOG_FATAL_IF(clazz == NULL, "Unable to find class android.os.Binder");

    gBinderOffsets.mClass = (jclass) env->NewGlobalRef(clazz);
    gBinderOffsets.mExecTransact
        = env->GetMethodID(clazz, "execTransact", "(IIII)Z");
    assert(gBinderOffsets.mExecTransact);

    gBinderOffsets.mObject
        = env->GetFieldID(clazz, "mObject", "I");
    assert(gBinderOffsets.mObject);

    return AndroidRuntime::registerNativeMethods(
        env, kBinderPathName,
        gBinderMethods, NELEM(gBinderMethods));
}
еҶҚжқҘзңӢgBinderProxyOffsetsзҡ„е®ҡд№үпјҡ
static struct binderproxy_offsets_t
{
    // Class state.
    jclass mClass;
    jmethodID mConstructor;
    jmethodID mSendDeathNotice;

    // Object state.
    jfieldID mObject;
    jfieldID mSelf;

} gBinderProxyOffsets;
з®ҖеҚ•жқҘиҜҙпјҢgBinderProxyOffsetsжҳҜз”ЁжқҘеҸҳйҮҸжҳҜз”ЁжқҘи®°еҪ•дёҠйқўз¬¬дёҖдёӘеӣҫдёӯзҡ„BinderProxyзұ»зҡ„зӣёе…ідҝЎжҒҜзҡ„пјҢе®ғжҳҜеңЁжіЁеҶҢBinderProxyзұ»зҡ„JNIж–№жі•зҡ„int_register_android_os_BinderProxyеҮҪж•°еҲқе§ӢеҢ–зҡ„пјҡ
const char* const kBinderProxyPathName = "android/os/BinderProxy";

static int int_register_android_os_BinderProxy(JNIEnv* env)
{
    jclass clazz;

    clazz = env->FindClass("java/lang/ref/WeakReference");
    LOG_FATAL_IF(clazz == NULL, "Unable to find class java.lang.ref.WeakReference");
    gWeakReferenceOffsets.mClass = (jclass) env->NewGlobalRef(clazz);
    gWeakReferenceOffsets.mGet
        = env->GetMethodID(clazz, "get", "()Ljava/lang/Object;");
    assert(gWeakReferenceOffsets.mGet);

    clazz = env->FindClass("java/lang/Error");
    LOG_FATAL_IF(clazz == NULL, "Unable to find class java.lang.Error");
    gErrorOffsets.mClass = (jclass) env->NewGlobalRef(clazz);

    clazz = env->FindClass(kBinderProxyPathName);
    LOG_FATAL_IF(clazz == NULL, "Unable to find class android.os.BinderProxy");

    gBinderProxyOffsets.mClass = (jclass) env->NewGlobalRef(clazz);
    gBinderProxyOffsets.mConstructor
        = env->GetMethodID(clazz, "<init>", "()V");
    assert(gBinderProxyOffsets.mConstructor);
    gBinderProxyOffsets.mSendDeathNotice
        = env->GetStaticMethodID(clazz, "sendDeathNotice", "(Landroid/os/IBinder$DeathRecipient;)V");
    assert(gBinderProxyOffsets.mSendDeathNotice);

    gBinderProxyOffsets.mObject
        = env->GetFieldID(clazz, "mObject", "I");
    assert(gBinderProxyOffsets.mObject);
    gBinderProxyOffsets.mSelf
        = env->GetFieldID(clazz, "mSelf", "Ljava/lang/ref/WeakReference;");
    assert(gBinderProxyOffsets.mSelf);

    return AndroidRuntime::registerNativeMethods(
        env, kBinderProxyPathName,
        gBinderProxyMethods, NELEM(gBinderProxyMethods));
}
еӣһеҲ°еүҚйқўзҡ„javaObjectForIBinderеҮҪж•°дёӯпјҢдёӢйқўиҝҷж®өд»Јз Ғпјҡ
    if (val->checkSubclass(&gBinderOffsets)) {
        // One of our own!
        jobject object = static_cast<JavaBBinder*>(val.get())->object();
        //printf("objectForBinder %p: it's our own %p!\n", val.get(), object);
        return object;
    }
еүҚйқўиҜҙиҝҮпјҢиҝҷйҮҢдј иҝӣжқҘзҡ„еҸӮж•°жҳҜдёҖдёӘBpBinderзҡ„жҢҮй’ҲпјҢиҖҢBpBinder::checkSubclass继жүҝдәҺзҲ¶зұ»IBinder::checkSubclassпјҢе®ғд»Җд№Ҳд№ҹдёҚеҒҡе°ұиҝ”еӣһfalseгҖӮ
дәҺжҳҜеҮҪ数继з»ӯеҫҖдёӢжү§иЎҢпјҡ
jobject object = (jobject)val->findObject(&gBinderProxyOffsets);з”ұдәҺиҝҷдёӘBpBinderеҜ№иұЎжҳҜ第дёҖеҲӣе»әпјҢе®ғйҮҢйқўд»Җд№ҲеҜ№иұЎд№ҹжІЎжңүпјҢеӣ жӯӨпјҢиҝҷйҮҢиҝ”еӣһзҡ„objectдёәNULLгҖӮ
дәҺжҳҜеҮҪж•°еҸҲ继з»ӯеҫҖдёӢжү§иЎҢпјҡ
object = env->NewObject(gBinderProxyOffsets.mClass, gBinderProxyOffsets.mConstructor);иҝҷйҮҢпјҢе°ұеҲӣе»әдәҶдёҖдёӘBinderProxyеҜ№иұЎдәҶгҖӮеҲӣе»әдәҶд№ӢеҗҺпјҢиҰҒжҠҠиҝҷдёӘBpBinderеҜ№иұЎе’ҢиҝҷдёӘBinderProxyеҜ№иұЎе…іиҒ”иө·жқҘпјҡ
env->SetIntField(object, gBinderProxyOffsets.mObject, (int)val.get());е°ұжҳҜйҖҡиҝҮBinderProxy.mObjectжҲҗе‘ҳеҸҳйҮҸжқҘе…іиҒ”зҡ„дәҶпјҢBinderProxy.mObjectжҲҗе‘ҳеҸҳйҮҸи®°еҪ•дәҶиҝҷдёӘBpBinderеҜ№иұЎзҡ„ең°еқҖгҖӮ
жҺҘдёӢеҺ»пјҢиҝҳиҰҒжҠҠе®ғж”ҫеҲ°BpBinderйҮҢйқўеҺ»пјҢдёӢж¬Ўе°ұиҰҒдҪҝз”Ёж—¶пјҢе°ұеҸҜд»ҘеңЁдёҠдёҖжӯҘи°ғз”ЁBpBinder::findObjжҠҠе®ғжүҫеӣһжқҘдәҶпјҡ
val->attachObject(&gBinderProxyOffsets, refObject,
                jnienv_to_javavm(env), proxy_cleanup);
жңҖеҗҺпјҢе°ұжҠҠиҝҷдёӘBinderProxyиҝ”еӣһеҲ°android_os_BinderInternal_getContextObjectеҮҪж•°пјҢжңҖз»Ҳиҝ”еӣһеҲ°жңҖејҖе§Ӣзҡ„ServiceManager.getIServiceManagerеҮҪж•°дёӯжқҘдәҶпјҢдәҺжҳҜпјҢжҲ‘们е°ұиҺ·еҫ—дёҖдёӘBinderProxyеҜ№иұЎдәҶгҖӮ
еӣһеҲ°ServiceManager.getIServiceManagerдёӯпјҢд»ҺдёӢйқўиҜӯеҸҘиҝ”еӣһпјҡ
sServiceManager = ServiceManagerNative.asInterface(BinderInternal.getContextObject());
зӣёеҪ“дәҺжҳҜпјҡ
sServiceManager = ServiceManagerNative.asInterface(new BinderProxy());
жҺҘдёӢеҺ»е°ұжҳҜи°ғз”ЁServiceManagerNative.asInterfaceеҮҪж•°дәҶпјҢиҝҷдёӘеҮҪж•°е®ҡд№үеңЁframeworks/base/core/java/android/os/ServiceManagerNative.javaж–Ү件дёӯпјҡ
public abstract class ServiceManagerNative ......
{
	......
	static public IServiceManager asInterface(IBinder obj)
	{
		if (obj == null) {
			return null;
		}
		IServiceManager in =
			(IServiceManager)obj.queryLocalInterface(descriptor);
		if (in != null) {
			return in;
		}

		return new ServiceManagerProxy(obj);
	}
	......
}
иҝҷйҮҢзҡ„еҸӮж•°objжҳҜдёҖдёӘBinderProxyеҜ№иұЎпјҢе®ғзҡ„queryLocalInterfaceеҮҪж•°иҝ”еӣһnullгҖӮеӣ жӯӨпјҢжңҖз»Ҳд»ҘиҝҷдёӘBinderProxyеҜ№иұЎдёәеҸӮж•°еҲӣе»әдёҖдёӘServiceManagerProxyеҜ№иұЎгҖӮ
иҝ”еӣһеҲ°ServiceManager.getIServiceManagerдёӯпјҢд»ҺдёӢйқўиҜӯеҸҘиҝ”еӣһпјҡ
sServiceManager = ServiceManagerNative.asInterface(new BinderProxy());
е°ұзӣёеҪ“дәҺжҳҜпјҡ
sServiceManager = new ServiceManagerProxy(new BinderProxy());дәҺжҳҜпјҢжҲ‘们зҡ„зӣ®ж Үз»ҲдәҺе®ҢжҲҗдәҶгҖӮ
жҖ»з»“дёҖдёӢпјҢе°ұжҳҜеңЁJavaеұӮпјҢжҲ‘们жӢҘжңүдәҶдёҖдёӘService ManagerиҝңзЁӢжҺҘеҸЈServiceManagerProxyпјҢиҖҢиҝҷдёӘServiceManagerProxyеҜ№иұЎеңЁJNIеұӮжңүдёҖдёӘеҸҘжҹ„еҖјдёә0зҡ„BpBinderеҜ№иұЎдёҺд№ӢйҖҡиҝҮgBinderProxyOffsetsе…іиҒ”иө·жқҘгҖӮ
иҝҷж ·иҺ·еҸ–Service Managerзҡ„JavaиҝңзЁӢжҺҘеҸЈзҡ„иҝҮзЁӢе°ұе®ҢжҲҗдәҶгҖӮ
дәҢ.HelloServiceжҺҘеҸЈзҡ„е®ҡд№ү
еүҚйқўжҲ‘们еңЁеӯҰд№ Androidзі»з»ҹзҡ„硬件жҠҪиұЎеұӮпјҲHALпјүж—¶пјҢеңЁеңЁUbuntuдёҠдёәAndroidзі»з»ҹзҡ„Application FrameworksеұӮеўһеҠ 硬件и®ҝй—®жңҚеҠЎиҝҷзҜҮж–Үз« дёӯпјҢжҲ‘们编еҶҷдәҶдёҖдёӘ硬件жңҚеҠЎHelloServiceпјҢе®ғзҡ„жңҚеҠЎжҺҘеҸЈе®ҡд№үеңЁframeworks/base/core/java/android/os/IHelloService.aidlж–Ү件дёӯпјҡ
package android.os;

interface IHelloService
{
	void setVal(int val);
	int getVal();
}
иҝҷдёӘжңҚеҠЎжҺҘеҸЈеҫҲз®ҖеҚ•пјҢеҸӘжңүдёӨдёӘеҮҪж•°пјҢеҲҶеҲ«з”ЁжқҘиҜ»еҶҷ硬件еҜ„еӯҳеҷЁгҖӮ
жіЁж„ҸпјҢиҝҷжҳҜдёҖдёӘaidlж–Ү件пјҢзј–иҜ‘еҗҺдјҡз”ҹжҲҗдёҖдёӘIHelloService.javaгҖӮжҲ‘们жқҘзңӢдёҖдёӢиҝҷдёӘж–Ү件зҡ„еҶ…е®№йҡҗи—ҸзқҖд»Җд№ҲеҘҘз§ҳпјҢеҸҜд»Ҙиҝҷд№ҲзҘһеҘҮең°ж”ҜжҢҒиҝӣзЁӢй—ҙйҖҡдҝЎгҖӮ
/*
 * This file is auto-generated.  DO NOT MODIFY.
 * Original file: frameworks/base/core/java/android/os/IHelloService.aidl
 */
package android.os;
public interface IHelloService extends android.os.IInterface
{
	/** Local-side IPC implementation stub class. */
	public static abstract class Stub extends android.os.Binder implements android.os.IHelloService
	{
		private static final java.lang.String DESCRIPTOR = "android.os.IHelloService";
		/** Construct the stub at attach it to the interface. */
		public Stub()
		{
			this.attachInterface(this, DESCRIPTOR);
		}

		/**
		* Cast an IBinder object into an android.os.IHelloService interface,
		* generating a proxy if needed.
		*/
		public static android.os.IHelloService asInterface(android.os.IBinder obj)
		{
			if ((obj==null)) {
				return null;
			}
			android.os.IInterface iin = (android.os.IInterface)obj.queryLocalInterface(DESCRIPTOR);
			if (((iin!=null)&&(iin instanceof android.os.IHelloService))) {
				return ((android.os.IHelloService)iin);
			}
			return new android.os.IHelloService.Stub.Proxy(obj);
		}

		public android.os.IBinder asBinder()
		{
			return this;
		}

		@Override
		public boolean onTransact(int code, android.os.Parcel data, android.os.Parcel reply, int flags) throws android.os.RemoteException
		{
			switch (code)
			{
				case INTERFACE_TRANSACTION:
				{
					reply.writeString(DESCRIPTOR);
					return true;
				}
				case TRANSACTION_setVal:
				{
					data.enforceInterface(DESCRIPTOR);
					int _arg0;
					_arg0 = data.readInt();
					this.setVal(_arg0);
					reply.writeNoException();
					return true;
				}
				case TRANSACTION_getVal:
				{
					data.enforceInterface(DESCRIPTOR);
					int _result = this.getVal();
					reply.writeNoException();
					reply.writeInt(_result);
					return true;
				}
			}
			return super.onTransact(code, data, reply, flags);
		}

		private static class Proxy implements android.os.IHelloService
		{
			private android.os.IBinder mRemote;

			Proxy(android.os.IBinder remote)
			{
				mRemote = remote;
			}

			public android.os.IBinder asBinder()
			{
				return mRemote;
			}

			public java.lang.String getInterfaceDescriptor()
			{
				return DESCRIPTOR;
			}

			public void setVal(int val) throws android.os.RemoteException
			{
				android.os.Parcel _data = android.os.Parcel.obtain();
				android.os.Parcel _reply = android.os.Parcel.obtain();
				try {
					_data.writeInterfaceToken(DESCRIPTOR);
					_data.writeInt(val);
					mRemote.transact(Stub.TRANSACTION_setVal, _data, _reply, 0);
					_reply.readException();
				}
				finally {
					_reply.recycle();
					_data.recycle();
				}
			}

			public int getVal() throws android.os.RemoteException
			{
				android.os.Parcel _data = android.os.Parcel.obtain();
				android.os.Parcel _reply = android.os.Parcel.obtain();
				int _result;
				try {
					_data.writeInterfaceToken(DESCRIPTOR);
					mRemote.transact(Stub.TRANSACTION_getVal, _data, _reply, 0);
					_reply.readException();
					_result = _reply.readInt();
				}
				finally {
					_reply.recycle();
					_data.recycle();
				}
				return _result;
			}
		}

		static final int TRANSACTION_setVal = (android.os.IBinder.FIRST_CALL_TRANSACTION + 0);
		static final int TRANSACTION_getVal = (android.os.IBinder.FIRST_CALL_TRANSACTION + 1);
	}

	public void setVal(int val) throws android.os.RemoteException;
	public int getVal() throws android.os.RemoteException;
}
иҝҷйҮҢжҲ‘们еҸҜд»ҘзңӢеҲ°IHelloService.aidlиҝҷдёӘж–Ү件编иҜ‘еҗҺзҡ„зңҹйқўзӣ®пјҢеҺҹжқҘе°ұжҳҜж №жҚ®IHelloServiceжҺҘеҸЈзҡ„е®ҡд№үз”ҹжҲҗзӣёеә”зҡ„Stubе’ҢProxyзұ»пјҢиҝҷдёӘе°ұжҳҜжҲ‘们зҶҹжӮүзҡ„BinderжңәеҲ¶зҡ„еҶ…е®№дәҶпјҢеҚіе®һзҺ°иҝҷдёӘHelloServiceзҡ„Serverеҝ…须继з»ӯдәҺиҝҷйҮҢзҡ„IHelloService.Stubзұ»пјҢиҖҢиҝҷдёӘHelloServiceзҡ„иҝңзЁӢжҺҘеҸЈе°ұжҳҜиҝҷйҮҢзҡ„IHelloService.Stub.ProxyеҜ№иұЎиҺ·еҫ—зҡ„IHelloServiceжҺҘеҸЈгҖӮжҺҘдёӢжқҘзҡ„еҶ…е®№пјҢжҲ‘们е°ұеҸҜд»ҘзңӢеҲ°IHelloService.Stubе’ҢIHelloService.Stub.ProxyжҳҜжҖҺд№ҲеҲӣе»әжҲ–иҖ…дҪҝз”Ёзҡ„гҖӮ
дёү.HelloServiceзҡ„еҗҜеҠЁиҝҮзЁӢ
еңЁи®Ёи®әHelloServiceзҡ„еҗҜеҠЁиҝҮзЁӢд№ӢеүҚпјҢжҲ‘们е…ҲжқҘзңӢдёҖдёӢе®һзҺ°HelloServiceжҺҘеҸЈзҡ„ServerжҳҜжҖҺд№Ҳе®ҡд№үзҡ„гҖӮ
еӣһеҝҶеңЁUbuntuдёҠдёәAndroidзі»з»ҹзҡ„Application FrameworksеұӮеўһеҠ 硬件и®ҝй—®жңҚеҠЎдёҖж–ҮпјҢжҲ‘们еңЁframeworks/base/services/java/com/android/serverзӣ®еҪ•дёӢж–°еўһдәҶдёҖдёӘHelloService.javaж–Ү件пјҡ
package com.android.server;

import android.content.Context;
import android.os.IHelloService;
import android.util.Slog;

public class HelloService extends IHelloService.Stub {
	private static final String TAG = "HelloService";

	HelloService() {
		init_native();
	}

	public void setVal(int val) {
		setVal_native(val);
	}

	public int getVal() {
		return getVal_native();
	}

	private static native boolean init_native();
    	private static native void setVal_native(int val);
	private static native int getVal_native();
}
иҝҷйҮҢпјҢжҲ‘们еҸҜд»ҘзңӢеҲ°пјҢHelloService继з»ӯдәҶIHelloService.Stubзұ»пјҢе®ғйҖҡиҝҮжң¬ең°ж–№жі•и°ғз”Ёе®һзҺ°дәҶgetValе’ҢsetValдёӨдёӘеҮҪж•°гҖӮжҲ‘们дёҚе…іеҝғиҝҷдёӨдёӘеҮҪж•°зҡ„е…·дҪ“е®һзҺ°пјҢжңүе…ҙи¶Јзҡ„иҜ»иҖ…еҸҜд»ҘеҸӮиҖғеңЁUbuntuдёҠдёәAndroidзі»з»ҹзҡ„Application FrameworksеұӮеўһеҠ 硬件и®ҝй—®жңҚеҠЎдёҖж–ҮгҖӮ
жңүдәҶHelloServiceиҝҷдёӘServerзұ»еҗҺпјҢдёӢдёҖжӯҘе°ұжҳҜиҖғиҷ‘жҖҺд№Ҳж ·жҠҠе®ғеҗҜеҠЁиө·жқҘдәҶгҖӮеңЁframeworks/base/services/java/com/android/server/SystemServer.javaж–Ү件дёӯпјҢе®ҡд№үдәҶSystemServerзұ»гҖӮSystemServerеҜ№иұЎжҳҜеңЁзі»з»ҹеҗҜеҠЁзҡ„ж—¶еҖҷеҲӣе»әзҡ„пјҢе®ғиў«еҲӣе»әзҡ„ж—¶еҖҷдјҡеҗҜеҠЁдёҖдёӘзәҝзЁӢжқҘеҲӣе»әHelloServiceпјҢ并且жҠҠе®ғж·»еҠ еҲ°Service ManagerдёӯеҺ»гҖӮ
жҲ‘们жқҘзңӢдёҖдёӢиҝҷйғЁд»Ҫзҡ„д»Јз Ғпјҡ
class ServerThread extends Thread {
	......

	@Override
	public void run() {

		......

		Looper.prepare();

		......

		try {
			Slog.i(TAG, "Hello Service");
			ServiceManager.addService("hello", new HelloService());
		} catch (Throwable e) {
			Slog.e(TAG, "Failure starting Hello Service", e);
		}

		......

		Looper.loop();

		......
	}
}

......

public class SystemServer
{
	......

	/**
	* This method is called from Zygote to initialize the system. This will cause the native
	* services (SurfaceFlinger, AudioFlinger, etc..) to be started. After that it will call back
	* up into init2() to start the Android services.
	*/
	native public static void init1(String[] args);

	......

	public static final void init2() {
		Slog.i(TAG, "Entered the Android system server!");
		Thread thr = new ServerThread();
		thr.setName("android.server.ServerThread");
		thr.start();
	}
	......
}
иҝҷйҮҢпјҢжҲ‘们еҸҜд»ҘзңӢеҲ°пјҢеңЁServerThread.runеҮҪж•°дёӯпјҢжү§иЎҢдәҶдёӢйқўд»Јз ҒжҠҠHelloServiceж·»еҠ еҲ°Service ManagerдёӯеҺ»гҖӮиҝҷйҮҢжҲ‘们关注жҠҠHelloServiceж·»еҠ еҲ°Service ManagerдёӯеҺ»зҡ„д»Јз Ғпјҡ
try {
	Slog.i(TAG, "Hello Service");
	ServiceManager.addService("hello", new HelloService());
} catch (Throwable e) {
	Slog.e(TAG, "Failure starting Hello Service", e);
}
йҖҡиҝҮи°ғз”ЁServiceManager.addServiceжҠҠдёҖдёӘHelloServiceе®һдҫӢж·»еҠ еҲ°Service ManagerдёӯеҺ»гҖӮ
жҲ‘们е…ҲжқҘзңӢдёҖдёӢHelloServiceзҡ„еҲӣе»әиҝҮзЁӢпјҡ
new HelloService();
иҝҷдёӘиҜӯеҸҘдјҡи°ғз”ЁHelloServiceзұ»зҡ„жһ„йҖ еҮҪж•°пјҢиҖҢHelloServiceзұ»з»§жүҝдәҺIHelloService.Stubзұ»пјҢIHelloService.Stubзұ»еҸҲ继жүҝдәҶBinderзұ»пјҢеӣ жӯӨпјҢжңҖеҗҺдјҡи°ғз”ЁBinderзұ»зҡ„жһ„йҖ еҮҪж•°пјҡ
public class Binder implements IBinder {
	......

	private int mObject;

	......


	public Binder() {
		init();
		......
	}


	private native final void init();


	......
}
иҝҷйҮҢи°ғз”ЁдәҶдёҖдёӘJNIж–№жі•initжқҘеҲқе§ӢеҢ–иҝҷдёӘBinderеҜ№иұЎпјҢиҝҷдёӘJNIж–№жі•е®ҡд№үеңЁframeworks/base/core/jni/android_util_Binder.cppж–Ү件дёӯпјҡ
static void android_os_Binder_init(JNIEnv* env, jobject clazz)
{
    JavaBBinderHolder* jbh = new JavaBBinderHolder(env, clazz);
    if (jbh == NULL) {
        jniThrowException(env, "java/lang/OutOfMemoryError", NULL);
        return;
    }
    LOGV("Java Binder %p: acquiring first ref on holder %p", clazz, jbh);
    jbh->incStrong(clazz);
    env->SetIntField(clazz, gBinderOffsets.mObject, (int)jbh);
} е®ғе®һйҷ…дёҠеҸӘеҒҡдәҶдёҖ件дәӢжғ…пјҢе°ұжҳҜеҲӣе»әдёҖдёӘJavaBBinderHolderеҜ№иұЎjbhпјҢ然еҗҺжҠҠиҝҷдёӘеҜ№иұЎзҡ„ең°еқҖдҝқеӯҳеңЁдёҠйқўзҡ„Binderзұ»зҡ„mObjectжҲҗе‘ҳеҸҳйҮҸдёӯпјҢеҗҺйқўжҲ‘们дјҡз”ЁеҲ°гҖӮеӣһеҲ°ServerThread.runеҮҪж•°дёӯпјҢжҲ‘们еҶҚжқҘзңӢдёҖдёӢServiceManager.addServiceеҮҪж•°зҡ„е®һзҺ°пјҡ
public final class ServiceManager {
	......

	private static IServiceManager sServiceManager;

	......

	public static void addService(String name, IBinder service) {
		try {
			getIServiceManager().addService(name, service);
		} catch (RemoteException e) {
			Log.e(TAG, "error in addService", e);
		}
	}

	......

}
иҝҷйҮҢзҡ„getIServiceManagerеҮҪж•°жҲ‘们еңЁеүҚйқўе·Із»ҸеҲҶжһҗиҝҮдәҶпјҢе®ғиҝ”еӣһзҡ„жҳҜдёҖдёӘServiceManagerProxyеҜ№иұЎзҡ„IServiceManagerжҺҘеҸЈгҖӮеӣ жӯӨпјҢжҲ‘们иҝӣе…ҘеҲ°ServiceManagerProxy.addServiceдёӯеҺ»зңӢзңӢпјҡ
class ServiceManagerProxy implements IServiceManager {
	public ServiceManagerProxy(IBinder remote) {
		mRemote = remote;
	}

	......

	public void addService(String name, IBinder service)
		throws RemoteException {
			Parcel data = Parcel.obtain();
			Parcel reply = Parcel.obtain();
			data.writeInterfaceToken(IServiceManager.descriptor);
			data.writeString(name);
			data.writeStrongBinder(service);
			mRemote.transact(ADD_SERVICE_TRANSACTION, data, reply, 0);
			reply.recycle();
			data.recycle();
	}

	......

	private IBinder mRemote;
}
иҝҷйҮҢзҡ„Parcelзұ»жҳҜз”ЁJavaжқҘе®һзҺ°зҡ„пјҢе®ғи·ҹжҲ‘们еүҚйқўеҮ зҜҮж–Үз« д»Ӣз»ҚBinderжңәеҲ¶ж—¶жҸҗеҲ°зҡ„з”ЁC++е®һзҺ°зҡ„Parcelзұ»зҡ„дҪңз”ЁжҳҜдёҖж ·зҡ„пјҢеҚіз”ЁжқҘеңЁдёӨдёӘиҝӣзЁӢд№Ӣй—ҙдј йҖ’ж•°жҚ®гҖӮ
иҝҷйҮҢжҲ‘们关注жҳҜеҰӮдҪ•жҠҠеҸӮж•°serviceеҶҷеҲ°dataиҝҷдёӘParcelеҜ№иұЎдёӯеҺ»зҡ„пјҡ
data.writeStrongBinder(service);
жҲ‘们жқҘзңӢзңӢParcel.writeStrongBinderеҮҪж•°зҡ„е®һзҺ°пјҡ
public final class Parcel {
	......

	/**
	* Write an object into the parcel at the current dataPosition(),
	* growing dataCapacity() if needed.
	*/
	public final native void writeStrongBinder(IBinder val);

	......
}
иҝҷйҮҢзҡ„writeStrongBinderеҮҪж•°еҸҲжҳҜдёҖдёӘJNIж–№жі•пјҢе®ғе®ҡд№үеңЁframeworks/base/core/jni/android_util_Binder.cppж–Ү件дёӯпјҡ
static void android_os_Parcel_writeStrongBinder(JNIEnv* env, jobject clazz, jobject object)
{
    Parcel* parcel = parcelForJavaObject(env, clazz);
    if (parcel != NULL) {
        const status_t err = parcel->writeStrongBinder(ibinderForJavaObject(env, object));
        if (err != NO_ERROR) {
            jniThrowException(env, "java/lang/OutOfMemoryError", NULL);
        }
    }
} иҝҷйҮҢзҡ„clazzеҸӮж•°жҳҜдёҖдёӘJavaиҜӯиЁҖе®һзҺ°зҡ„ParcelеҜ№иұЎпјҢйҖҡиҝҮparcelForJavaObjectжҠҠе®ғиҪ¬жҚўжҲҗC++иҜӯиЁҖе®һзҺ°зҡ„ParcelеҜ№иұЎгҖӮиҝҷдёӘеҮҪж•°зҡ„е®һзҺ°жҲ‘们е°ұдёҚзңӢдәҶпјҢжңүе…ҙи¶Јзҡ„иҜ»иҖ…еҸҜд»Ҙз ”з©¶дёҖдёӢпјҢиҝҷдёӘеҮҪж•°д№ҹжҳҜе®һзҺ°еңЁframeworks/base/core/jni/android_util_Binder.cppиҝҷдёӘж–Ү件дёӯгҖӮиҝҷйҮҢзҡ„objectеҸӮж•°жҳҜдёҖдёӘJavaиҜӯиЁҖе®һзҺ°зҡ„BinderеҜ№иұЎпјҢеңЁи°ғз”ЁC++иҜӯиЁҖе®һзҺ°зҡ„Parcel::writeStrongBinderжҠҠиҝҷдёӘеҜ№иұЎеҶҷе…ҘеҲ°parcelеҜ№иұЎж—¶пјҢйҰ–е…ҲйҖҡиҝҮibinderForJavaObjectеҮҪж•°жҠҠиҝҷдёӘJavaиҜӯиЁҖе®һзҺ°зҡ„BinderеҜ№иұЎиҪ¬жҚўдёәC++иҜӯиЁҖе®һзҺ°зҡ„JavaBBinderHolderеҜ№иұЎпјҡ
sp<IBinder> ibinderForJavaObject(JNIEnv* env, jobject obj)
{
    if (obj == NULL) return NULL;

    if (env->IsInstanceOf(obj, gBinderOffsets.mClass)) {
        JavaBBinderHolder* jbh = (JavaBBinderHolder*)
            env->GetIntField(obj, gBinderOffsets.mObject);
        return jbh != NULL ? jbh->get(env) : NULL;
    }

    if (env->IsInstanceOf(obj, gBinderProxyOffsets.mClass)) {
        return (IBinder*)
            env->GetIntField(obj, gBinderProxyOffsets.mObject);
    }

    LOGW("ibinderForJavaObject: %p is not a Binder object", obj);
    return NULL;
}
жҲ‘们зҹҘйҒ“пјҢиҝҷйҮҢзҡ„objеҸӮж•°жҳҜдёҖдёӘBinderзұ»зҡ„е®һдҫӢпјҢеӣ жӯӨпјҢиҝҷйҮҢдјҡиҝӣе…ҘеҲ°з¬¬дёҖдёӘifиҜӯеҸҘдёӯеҺ»гҖӮ
еңЁеүҚйқўеҲӣе»әHelloServiceеҜ№иұЎпјҢжӣҫз»ҸеңЁи°ғз”ЁеҲ°HelloServiceзҡ„зҲ¶зұ»BinderдёӯпјҢжӣҫз»ҸеңЁJNIеұӮеҲӣе»әдәҶдёҖдёӘJavaBBinderHolderеҜ№иұЎпјҢ然еҗҺжҠҠиҝҷдёӘеҜ№иұЎзҡ„ең°еқҖдҝқеӯҳеңЁBinderзұ»зҡ„mObjectжҲҗе‘ҳеҸҳйҮҸдёӯпјҢеӣ жӯӨпјҢиҝҷйҮҢжҠҠobjеҜ№иұЎзҡ„mObjectжҲҗе‘ҳеҸҳйҮҸејәеҲ¶иҪ¬дёәJavaBBinderHolderеҜ№иұЎгҖӮ
еҲ°дәҶиҝҷйҮҢпјҢиҝҷдёӘеҮҪж•°зҡ„еҠҹиҜҫиҝҳжңӘе®ҢжҲҗпјҢиҝҳеү©дёӢжңҖеҗҺе…ій”®зҡ„дёҖжӯҘпјҡ
return jbh != NULL ? jbh->get(env) : NULL;
иҝҷйҮҢе°ұжҳҜjbh->getиҝҷдёӘиҜӯеҸҘдәҶгҖӮ
еңЁJavaBBinderHolderзұ»дёӯпјҢжңүдёҖдёӘжҲҗе‘ҳеҸҳйҮҸmBinderпјҢе®ғзҡ„зұ»еһӢдёәJavaBBinderпјҢиҖҢJavaBBinderзұ»з»§жүҝдәҺBBinderзұ»гҖӮеңЁеүҚйқўеӯҰд№ BinderжңәеҲ¶зҡ„C++иҜӯиЁҖе®һзҺ°ж—¶пјҢжҲ‘们еңЁAndroidзі»з»ҹиҝӣзЁӢй—ҙйҖҡдҝЎпјҲIPCпјүжңәеҲ¶Binderдёӯзҡ„ServerеҗҜеҠЁиҝҮзЁӢжәҗд»Јз ҒеҲҶжһҗиҝҷзҜҮж–Үз« дёӯпјҢжӣҫз»Ҹд»Ӣз»ҚиҝҮпјҢIPCThreadStateзұ»иҙҹиҙЈдёҺBinderй©ұеҠЁзЁӢеәҸиҝӣиЎҢдәӨдә’пјҢе®ғжҠҠд»ҺBinderй©ұеҠЁзЁӢеәҸиҜ»еҮәжқҘзҡ„иҜ·жұӮдҪңз®ҖеҚ•зҡ„еӨ„зҗҶеҗҺпјҢжңҖеҗҺжҠҠиҝҷдёӘиҜ·жұӮжү”з»ҷBBinderзҡ„onTransactеҮҪж•°жқҘиҝӣдёҖжӯҘеӨ„зҗҶгҖӮ
иҝҷйҮҢпјҢжҲ‘们е°ұжҳҜиҰҒжҠҠJavaBBinderHolderйҮҢйқўзҡ„JavaBBinderзұ»еһӢBinderе®һдҪ“ж·»еҠ еҲ°Service ManagerдёӯеҺ»пјҢд»ҘдҫҝдҪҝеҫ—иҝҷдёӘHelloServiceжңүClientжқҘиҜ·жұӮжңҚеҠЎж—¶пјҢз”ұBinderй©ұеҠЁзЁӢеәҸжқҘе”ӨйҶ’иҝҷдёӘServerзәҝзЁӢпјҢиҝӣиҖҢи°ғз”ЁиҝҷдёӘJavaBBinderзұ»еһӢBinderе®һдҪ“зҡ„onTransactеҮҪж•°жқҘиҝӣдёҖжӯҘеӨ„зҗҶпјҢиҝҷдёӘеҮҪж•°жҲ‘们еңЁеҗҺйқўдјҡ继з»ӯд»Ӣз»ҚгҖӮ
е…ҲжқҘзңӢдёҖдёӢJavaBBinderHolder::getеҮҪж•°зҡ„е®һзҺ°пјҡ
class JavaBBinderHolder : public RefBase
{
	......

	JavaBBinderHolder(JNIEnv* env, jobject object)
		: mObject(object)
	{
		......
	}

	......

	sp<JavaBBinder> get(JNIEnv* env)
	{
		AutoMutex _l(mLock);
		sp<JavaBBinder> b = mBinder.promote();
		if (b == NULL) {
			b = new JavaBBinder(env, mObject);
			mBinder = b;
			......
		}

		return b;
	}

	......

	jobject         mObject;
	wp<JavaBBinder> mBinder;
};
иҝҷйҮҢжҳҜ第дёҖж¬Ўи°ғз”ЁgetеҮҪж•°пјҢеӣ жӯӨпјҢдјҡеҲӣе»әдёҖдёӘJavaBBinderеҜ№иұЎпјҢ并且дҝқеӯҳеңЁmBinderжҲҗе‘ҳеҸҳйҮҸдёӯгҖӮжіЁж„ҸпјҢиҝҷйҮҢзҡ„mObjectе°ұжҳҜдёҠйқўеҲӣе»әзҡ„HelloServiceеҜ№иұЎдәҶпјҢиҝҷжҳҜдёҖдёӘJavaеҜ№иұЎгҖӮиҝҷдёӘHelloServiceеҜ№иұЎжңҖз»Ҳд№ҹдјҡдҝқеӯҳеңЁJavaBBinderеҜ№иұЎзҡ„жҲҗе‘ҳеҸҳйҮҸmObjectдёӯгҖӮ
еӣһеҲ°android_os_Parcel_writeStrongBinderеҮҪж•°дёӯпјҢдёӢйқўиҝҷдёӘиҜӯеҸҘпјҡ
const status_t err = parcel->writeStrongBinder(ibinderForJavaObject(env, object));зӣёеҪ“дәҺжҳҜпјҡ
const status_t err = parcel->writeStrongBinder((JavaBBinderHodler*)(obj.mObject));еӣ жӯӨпјҢиҝҷйҮҢзҡ„ж•ҲжһңзӣёеҪ“дәҺжҳҜеҶҷе…ҘдәҶдёҖдёӘJavaBBinderзұ»еһӢзҡ„Binderе®һдҪ“еҲ°parcelдёӯеҺ»гҖӮиҝҷдёҺжҲ‘们еүҚйқўд»Ӣз»Қзҡ„BinderжңәеҲ¶зҡ„C++е®һзҺ°жҳҜдёҖиҮҙзҡ„гҖӮ
жҺҘзқҖпјҢеҶҚеӣһеҲ°ServiceManagerProxy.addServiceиҝҷдёӘеҮҪж•°дёӯпјҢжңҖеҗҺе®ғйҖҡиҝҮе…¶жҲҗе‘ҳеҸҳйҮҸmRemoteжқҘжү§иЎҢиҝӣзЁӢй—ҙйҖҡдҝЎж“ҚдҪңгҖӮеүҚйқўжҲ‘们еңЁд»Ӣз»ҚеҰӮдҪ•иҺ·еҸ–Service ManagerиҝңзЁӢжҺҘеҸЈж—¶жҸҗеҲ°пјҢиҝҷйҮҢзҡ„mRemoteжҲҗе‘ҳеҸҳйҮҸе®һйҷ…дёҠжҳҜдёҖдёӘBinderProxyеҜ№иұЎпјҢеӣ жӯӨпјҢжҲ‘们еҶҚжқҘзңӢзңӢBinderProxy.transactеҮҪж•°зҡ„е®һзҺ°пјҡ
final class BinderProxy implements IBinder {
	......

	public native boolean transact(int code, Parcel data, Parcel reply,
								int flags) throws RemoteException;

	......
}
иҝҷйҮҢзҡ„transactжҲҗе‘ҳеҮҪж•°еҸҲжҳҜдёҖдёӘJNIж–№жі•пјҢе®ғе®ҡд№үеңЁframeworks/base/core/jni/android_util_Binder.cppж–Ү件дёӯпјҡ
static jboolean android_os_BinderProxy_transact(JNIEnv* env, jobject obj,
						jint code, jobject dataObj,
						jobject replyObj, jint flags)
{
	......

	Parcel* data = parcelForJavaObject(env, dataObj);
	if (data == NULL) {
		return JNI_FALSE;
	}
	Parcel* reply = parcelForJavaObject(env, replyObj);
	if (reply == NULL && replyObj != NULL) {
		return JNI_FALSE;
	}

	IBinder* target = (IBinder*)
		env->GetIntField(obj, gBinderProxyOffsets.mObject);
	if (target == NULL) {
		jniThrowException(env, "java/lang/IllegalStateException", "Binder has been finalized!");
		return JNI_FALSE;
	}

	......

	status_t err = target->transact(code, *data, reply, flags);

	......

	if (err == NO_ERROR) {
		return JNI_TRUE;
	} else if (err == UNKNOWN_TRANSACTION) {
		return JNI_FALSE;
	}

	signalExceptionForError(env, obj, err);
	return JNI_FALSE;
}
иҝҷйҮҢдј иҝӣжқҘзҡ„еҸӮж•°dataObjе’ҢreplyObjжҳҜдёҖдёӘJavaжҺҘеҸЈе®һзҺ°зҡ„Parcelзұ»пјҢз”ұдәҺиҝҷйҮҢжҳҜJNIеұӮпјҢйңҖиҰҒжҠҠе®ғиҪ¬жҚўдёәC++е®һзҺ°зҡ„Parcelзұ»пјҢе®ғ们е°ұжҳҜйҖҡиҝҮжҲ‘们еүҚйқўиҜҙзҡ„parcelForJavaObjectеҮҪж•°иҝӣиЎҢиҪ¬жҚўзҡ„гҖӮ
еүҚйқўжҲ‘们еңЁеҲҶжһҗеҰӮдҪ•иҺ·еҸ–Service ManagerиҝңзЁӢжҺҘеҸЈж—¶пјҢжӣҫз»ҸиҜҙеҲ°пјҢеңЁJNIеұӮдёӯпјҢеҲӣе»әдәҶдёҖдёӘBpBinderеҜ№иұЎпјҢе®ғзҡ„еҸҘжҹ„еҖјдёә0пјҢе®ғзҡ„ең°еқҖдҝқеӯҳеңЁgBinderProxyOffsets.mObjectдёӯпјҢеӣ жӯӨпјҢиҝҷйҮҢйҖҡиҝҮдёӢйқўиҜӯеҸҘеҫ—еҲ°иҝҷдёӘBpBinderеҜ№иұЎзҡ„IBinderжҺҘеҸЈпјҡ
IBinder* target = (IBinder*)
        env->GetIntField(obj, gBinderProxyOffsets.mObject);
жңүдәҶиҝҷдёӘIBinderжҺҘеҸЈеҗҺпјҢе°ұе’ҢжҲ‘们еүҚйқўеҮ зҜҮж–Үз« д»Ӣз»ҚBinderжңәеҲ¶зҡ„C/C++е®һзҺ°дёҖиҮҙдәҶгҖӮ
жңҖеҗҺпјҢйҖҡиҝҮBpBinder::transactеҮҪж•°иҝӣе…ҘеҲ°Binderй©ұеҠЁзЁӢеәҸпјҢ然еҗҺBinderй©ұеҠЁзЁӢеәҸе”ӨйҶ’Service Managerе“Қеә”иҝҷдёӘADD_SERVICE_TRANSACTIONиҜ·жұӮпјҡ
status_t err = target->transact(code, *data, reply, flags);
е…·дҪ“еҸҜд»ҘеҸӮиҖғAndroidзі»з»ҹиҝӣзЁӢй—ҙйҖҡдҝЎпјҲIPCпјүжңәеҲ¶Binderдёӯзҡ„ServerеҗҜеҠЁиҝҮзЁӢжәҗд»Јз ҒеҲҶжһҗдёҖж–ҮгҖӮйңҖиҰҒжіЁж„Ҹзҡ„жҳҜпјҢиҝҷйҮҢзҡ„dataеҢ…еҗ«дәҶдёҖдёӘJavaBBinderHolderзұ»еһӢзҡ„Binderе®һдҪ“еҜ№иұЎпјҢе®ғе°ұд»ЈиЎЁдәҶжҲ‘们дёҠйқўеҲӣе»әзҡ„HelloServiceгҖӮService Manager收еҲ°иҝҷдёӘADD_SERVICE_TRANSACTIONиҜ·жұӮж—¶пјҢе°ұдјҡжҠҠиҝҷдёӘBinderе®һдҪ“зәіе…ҘеҲ°иҮӘе·ұеҶ…йғЁиҝӣиЎҢз®ЎзҗҶгҖӮ
иҝҷж ·пјҢе®һзҺ°HelloServiceзҡ„Serverзҡ„еҗҜеҠЁиҝҮзЁӢе°ұе®ҢжҲҗдәҶгҖӮ
еӣӣ.ClientиҺ·еҸ–HelloServiceзҡ„JavaиҝңзЁӢжҺҘеҸЈзҡ„иҝҮзЁӢ
еүҚйқўжҲ‘们еңЁеӯҰд№ Androidзі»з»ҹ硬件жҠҪиұЎеұӮпјҲHALпјүж—¶пјҢеңЁеңЁUbuntuдёҠдёәAndroidзі»з»ҹеҶ…зҪ®Javaеә”з”ЁзЁӢеәҸжөӢиҜ•Application FrameworksеұӮзҡ„硬件жңҚеҠЎиҝҷзҜҮж–Үз« дёӯпјҢжҲ‘们еҲӣе»әдәҶдёҖдёӘеә”з”ЁзЁӢеәҸпјҢиҝҷдёӘеә”з”ЁзЁӢеәҸдҪңдёәдёҖдёӘClientи§’иүІпјҢеҖҹеҠ©Service ManagerиҝҷдёӘJavaиҝңзЁӢжҺҘеҸЈжқҘиҺ·еҫ—HelloServiceзҡ„иҝңзЁӢжҺҘеҸЈпјҢиҝӣиҖҢи°ғз”ЁHelloServiceжҸҗдҫӣзҡ„жңҚеҠЎгҖӮ
жҲ‘们зңӢзңӢе®ғжҳҜеҰӮдҪ•еҖҹеҠ©Service ManagerиҝҷдёӘJavaиҝңзЁӢжҺҘеҸЈжқҘиҺ·еҫ—HelloServiceзҡ„иҝңзЁӢжҺҘеҸЈзҡ„гҖӮеңЁHelloиҝҷдёӘActivityзҡ„onCreateеҮҪж•°пјҢйҖҡиҝҮIServiceManager.getServiceеҮҪж•°жқҘиҺ·еҫ—HelloServiceзҡ„иҝңзЁӢжҺҘеҸЈпјҡ
public class Hello extends Activity implements OnClickListener {
	......

	private IHelloService helloService = null;

	......

	@Override
	public void onCreate(Bundle savedInstanceState) {

		helloService = IHelloService.Stub.asInterface(
							ServiceManager.getService("hello"));
	}

	......
}
жҲ‘们е…ҲжқҘзңӢServiceManager.getServiceзҡ„е®һзҺ°гҖӮеүҚйқўжҲ‘们иҜҙиҝҮпјҢиҝҷйҮҢе®һйҷ…дёҠжҳҜи°ғз”ЁдәҶServiceManagerProxy.getServiceеҮҪж•°пјҡ
class ServiceManagerProxy implements IServiceManager {
	public ServiceManagerProxy(IBinder remote) {
		mRemote = remote;
	}

	......

	public IBinder getService(String name) throws RemoteException {
		Parcel data = Parcel.obtain();
		Parcel reply = Parcel.obtain();
		data.writeInterfaceToken(IServiceManager.descriptor);
		data.writeString(name);
		mRemote.transact(GET_SERVICE_TRANSACTION, data, reply, 0);
		IBinder binder = reply.readStrongBinder();
		reply.recycle();
		data.recycle();
		return binder;
	}

	......

	private IBinder mRemote;
}
жңҖз»ҲйҖҡиҝҮmRemote.transactжқҘжү§иЎҢе®һйҷ…ж“ҚдҪңгҖӮжҲ‘们еңЁеүҚйқўе·Із»Ҹд»Ӣз»ҚиҝҮдәҶпјҢиҝҷйҮҢзҡ„mRemoteе®һйҷ…дёҠжҳҜдёҖдёӘBinderProxyеҜ№иұЎпјҢе®ғзҡ„transactжҲҗе‘ҳеҮҪж•°жҳҜдёҖдёӘJNIж–№жі•пјҢе®һзҺ°еңЁframeworks/base/core/jni/android_util_Binder.cppж–Ү件дёӯзҡ„android_os_BinderProxy_transactеҮҪж•°дёӯгҖӮ
иҝҷдёӘеҮҪж•°еүҚйқўжҲ‘们已з»ҸзңӢеҲ°дәҶпјҢиҝҷйҮҢе°ұдёҚеҶҚеҲ—еҮәжқҘдәҶгҖӮдёҚиҝҮпјҢеҪ“иҝҷдёӘеҮҪж•°д»Һпјҡ
status_t err = target->transact(code, *data, reply, flags);
иҝҷйҮҢзҡ„replyеҸҳйҮҸйҮҢйқўе°ұеҢ…жӢ¬дәҶдёҖдёӘHelloServiceзҡ„еј•з”ЁдәҶгҖӮжіЁж„ҸпјҢиҝҷйҮҢзҡ„replyеҸҳйҮҸе°ұжҳҜжҲ‘们еңЁServiceManagerProxy.getServiceеҮҪж•°йҮҢйқўдј иҝӣжқҘзҡ„еҸӮж•°replyпјҢе®ғжҳҜдёҖдёӘParcelеҜ№иұЎгҖӮ
еӣһеҲ°ServiceManagerProxy.getServiceеҮҪж•°дёӯпјҢд»ҺдёӢйқўиҜӯеҸҘиҝ”еӣһпјҡ
mRemote.transact(GET_SERVICE_TRANSACTION, data, reply, 0);
жҺҘзқҖпјҢе°ұйҖҡиҝҮдёӢйқўиҜӯеҸҘе°ҶиҝҷдёӘHelloServiceзҡ„еј•з”ЁиҜ»еҮәжқҘпјҡ
IBinder binder = reply.readStrongBinder();
жҲ‘们зңӢзңӢParcel.readStrongBinderзҡ„е®һзҺ°пјҡ
public final class Parcel {
	......

	/**
	* Read an object from the parcel at the current dataPosition().
	*/
	public final native IBinder readStrongBinder();

	......
}
е®ғд№ҹжҳҜдёҖдёӘJNIж–№жі•пјҢе®һзҺ°еңЁframeworks/base/core/jni/android_util_Binder.cppж–Ү件дёӯпјҡ
static jobject android_os_Parcel_readStrongBinder(JNIEnv* env, jobject clazz)
{
    Parcel* parcel = parcelForJavaObject(env, clazz);
    if (parcel != NULL) {
        return javaObjectForIBinder(env, parcel->readStrongBinder());
    }
    return NULL;
}
иҝҷйҮҢйҰ–е…ҲжҠҠJavaиҜӯиЁҖе®һзҺ°зҡ„ParcelеҜ№иұЎclassиҪ¬жҚўжҲҗC++иҜӯиЁҖе®һзҺ°зҡ„ParcelеҜ№иұЎparcelпјҢжҺҘзқҖпјҢйҖҡиҝҮparcel->readStrongBinderеҮҪж•°жқҘиҺ·еҫ—дёҖдёӘBinderеј•з”ЁгҖӮ
жҲ‘们еңЁеүҚйқўеӯҰд№ BinderжңәеҲ¶ж—¶пјҢеңЁAndroidзі»з»ҹиҝӣзЁӢй—ҙйҖҡдҝЎпјҲIPCпјүжңәеҲ¶Binderдёӯзҡ„ClientиҺ·еҫ—ServerиҝңзЁӢжҺҘеҸЈиҝҮзЁӢжәҗд»Јз ҒеҲҶжһҗиҝҷзҜҮж–Үз« дёӯпјҢжӣҫз»ҸеҲҶжһҗиҝҮиҝҷдёӘеҮҪж•°пјҢе®ғжңҖз»Ҳиҝ”еӣһжқҘзҡ„жҳҜдёҖдёӘBpBinderеҜ№иұЎпјҢеӣ жӯӨпјҢдёӢйқўзҡ„иҜӯеҸҘпјҡ
return javaObjectForIBinder(env, parcel->readStrongBinder());
е°ұзӣёеҪ“дәҺжҳҜпјҡ
return javaObjectForIBinder(env, new BpBinder(handle));
иҝҷйҮҢзҡ„handleе°ұжҳҜHelloServiceиҝҷдёӘBinderе®һдҪ“еңЁClientиҝӣзЁӢдёӯзҡ„еҸҘжҹ„дәҶпјҢе®ғжҳҜз”ұBinderй©ұеҠЁзЁӢеәҸи®ҫзҪ®зҡ„пјҢдёҠеұӮдёҚз”Ёе…іеҝғе®ғзҡ„еҖје…·дҪ“жҳҜеӨҡе°‘гҖӮиҮідәҺjavaObjectForIBinderиҝҷдёӘеҮҪж•°пјҢжҲ‘们еүҚйқўд»Ӣз»ҚеҰӮдҪ•иҺ·еҸ–Service Managerзҡ„JavaиҝңзЁӢжҺҘеҸЈж—¶е·Із»ҸжңүиҜҰз»Ҷд»Ӣз»ҚпјҢиҝҷйҮҢе°ұдёҚзҙҜиҝ°дәҶпјҢе®ғзҡ„дҪңз”Ёе°ұжҳҜеҲӣе»әдёҖдёӘBinderProxyеҜ№иұЎпјҢ并且жҠҠеҲҡжүҚиҺ·еҫ—зҡ„BpBinderеҜ№иұЎзҡ„ең°еқҖдҝқеӯҳеңЁиҝҷдёӘBinderProxyеҜ№иұЎзҡ„mObjectжҲҗе‘ҳеҸҳйҮҸдёӯгҖӮ
жңҖеҗҺиҝ”еӣһеҲ°Hello.onCreateеҮҪж•°дёӯпјҢд»ҺдёӢйқўиҜӯеҸҘиҝ”еӣһпјҡ
helloService = IHelloService.Stub.asInterface(
					ServiceManager.getService("hello"));
е°ұзӣёеҪ“дәҺжҳҜпјҡ
helloService = IHelloService.Stub.asInterface(new BinderProxy()));
еӣһеҝҶдёҖдёӢеүҚйқўд»Ӣз»ҚIHelloServiceжҺҘеҸЈзҡ„е®ҡд№үж—¶пјҢIHelloService.Stub.asInterfaceжҳҜиҝҷж ·е®ҡд№үзҡ„пјҡ
public interface IHelloService extends android.os.IInterface
{
	/** Local-side IPC implementation stub class. */
	public static abstract class Stub extends android.os.Binder implements android.os.IHelloService
	{
		......

		public static android.os.IHelloService asInterface(android.os.IBinder obj)
		{
			if ((obj==null)) {
				return null;
			}
			android.os.IInterface iin = (android.os.IInterface)obj.queryLocalInterface(DESCRIPTOR);
			if (((iin!=null)&&(iin instanceof android.os.IHelloService))) {
				return ((android.os.IHelloService)iin);
			}
			return new android.os.IHelloService.Stub.Proxy(obj);
		}

		......
	}
}
иҝҷйҮҢзҡ„objжҳҜдёҖдёӘBinderProxyеҜ№иұЎпјҢе®ғзҡ„queryLocalInterfaceиҝ”еӣһnullпјҢдәҺжҳҜи°ғз”ЁдёӢйқўиҜӯеҸҘиҺ·еҫ—HelloServiceзҡ„иҝңзЁӢжҺҘеҸЈпјҡ
return new android.os.IHelloService.Stub.Proxy(obj);
зӣёеҪ“дәҺжҳҜпјҡ
return new android.os.IHelloService.Stub.Proxy(new BinderProxy());
иҝҷж ·пјҢжҲ‘们е°ұиҺ·еҫ—дәҶHelloServiceзҡ„иҝңзЁӢжҺҘеҸЈдәҶпјҢе®ғе®һиҙЁдёҠжҳҜдёҖдёӘе®һзҺ°дәҶIHelloServiceжҺҘеҸЈзҡ„IHelloService.Stub.ProxyеҜ№иұЎгҖӮ
дә”.ClientйҖҡиҝҮHelloServiceзҡ„JavaиҝңзЁӢжҺҘеҸЈжқҘдҪҝз”ЁHelloServiceжҸҗдҫӣзҡ„жңҚеҠЎзҡ„иҝҮзЁӢ
дёҠйқўд»Ӣз»Қзҡ„HelloиҝҷдёӘActivityиҺ·еҫ—дәҶHelloServiceзҡ„иҝңзЁӢжҺҘеҸЈеҗҺпјҢе°ұеҸҜд»ҘдҪҝз”Ёе®ғзҡ„жңҚеҠЎдәҶгҖӮ
жҲ‘们д»ҘдҪҝз”ЁIHelloService.getValеҮҪж•°дёәдҫӢиҜҰз»ҶиҜҙжҳҺгҖӮеңЁHello::onClickеҮҪж•°дёӯи°ғз”ЁдәҶIHelloService.getValеҮҪж•°пјҡ
public class Hello extends Activity implements OnClickListener {
	......

	@Override
	public void onClick(View v) {
		if(v.equals(readButton)) {
			int val = helloService.getVal();
			......
		}
		else if(v.equals(writeButton)) {
			......
		}
		else if(v.equals(clearButton)) {
			......
		}
	}

	......
}
йҖҡзҹҘеүҚйқўзҡ„еҲҶжһҗпјҢжҲ‘们зҹҘйҒ“пјҢиҝҷйҮҢзҡ„helloServiceжҺҘеҸЈе®һйҷ…дёҠжҳҜдёҖдёӘIHelloService.Stub.ProxyеҜ№иұЎпјҢеӣ жӯӨпјҢжҲ‘们иҝӣе…ҘеҲ°IHelloService.Stub.Proxyзұ»зҡ„getValеҮҪж•°дёӯпјҡ
public interface IHelloService extends android.os.IInterface
{
	/** Local-side IPC implementation stub class. */
	public static abstract class Stub extends android.os.Binder implements android.os.IHelloService
	{

		......

		private static class Proxy implements android.os.IHelloService
		{
			private android.os.IBinder mRemote;

			......

			public int getVal() throws android.os.RemoteException
			{
				android.os.Parcel _data = android.os.Parcel.obtain();
				android.os.Parcel _reply = android.os.Parcel.obtain();
				int _result;
				try {
					_data.writeInterfaceToken(DESCRIPTOR);
					mRemote.transact(Stub.TRANSACTION_getVal, _data, _reply, 0);
					_reply.readException();
					_result = _reply.readInt();
				}
				finally {
					_reply.recycle();
					_data.recycle();
				}
				return _result;
			}
		}

		......
		static final int TRANSACTION_getVal = (android.os.IBinder.FIRST_CALL_TRANSACTION + 1);
	}

	......
}
иҝҷйҮҢжҲ‘们еҸҜд»ҘзңӢеҮәпјҢе®һйҷ…дёҠжҳҜйҖҡиҝҮmRemote.transactжқҘиҜ·жұӮHelloServiceжү§иЎҢTRANSACTION_getValж“ҚдҪңгҖӮиҝҷйҮҢзҡ„mRemoteжҳҜдёҖдёӘBinderProxyеҜ№иұЎпјҢиҝҷжҳҜжҲ‘们еңЁеүҚйқўиҺ·еҸ–HelloServiceзҡ„JavaиҝңзЁӢжҺҘеҸЈзҡ„иҝҮзЁӢдёӯеҲӣе»әзҡ„гҖӮ
BinderProxy.transactеҮҪж•°жҳҜдёҖдёӘJNIж–№жі•пјҢжҲ‘们еңЁеүҚйқўе·Із»Ҹд»Ӣз»ҚиҝҮдәҶпјҢиҝҷйҮҢдёҚеҶҚзҙҜиҝ°гҖӮжңҖиҝҮи°ғз”ЁеҲ°Binderй©ұеҠЁзЁӢеәҸпјҢBinderй©ұеҠЁзЁӢеәҸе”ӨйҶ’HelloServiceиҝҷдёӘServerгҖӮеүҚйқўжҲ‘们еңЁд»Ӣз»ҚHelloServiceзҡ„еҗҜеҠЁиҝҮзЁӢж—¶пјҢжӣҫз»ҸжҸҗеҲ°пјҢHelloServiceиҝҷдёӘServerзәҝзЁӢиў«е”ӨйҶ’д№ӢеҗҺпјҢе°ұдјҡи°ғз”ЁJavaBBinderзұ»зҡ„onTransactеҮҪж•°пјҡ
class JavaBBinder : public BBinder
{
	JavaBBinder(JNIEnv* env, jobject object)
		: mVM(jnienv_to_javavm(env)), mObject(env->NewGlobalRef(object))
	{
		......
	}

	......

	virtual status_t onTransact(
		uint32_t code, const Parcel& data, Parcel* reply, uint32_t flags = 0)
	{
		JNIEnv* env = javavm_to_jnienv(mVM);

		......

		jboolean res = env->CallBooleanMethod(mObject, gBinderOffsets.mExecTransact,
			code, (int32_t)&data, (int32_t)reply, flags);

		......

		return res != JNI_FALSE ? NO_ERROR : UNKNOWN_TRANSACTION;
	}

	......

        JavaVM* const   mVM;
	jobject const   mObject;
};
еүҚйқўжҲ‘们еңЁд»Ӣз»ҚHelloServiceзҡ„еҗҜеҠЁиҝҮзЁӢж—¶пјҢжӣҫз»Ҹд»Ӣз»ҚиҝҮпјҢJavaBBinderзұ»йҮҢйқўзҡ„жҲҗе‘ҳеҸҳйҮҸmObjectе°ұжҳҜHelloServiceзұ»зҡ„дёҖдёӘе®һдҫӢеҜ№иұЎдәҶгҖӮеӣ жӯӨпјҢиҝҷйҮҢйҖҡиҝҮиҜӯеҸҘпјҡ
jboolean res = env->CallBooleanMethod(mObject, gBinderOffsets.mExecTransact,
			code, (int32_t)&data, (int32_t)reply, flags);
е°ұи°ғз”ЁдәҶHelloService.execTransactеҮҪж•°пјҢиҖҢHelloService.execTransactеҮҪ数继жүҝдәҶBinderзұ»зҡ„execTransactеҮҪж•°пјҡ
public class Binder implements IBinder {
	......

	// Entry point from android_util_Binder.cpp's onTransact
	private boolean execTransact(int code, int dataObj, int replyObj, int flags) {
		Parcel data = Parcel.obtain(dataObj);
		Parcel reply = Parcel.obtain(replyObj);
		// theoretically, we should call transact, which will call onTransact,
		// but all that does is rewind it, and we just got these from an IPC,
		// so we'll just call it directly.
		boolean res;
		try {
			res = onTransact(code, data, reply, flags);
		} catch (RemoteException e) {
			reply.writeException(e);
			res = true;
		} catch (RuntimeException e) {
			reply.writeException(e);
			res = true;
		} catch (OutOfMemoryError e) {
			RuntimeException re = new RuntimeException("Out of memory", e);
			reply.writeException(re);
			res = true;
		}
		reply.recycle();
		data.recycle();
		return res;
	}
}
иҝҷйҮҢеҸҲи°ғз”ЁдәҶonTransactеҮҪж•°жқҘдҪңиҝӣдёҖжӯҘеӨ„зҗҶгҖӮз”ұдәҺHelloServiceзұ»з»§жүҝдәҶIHelloService.Stubзұ»пјҢиҖҢIHelloService.Stubзұ»е®һзҺ°дәҶonTransactеҮҪж•°пјҢHelloServiceзұ»жІЎжңүе®һзҺ°пјҢеӣ жӯӨпјҢжңҖз»Ҳи°ғз”ЁдәҶIHelloService.Stub.onTransactеҮҪж•°пјҡ
public interface IHelloService extends android.os.IInterface
{
	/** Local-side IPC implementation stub class. */
	public static abstract class Stub extends android.os.Binder implements android.os.IHelloService
	{
		......

		@Override
		public boolean onTransact(int code, android.os.Parcel data, android.os.Parcel reply, int flags) throws android.os.RemoteException
		{
			switch (code)
			{
			......
			case TRANSACTION_getVal:
				{
					data.enforceInterface(DESCRIPTOR);
					int _result = this.getVal();
					reply.writeNoException();
					reply.writeInt(_result);
					return true;
				}
			}
			return super.onTransact(code, data, reply, flags);
		}

		......

	}
}
еҮҪж•°жңҖз»ҲеҸҲи°ғз”ЁдәҶHelloService.getValеҮҪж•°пјҡ
public class HelloService extends IHelloService.Stub {
	......

	public int getVal() {
		return getVal_native();
	}

	......
	private static native int getVal_native();
}
жңҖз»ҲпјҢз»ҸиҝҮеұӮеұӮиҝ”еӣһпјҢе°ұеӣһеҲ°IHelloService.Stub.Proxy.getValеҮҪж•°дёӯжқҘдәҶпјҢд»ҺдёӢйқўиҜӯеҸҘиҝ”еӣһпјҡ
mRemote.transact(Stub.TRANSACTION_getVal, _data, _reply, 0);
并е°Ҷз»“жһңиҜ»еҮәжқҘпјҡ
_result = _reply.readInt();
жңҖеҗҺе°ҶиҝҷдёӘз»“жһңиҝ”еӣһеҲ°Hello.onClickеҮҪж•°дёӯгҖӮ
иҝҷж ·пјҢClientйҖҡиҝҮHelloServiceзҡ„JavaиҝңзЁӢжҺҘеҸЈжқҘдҪҝз”ЁHelloServiceжҸҗдҫӣзҡ„жңҚеҠЎзҡ„иҝҮзЁӢе°ұд»Ӣз»Қе®ҢдәҶгҖӮ
иҮіжӯӨпјҢAndroidзі»з»ҹиҝӣзЁӢй—ҙйҖҡдҝЎBinderжңәеҲ¶еңЁеә”з”ЁзЁӢеәҸжЎҶжһ¶еұӮзҡ„JavaжҺҘеҸЈжәҗд»Јз ҒеҲҶжһҗд№ҹе®ҢжҲҗдәҶпјҢж•ҙдёӘBinderжңәеҲ¶зҡ„еӯҰд№ е°ұз»“жқҹдәҶгҖӮ
йҮҚж–°еӯҰд№ Androidзі»з»ҹиҝӣзЁӢй—ҙйҖҡдҝЎBinderжңәеҲ¶пјҢиҜ·еӣһеҲ°AndroidиҝӣзЁӢй—ҙйҖҡдҝЎпјҲIPCпјүжңәеҲ¶Binderз®ҖиҰҒд»Ӣз»Қе’ҢеӯҰд№ и®ЎеҲ’дёҖж–ҮгҖӮ
иҖҒзҪ—зҡ„ж–°жөӘеҫ®еҚҡпјҡhttp://weibo.com/shengyangluoпјҢж¬ўиҝҺе…іжіЁпјҒ


- 2011-07-30 01:48
- жөҸи§Ҳ 322
- иҜ„и®ә(0)
- жҹҘзңӢжӣҙеӨҡ
еҸ‘иЎЁиҜ„и®ә

зӣёе…іжҺЁиҚҗ
Androidзі»з»ҹиҝӣзЁӢй—ҙйҖҡдҝЎBinderжңәеҲ¶еңЁеә”з”ЁзЁӢеәҸжЎҶжһ¶еұӮзҡ„JavaжҺҘеҸЈжәҗд»Јз ҒеҲҶжһҗ[еҪ’зәі].pdf
Androidзі»з»ҹиҝӣзЁӢй—ҙйҖҡдҝЎBinderжңәеҲ¶еңЁеә”з”ЁзЁӢеәҸжЎҶжһ¶еұӮзҡ„JavaжҺҘеҸЈжәҗд»Јз ҒеҲҶжһҗ
дёҖпјҺз®ҖиҰҒд»Ӣз»Қе’ҢеӯҰд№ и®ЎеҲ’ дәҢпјҺService Manager жҲҗдёәBinder е®ҲжҠӨиҝӣзЁӢд№Ӣи·Ҝ дёүпјҺServer е’ҢClient иҺ·еҫ—Service Manager жҺҘеҸЈд№Ӣи·Ҝ еӣӣпјҺServer еҗҜеҠЁиҝҮзЁӢжәҗд»Јз ҒеҲҶжһҗ ...еә”з”ЁзЁӢеәҸжЎҶжһ¶еұӮзҡ„Java жҺҘеҸЈжәҗд»Јз ҒеҲҶжһҗ
5.10гҖҖBinderиҝӣзЁӢй—ҙйҖҡдҝЎжңәеҲ¶зҡ„JavaжҺҘеҸЈ 5.10.1гҖҖService Managerзҡ„Javaд»ЈзҗҶеҜ№иұЎзҡ„иҺ·еҸ–иҝҮзЁӢ 5.10.2гҖҖJavaжңҚеҠЎжҺҘеҸЈзҡ„е®ҡд№үе’Ңи§Јжһҗ 5.10.3гҖҖJavaжңҚеҠЎзҡ„еҗҜеҠЁиҝҮзЁӢ 5.10.4гҖҖJavaжңҚеҠЎд»ЈзҗҶеҜ№иұЎзҡ„иҺ·еҸ–иҝҮзЁӢ 5.10.5гҖҖJava...
еңЁеҶ…е®№дёҠпјҢжң¬д№Ұз»“еҗҲдҪҝз”Ёжғ…жҷҜпјҢе…ЁйқўгҖҒж·ұе…ҘгҖҒз»ҶиҮҙең°еҲҶжһҗAndroidзі»з»ҹзҡ„жәҗд»Јз ҒпјҢж¶үеҸҠеҲ°LinuxеҶ…ж ёеұӮгҖҒ硬件жҠҪиұЎеұӮпјҲHALпјүгҖҒиҝҗиЎҢж—¶еә“еұӮ(Runtime)гҖҒеә”з”ЁзЁӢеәҸжЎҶжһ¶еұӮ(Application Framework)д»ҘеҸҠеә”з”ЁзЁӢеәҸеұӮ(Application)гҖӮ...
5.10гҖҖBinderиҝӣзЁӢй—ҙйҖҡдҝЎжңәеҲ¶зҡ„JavaжҺҘеҸЈ 5.10.1гҖҖService Managerзҡ„Javaд»ЈзҗҶеҜ№иұЎзҡ„иҺ·еҸ–иҝҮзЁӢ 5.10.2гҖҖJavaжңҚеҠЎжҺҘеҸЈзҡ„е®ҡд№үе’Ңи§Јжһҗ 5.10.3гҖҖJavaжңҚеҠЎзҡ„еҗҜеҠЁиҝҮзЁӢ 5.10.4гҖҖJavaжңҚеҠЎд»ЈзҗҶеҜ№иұЎзҡ„иҺ·еҸ–иҝҮзЁӢ 5.10.5гҖҖJavaжңҚеҠЎзҡ„...
еңЁеҶ…е®№дёҠпјҢжң¬д№Ұз»“еҗҲдҪҝз”Ёжғ…жҷҜпјҢе…ЁйқўгҖҒж·ұе…ҘгҖҒз»ҶиҮҙең°еҲҶжһҗAndroidзі»з»ҹзҡ„жәҗд»Јз ҒпјҢж¶үеҸҠеҲ°LinuxеҶ…ж ёеұӮгҖҒ硬件жҠҪиұЎеұӮпјҲHALпјүгҖҒиҝҗиЎҢж—¶еә“еұӮ(Runtime)гҖҒеә”з”ЁзЁӢеәҸжЎҶжһ¶еұӮ(Application Framework)д»ҘеҸҠеә”з”ЁзЁӢеәҸеұӮ(Application)гҖӮ...
Androidзі»з»ҹжәҗд»Јз Ғжғ…жҷҜеҲҶжһҗе…үзӣҳиө„ж–ҷ зӣ®еҪ• 第1зҜҮеҲқиҜҶAndroidзі»з»ҹ 第1з« гҖҖеҮҶеӨҮзҹҘиҜҶ................................................................ 2 1.1гҖҖLinuxеҶ…ж ёеҸӮиҖғд№ҰзұҚ......................................
BinderзҜҮпјҲ第5пҪһ6з« пјүзқҖйҮҚеҲҶжһҗдәҶBinderеңЁNativeжЎҶжһ¶еұӮе’ҢJavaжЎҶжһ¶еұӮзҡ„жңәеҲ¶е’Ңе®һзҺ°пјҢиғҪи®©иҜ»иҖ…ж·ұе…ҘзҗҶи§ЈиҝӣзЁӢй—ҙзҡ„йҖҡдҝЎжЁЎеһӢпјӣ ж¶ҲжҒҜйҖҡдҝЎзҜҮпјҲ第7з« пјүйҮҚзӮ№еҲҶжһҗдәҶAndroidзҡ„ж¶ҲжҒҜй©ұеҠЁе’ҢејӮжӯҘеӨ„зҗҶжңәеҲ¶пјҢиғҪи®©иҜ»иҖ…ж·ұе…ҘзҗҶи§ЈзәҝзЁӢй—ҙзҡ„...
binderзҜҮпјҲ第5пҪһ6з« пјүзқҖйҮҚеҲҶжһҗдәҶbinderеңЁnativeжЎҶжһ¶еұӮе’ҢjavaжЎҶжһ¶еұӮзҡ„жңәеҲ¶е’Ңе®һзҺ°пјҢиғҪи®©иҜ»иҖ…ж·ұе…ҘзҗҶи§ЈиҝӣзЁӢй—ҙзҡ„йҖҡдҝЎжЁЎеһӢпјӣж¶ҲжҒҜйҖҡдҝЎзҜҮпјҲ第7з« пјүйҮҚзӮ№еҲҶжһҗдәҶandroidзҡ„ж¶ҲжҒҜй©ұеҠЁе’ҢејӮжӯҘеӨ„зҗҶжңәеҲ¶пјҢиғҪи®©иҜ»иҖ…ж·ұе…ҘзҗҶи§ЈзәҝзЁӢй—ҙзҡ„йҖҡдҝЎ...
26 Android IPC йҖҡи®ҜжңәеҲ¶жәҗз ҒеҲҶжһҗ 73 26.1 BinderйҖҡдҝЎз®Җд»Ӣпјҡ 73 26.1.1. ServiceManangerиҝӣзЁӢжіЁеҶҢиҝҮзЁӢжәҗз ҒеҲҶжһҗпјҡ 74 26.1.2. clientиҺ·еҸ–remote IServiceManager IBinderжҺҘеҸЈпјҡ 75 26.1.3. clientиҺ·еҸ–Serviceзҡ„иҝңзЁӢ...
гҖҖз»“еҗҲе®һйҷ…еә”з”ЁејҖеҸ‘йңҖжұӮпјҢд»Ҙжғ…жҷҜеҲҶжһҗзҡ„ж–№ејҸжңүй’ҲеҜ№жҖ§ең°еҜ№Androidзҡ„жәҗд»Јз ҒиҝӣиЎҢдәҶеҚҒеҲҶиҜҰе°Ҫзҡ„еү–жһҗпјҢж·ұеҲ»жҸӯзӨәAndroidзі»з»ҹзҡ„е·ҘдҪңеҺҹзҗҶ гҖҖжңәй”ӢзҪ‘гҖҒ51CTOгҖҒејҖжәҗдёӯеӣҪзӨҫеҢәзӯүдё“дёҡжҠҖжңҜзҪ‘з«ҷдёҖиҮҙйјҺеҠӣжҺЁиҚҗ еҶ…е®№з®Җд»Ӣ гҖҖгҖҠж·ұе…ҘзҗҶи§Ј...