- 浏览: 2109011 次
- 性别:

- 来自: 深圳
-

文章分类
最新评论
-
wahahachuang5:
web实时推送技术使用越来越广泛,但是自己开发又太麻烦了,我觉 ...
细说websocket - php篇 -
wahahachuang8:
挺好的,学习了
细说websocket - php篇 -
jacking124:
学习了!支持你,继续
初窥Linux 之 我最常用的20条命令 -
aliahhqcheng:
应该是可以实现的,没有看过源码。你可以参考下:http://w ...
Jackson 框架,轻易转换JSON
【Android开发笔记】4.简单基站定位程序
LBS接口文档
请求方式
http请求方式:GET
DEMO:http://api2.mini361.com/GetGPSByLBS.aspx?mcc=460&mnc=0&lac=9520&cid=3672&key=74UFJUR9232MM01
返回:22.49554,113.92598,广东省深圳市公园路6号
前言
经过前面几节的学习,我们已经对Android程序的开发流程有了个大体的了解,为了提高我们的学习兴趣,在这一节我们将编写一个简单的基站定位程序。现在LBS(Location Based Service,基于位置的服务)移动应用相当流行(如:微信,切客,嘀咕,街旁等),基站定位是这类程序用到的关键性技术之一,我们来揭开它的神秘面纱吧。
在这一节里,我们会接触到事件、TelephonyManager、HTTP通信、JSON的使用等知识点。
声明
本系列文章不是教程,仅为笔记,如有不当之处请指正。
欢迎转载,转载请保留原出处:http://www.cnblogs.com/rayee
目录
一、设置界面
二、为按钮绑定事件
三、获取基站信息
四、获取经纬度
五、获取物理位置
六、显示结果
七、运行程序
八、总结
九、程序代码
正文
在Android操作系统下,基站定位其实很简单,先说一下实现流程:
调用SDK中的API(TelephonyManager)获得MCC、MNC、LAC、CID等信息,然后通过google的API获得所在位置的经纬度,最后再通过google map的API获得实际的地理位置。(google真牛!)
有同学会问:MNC、MCC、LAC、CID都是些什么东西?google又怎么通过这些东西就获得经纬度了呢?
我们一起来学习一下:
MCC,Mobile Country Code,移动国家代码(中国的为460);
MNC,Mobile Network Code,移动网络号码(中国移动为00,中国联通为01);
LAC,Location Area Code,位置区域码;
CID,Cell Identity,基站编号,是个16位的数据(范围是0到65535)。
了解了这几个名词的意思,相信有些朋友已经知道后面的事了:google存储了这些信息,直接查询就能得到经纬度了。(至于google怎么得到移动、联通的基站信息,这就不得而知了,反正google免费提供接口,直接调用就是)
下面开始动手。
一、设置界面
我们在上一节的程序的基础上进行开发,在DemoActivity的界面上实现这个功能。(没有代码的同学可点击这里下载,感谢yuejianjun同学的建议,以后我会在每一节的最后把例子打包提供下载)
首先我们将DemoActivity使用的布局修改一下:

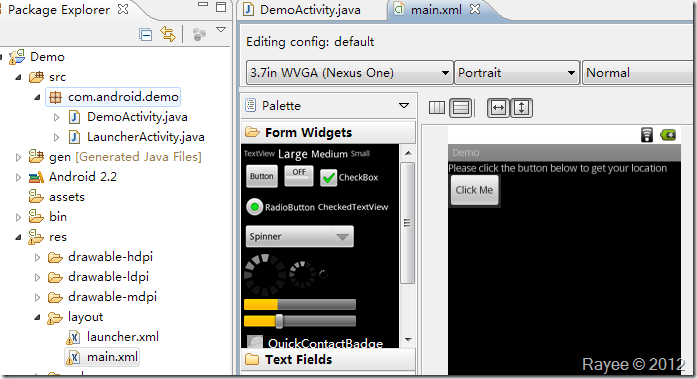
第1行为TextView,显示提示文字;第2行为一个Button,触发事件;第3行、第4行分别显示基站信息和地理位置(现在为空,看不到)。
layout/main.xml文件内容如下:
|
1
2
3
4
5
6
7
8
9
10
11
12
13
14
15
16
17
18
19
20
21
22
23
24
25
26
27
28
29
30
|
<?xmlversion="1.0"encoding="utf-8"?>
android:layout_width="fill_parent"
android:layout_height="fill_parent"
android:orientation="vertical">
<TextView
android:layout_width="fill_parent"
android:layout_height="wrap_content"
android:text="Please
click the button below to get your location"/>
<Button
android:id="@+id/button1"
android:layout_width="wrap_content"
android:layout_height="wrap_content"
android:text="Click
Me"/>
<TextView
android:id="@+id/cellText"
android:layout_width="wrap_content"
android:layout_height="wrap_content"
android:text=""/>
<TextView
android:id="@+id/lacationText"
android:layout_width="wrap_content"
android:layout_height="wrap_content"
android:text=""/>
</LinearLayout>
|
接下来我们打开DemoActivity.java编写代码。
二、为按钮绑定事件
我们在Activity创建时绑定事件,将以下代码添加到setContentView(R.layout.main);后:
|
1
2
3
4
5
6
7
8
9
|
/**
 为按钮绑定事件 */
Button
 btnGetLocation = (Button)findViewById(R.id.button1);
btnGetLocation.setOnClickListener(newOnClickListener()
{
@Override
publicvoidonClick(View
arg0) {
//
 TODO Auto-generated method stub
onBtnClick();
}
});
|
同时还需要在头部import相关组件:
|
1
2
3
|
importandroid.view.View;
importandroid.widget.Button;
importandroid.view.View.OnClickListener;
|
我们来分析一下这段代码:
首先我们通过findViewById(R.id.button1)找到按钮这个对象,前面加(Button)表示显示的转换为Button对象;
然后设置按钮点击事件的监听器,参数为OnClickListener对象,再重载这个类的onClick方法,调用onBtnClick方法(这个方法得由我们自己去写,他在点击按钮时被调用)。
好了,调用方法写好了,我们来写实现(调用后需要做什么事)。动手编码之前先在脑中整理好思路,养成好习惯。
我们需要在DemoActivty类中添加如下私有方法:
- 我们需要刚刚提到的onBtnClick回调方法,被调用时实现取得基站信息、获取经纬度、获取地理位置、显示的功能。但是很显然,全部揉到一个方法里面并不是个好主意,我们将它分割为几个方法;
- 添加获取基站信息的方法getCellInfo,返回基站信息;
- 添加获取经纬度的方法getItude,传入基站信息,返回经纬度;
- 添加获取地理位置的方法getLocation,传入经纬度,返回地理位置;
- 添加显示结果的方法showResult,传入得到的信息在界面上显示出来。
好了,先将方法添上,完整代码如下:
|
1
2
3
4
5
6
7
8
9
10
11
12
13
14
15
16
17
18
19
20
21
22
23
24
25
26
27
28
29
30
31
32
33
34
35
36
37
38
39
40
41
42
43
44
45
46
47
48
49
50
51
52
53
54
55
56
57
58
59
60
61
62
63
64
65
66
67
|
packagecom.android.demo;
importandroid.R.bool;
importandroid.R.integer;
importandroid.app.Activity;
importandroid.os.Bundle;
importandroid.view.View;
importandroid.widget.Button;
importandroid.view.View.OnClickListener;
publicclassDemoActivityextendsActivity
{
/**
 Called when the activity is first created. */
@Override
publicvoidonCreate(Bundle
savedInstanceState) {
super.onCreate(savedInstanceState);
setContentView(R.layout.main);
/**
 为按钮绑定事件 */
Button
 btnGetLocation = (Button)findViewById(R.id.button1);
btnGetLocation.setOnClickListener(newOnClickListener()
{
@Override
publicvoidonClick(View
arg0) {
//
 TODO Auto-generated method stub
onBtnClick();
}
});
}
/**
 基站信息结构体 */
publicclassSCell{
publicintMCC;
publicintMNC;
publicintLAC;
publicintCID;
}
/**
 经纬度信息结构体 */
publicclassSItude{
publicString
latitude;
publicString
longitude;
}
/**
 按钮点击回调函数 */
privatevoidonBtnClick(){
}
/**
 获取基站信息 */
privateSCell
getCellInfo(){
}
/**
 获取经纬度 */
privateSItude
getItude(SCell cell){
}
/**
 获取地理位置 */
privateString
getLocation(SItude itude){
}
/**
 显示结果 */
privatevoidshowResult(SCell
cell, String location){
}
}
|
现在在onBtnClick方法中编码,依次调用后面几个方法,代码如下:
|
1
2
3
4
5
6
7
8
9
10
11
12
13
14
15
16
17
18
19
20
21
22
23
24
25
26
27
28
29
30
31
|
/**
 按钮点击回调函数 */
privatevoidonBtnClick(){
/**
 弹出一个等待状态的框 */
ProgressDialog
mProgressDialog = newProgressDialog(this);
mProgressDialog.setMessage("正在获取中...");
mProgressDialog.setProgressStyle(ProgressDialog.STYLE_SPINNER);
mProgressDialog.show();
try{
/**
 获取基站数据 */
SCell
 cell = getCellInfo();
/**
 根据基站数据获取经纬度 */
SItude
 itude = getItude(cell);
/**
 获取地理位置 */
String
 location = getLocation(itude);
/**
 显示结果 */
showResult(cell,
 location);
/**
 关闭对话框 */
mProgressDialog.dismiss();
}catch(Exception
e) {
/**
 关闭对话框 */
mProgressDialog.dismiss();
/**
 显示错误 */
TextView
 cellText = (TextView)findViewById(R.id.cellText);
cellText.setText(e.getMessage());
}
}
|
按钮相关的工作就完成了,接下来编写获取基站信息的方法。
三、获取基站信息
获取基站信息我们需要调用SDK提供的API中的TelephonyManager,需要在文件头部引入:
|
1
2
|
importandroid.telephony.TelephonyManager;
importandroid.telephony.gsm.GsmCellLocation;
|
完整代码为:
|
1
2
3
4
5
6
7
8
9
10
11
12
13
14
15
16
17
18
19
20
21
22
23
24
25
26
27
28
|
/**
*
 获取基站信息
*
*
 @throws Exception
*/
privateSCell
getCellInfo() throwsException
{
SCell
cell = newSCell();
/**
 调用API获取基站信息 */
TelephonyManager
 mTelNet = (TelephonyManager) getSystemService(Context.TELEPHONY_SERVICE);
GsmCellLocation
 location = (GsmCellLocation) mTelNet.getCellLocation();
if(location
== null)
thrownewException("获取基站信息失败");
String
 operator = mTelNet.getNetworkOperator();
intmcc
= Integer.parseInt(operator.substring(0,3));
intmnc
= Integer.parseInt(operator.substring(3));
intcid
= location.getCid();
intlac
= location.getLac();
/**
 将获得的数据放到结构体中 */
cell.MCC
 = mcc;
cell.MNC
 = mnc;
cell.LAC
 = lac;
cell.CID
 = cid;
returncell;
}
|
如果获得的位置信息为null将抛出错误,不再继续执行。最后将获取的基站信息封装为结构体返回。
四、获取经纬度
在这一步,我们需要采用HTTP调用google的API以获取基站所在的经纬度。
Android作为一款互联网手机,联网的功能必不可少。Android提供了多个接口供我们使用,这里我们使用DefaultHttpClient。
完整的方法代码如下:
|
1
2
3
4
5
6
7
8
9
10
11
12
13
14
15
16
17
18
19
20
21
22
23
24
25
26
27
28
29
30
31
32
33
34
35
36
37
38
39
40
41
42
43
44
45
46
47
48
49
50
51
52
53
54
55
56
57
58
59
60
61
62
63
64
|
/**
*
 获取经纬度
*
*
 @throws Exception
*/
privateSItude
getItude(SCell cell) throwsException
{
SItude
itude = newSItude();
/**
 采用Android默认的HttpClient */
HttpClient
client = newDefaultHttpClient();
/**
 采用POST方法 */
try{
/**
 构造POST的JSON数据 */
JSONObject
holder = newJSONObject();
holder.put("version","1.1.0");
holder.put("host","maps.google.com");
holder.put("address_language","zh_CN");
holder.put("request_address",true);
holder.put("radio_type","gsm");
holder.put("carrier","HTC");
JSONObject
tower = newJSONObject();
tower.put("mobile_country_code",
cell.MCC);
tower.put("mobile_network_code",
cell.MNC);
tower.put("cell_id",
cell.CID);
tower.put("location_area_code",
cell.LAC);
JSONArray
towerarray = newJSONArray();
towerarray.put(tower);
holder.put("cell_towers",
towerarray);
StringEntity
query = newStringEntity(holder.toString());
post.setEntity(query);
/**
 发出POST数据并获取返回数据 */
HttpResponse
 response = client.execute(post);
HttpEntity
 entity = response.getEntity();
BufferedReader
buffReader = newBufferedReader(newInputStreamReader(entity.getContent()));
StringBuffer
strBuff = newStringBuffer();
String
result = null;
while((result
= buffReader.readLine()) != null)
{
strBuff.append(result);
}
/**
 解析返回的JSON数据获得经纬度 */
JSONObject
json = newJSONObject(strBuff.toString());
JSONObject
subjosn = newJSONObject(json.getString("location"));
itude.latitude
= subjosn.getString("latitude");
itude.longitude
= subjosn.getString("longitude");
Log.i("Itude",
itude.latitude + itude.longitude);
}catch(Exception
e) {
Log.e(e.getMessage(),
 e.toString());
thrownewException("获取经纬度出现错误:"+e.getMessage());
}finally{
post.abort();
client
= null;
}
returnitude;
}
|
代笔中关键的地方都作了注释,同学们还有不理解的举手哈。
在这里采用POST方法将JSON数据发送到googleAPI,google返回JSON数据,我们得到数据后解析,得到经纬度信息。
关于google 基站信息API的官方说明>>请到这里查看。
五、获取物理位置
得到经纬度后,我们将之转换为物理地址。
我们仍然使用DefaultHttpClient来调用google地图的API,获得物理信息,不过在这里我们使用GET方法。
完整的方法代码如下:
|
1
2
3
4
5
6
7
8
9
10
11
12
13
14
15
16
17
18
19
20
21
22
23
24
25
26
27
28
29
30
31
32
33
34
35
36
37
38
39
40
41
42
43
44
45
46
|
/**
*
 获取地理位置
*
*
 @throws Exception
*/
privateString
getLocation(SItude itude) throwsException
{
String
resultString = "";
/**
 这里采用get方法,直接将参数加到URL上 */
String
urlString = String.format("http://maps.google.cn/maps/geo?key=abcdefg&q=%s,%s",
itude.latitude, itude.longitude);
Log.i("URL",
urlString);
/**
 新建HttpClient */
HttpClient
client = newDefaultHttpClient();
/**
 采用GET方法 */
HttpGet
get = newHttpGet(urlString);
try{
/**
 发起GET请求并获得返回数据 */
HttpResponse
 response = client.execute(get);
HttpEntity
 entity = response.getEntity();
BufferedReader
buffReader = newBufferedReader(newInputStreamReader(entity.getContent()));
StringBuffer
strBuff = newStringBuffer();
String
result = null;
while((result
= buffReader.readLine()) != null)
{
strBuff.append(result);
}
resultString
 = strBuff.toString();
/**
 解析JSON数据,获得物理地址 */
if(resultString
!= null&&
resultString.length() > 0)
{
JSONObject
jsonobject = newJSONObject(resultString);
JSONArray
jsonArray = newJSONArray(jsonobject.get("Placemark").toString());
resultString
= "";
for(inti
= 0;
i < jsonArray.length(); i++) {
resultString
= jsonArray.getJSONObject(i).getString("address");
}
}
}catch(Exception
e) {
thrownewException("获取物理位置出现错误:"+
e.getMessage());
}finally{
get.abort();
client
= null;
}
returnresultString;
}
|
GET方法就比POST方法简单多了,得到的数据同样为JSON格式,解析一下得到物理地址。
六、显示结果
好了,我们已经得到我们想要的信息了,我们把它显示出来,方法代码如下:
|
1
2
3
4
5
6
7
8
9
|
/**
 显示结果 */
privatevoidshowResult(SCell
cell, String location) {
TextView
 cellText = (TextView) findViewById(R.id.cellText);
cellText.setText(String.format("基站信息:mcc:%d,
mnc:%d, lac:%d, cid:%d",
cell.MCC,
 cell.MNC, cell.LAC, cell.CID));
TextView
 locationText = (TextView) findViewById(R.id.lacationText);
locationText.setText("物理位置:"+
location);
}
|
七、运行程序
我们的编码工作已经完成了。在上面的代码中有些地方需要的引入代码没有提到,下面把完整的代码贴出来:
|
1
2
3
4
5
6
7
8
9
10
11
12
13
14
15
16
17
18
19
20
21
22
23
24
25
26
27
28
29
30
31
32
33
34
35
36
37
38
39
40
41
42
43
44
45
46
47
48
49
50
51
52
53
54
55
56
57
58
59
60
61
62
63
64
65
66
67
68
69
70
71
72
73
74
75
76
77
78
79
80
81
82
83
84
85
86
87
88
89
90
91
92
93
94
95
96
97
98
99
100
101
102
103
104
105
106
107
108
109
110
111
112
113
114
115
116
117
118
119
120
121
122
123
124
125
126
127
128
129
130
131
132
133
134
135
136
137
138
139
140
141
142
143
144
145
146
147
148
149
150
151
152
153
154
155
156
157
158
159
160
161
162
163
164
165
166
167
168
169
170
171
172
173
174
175
176
177
178
179
180
181
182
183
184
185
186
187
188
189
190
191
192
193
194
195
196
197
198
199
200
201
202
203
204
205
206
207
208
209
210
211
212
213
214
215
216
217
218
219
220
221
222
223
224
225
226
227
228
229
230
231
232
233
234
235
236
237
238
239
240
241
242
243
244
|
packagecom.android.demo;
importjava.io.BufferedReader;
importjava.io.InputStreamReader;
importorg.apache.http.HttpEntity;
importorg.apache.http.HttpResponse;
importorg.apache.http.client.HttpClient;
importorg.apache.http.client.methods.HttpGet;
importorg.apache.http.client.methods.HttpPost;
importorg.apache.http.entity.StringEntity;
importorg.apache.http.impl.client.DefaultHttpClient;
importorg.json.JSONArray;
importorg.json.JSONObject;
importandroid.app.Activity;
importandroid.app.ProgressDialog;
importandroid.content.Context;
importandroid.os.Bundle;
importandroid.telephony.TelephonyManager;
importandroid.telephony.gsm.GsmCellLocation;
importandroid.util.Log;
importandroid.view.View;
importandroid.widget.Button;
importandroid.widget.TextView;
importandroid.view.View.OnClickListener;
publicclassDemoActivityextendsActivity
{
/**
 Called when the activity is first created. */
@Override
publicvoidonCreate(Bundle
savedInstanceState) {
super.onCreate(savedInstanceState);
setContentView(R.layout.main);
/**
 为按钮绑定事件 */
Button
 btnGetLocation = (Button) findViewById(R.id.button1);
btnGetLocation.setOnClickListener(newOnClickListener()
{
@Override
publicvoidonClick(View
arg0) {
//
 TODO Auto-generated method stub
onBtnClick();
}
});
}
/**
 基站信息结构体 */
publicclassSCell{
publicintMCC;
publicintMNC;
publicintLAC;
publicintCID;
}
/**
 经纬度信息结构体 */
publicclassSItude{
publicString
latitude;
publicString
longitude;
}
/**
 按钮点击回调函数 */
privatevoidonBtnClick()
{
/**
 弹出一个等待状态的框 */
ProgressDialog
mProgressDialog = newProgressDialog(this);
mProgressDialog.setMessage("正在获取中...");
mProgressDialog.setProgressStyle(ProgressDialog.STYLE_SPINNER);
mProgressDialog.show();
try{
/**
 获取基站数据 */
SCell
 cell = getCellInfo();
/**
 根据基站数据获取经纬度 */
SItude
 itude = getItude(cell);
/**
 获取地理位置 */
String
 location = getLocation(itude);
/**
 显示结果 */
showResult(cell,
 location);
/**
 关闭对话框 */
mProgressDialog.dismiss();
}catch(Exception
e) {
/**
 关闭对话框 */
mProgressDialog.dismiss();
/**
 显示错误 */
TextView
 cellText = (TextView) findViewById(R.id.cellText);
cellText.setText(e.getMessage());
Log.e("Error",
e.getMessage());
}
}
/**
*
 获取基站信息
*
*
 @throws Exception
*/
privateSCell
getCellInfo() throwsException
{
SCell
cell = newSCell();
/**
 调用API获取基站信息 */
TelephonyManager
 mTelNet = (TelephonyManager) getSystemService(Context.TELEPHONY_SERVICE);
GsmCellLocation
 location = (GsmCellLocation) mTelNet.getCellLocation();
if(location
== null)
thrownewException("获取基站信息失败");
String
 operator = mTelNet.getNetworkOperator();
intmcc
= Integer.parseInt(operator.substring(0,3));
intmnc
= Integer.parseInt(operator.substring(3));
intcid
= location.getCid();
intlac
= location.getLac();
/**
 将获得的数据放到结构体中 */
cell.MCC
 = mcc;
cell.MNC
 = mnc;
cell.LAC
 = lac;
cell.CID
 = cid;
returncell;
}
/**
*
 获取经纬度
*
*
 @throws Exception
*/
privateSItude
getItude(SCell cell) throwsException
{
SItude
itude = newSItude();
/**
 采用Android默认的HttpClient */
HttpClient
client = newDefaultHttpClient();
/**
 采用POST方法 */
try{
/**
 构造POST的JSON数据 */
JSONObject
holder = newJSONObject();
holder.put("version","1.1.0");
holder.put("host","maps.google.com");
holder.put("address_language","zh_CN");
holder.put("request_address",true);
holder.put("radio_type","gsm");
holder.put("carrier","HTC");
JSONObject
tower = newJSONObject();
tower.put("mobile_country_code",
cell.MCC);
tower.put("mobile_network_code",
cell.MNC);
tower.put("cell_id",
cell.CID);
tower.put("location_area_code",
cell.LAC);
JSONArray
towerarray = newJSONArray();
towerarray.put(tower);
holder.put("cell_towers",
towerarray);
StringEntity
query = newStringEntity(holder.toString());
post.setEntity(query);
/**
发出POST数据并获取返回数据 */
HttpResponse
response = client.execute(post);
HttpEntity
entity = response.getEntity();
BufferedReader
buffReader = newBufferedReader(newInputStreamReader(entity.getContent()));
StringBuffer
strBuff = newStringBuffer();
String
result = null;
while((result
= buffReader.readLine()) != null)
{
strBuff.append(result);
}
/**
解析返回的JSON数据获得经纬度 */
JSONObject
json = newJSONObject(strBuff.toString());
JSONObject
subjosn = newJSONObject(json.getString("location"));
itude.latitude
= subjosn.getString("latitude");
itude.longitude
= subjosn.getString("longitude");
Log.i("Itude",
itude.latitude + itude.longitude);
}catch(Exception
e) {
Log.e(e.getMessage(),
e.toString());
thrownewException("获取经纬度出现错误:"+e.getMessage());
}finally{
post.abort();
client
= null;
}
returnitude;
}
/**
*
获取地理位置
*
*
@throws Exception
*/
privateString
getLocation(SItude itude) throwsException
{
String
resultString = "";
/**
这里采用get方法,直接将参数加到URL上 */
String
urlString = String.format("http://maps.google.cn/maps/geo?key=abcdefg&q=%s,%s",
itude.latitude, itude.longitude);
Log.i("URL",
urlString);
/**
新建HttpClient */
HttpClient
client = newDefaultHttpClient();
/**
采用GET方法 */
HttpGet
get = newHttpGet(urlString);
try{
/**
发起GET请求并获得返回数据 */
HttpResponse
response = client.execute(get);
HttpEntity
entity = response.getEntity();
BufferedReader
buffReader = newBufferedReader(newInputStreamReader(entity.getContent()));
StringBuffer
strBuff = newStringBuffer();
String
result = null;
while((result
= buffReader.readLine()) != null)
{
strBuff.append(result);
}
resultString
= strBuff.toString();
/**
解析JSON数据,获得物理地址 */
if(resultString
!= null&&
resultString.length() > 0)
{
JSONObject
jsonobject = newJSONObject(resultString);
JSONArray
jsonArray = newJSONArray(jsonobject.get("Placemark").toString());
resultString
= "";
for(inti
= 0;
i < jsonArray.length(); i++) {
resultString
= jsonArray.getJSONObject(i).getString("address");
}
}
}catch(Exception
e) {
thrownewException("获取物理位置出现错误:"+
e.getMessage());
}finally{
get.abort();
client
= null;
}
returnresultString;
}
/**
显示结果 */
privatevoidshowResult(SCell
cell, String location) {
TextView
cellText = (TextView) findViewById(R.id.cellText);
cellText.setText(String.format("基站信息:mcc:%d,
mnc:%d, lac:%d, cid:%d",
cell.MCC,
cell.MNC, cell.LAC, cell.CID));
TextView
locationText = (TextView) findViewById(R.id.lacationText);
locationText.setText("物理位置:"+
location);
}
}
|
我们连上手机在手机上运行程序看看。
不出意外的话程序运行起来了,自动跳转到了主界面。点击“Click Me”,出错了!

详细的错误信息为:Neither user 10078 nor current process has android.permission.ACCESS_COARSE_LOCATION.
原来是没有权限,经过前面的学习,我们知道Android在应用的安全上下了一番功夫,要用一些特殊功能必须先报告,安装应用的时候列给用户看,必须要得到用户的允许。这里我们用了获取基站信息的功能,涉及到用户的隐私了,所以我们必须申明一下。
打开AndroidManifest.xml配置文件,在里面添加相应的配置信息:
|
1
|
<uses-permissionandroid:name="android.permission.ACCESS_FINE_LOCATION"></uses-permission>
|
我们继续把网络连接的权限申明也加上:
|
1
|
<uses-permissionandroid:name="android.permission.INTERNET"></uses-permission>
|
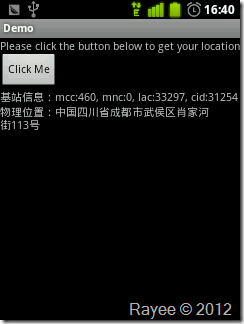
再编译运行看看(点击“Click Me”后程序会卡住,等待一段时间才有反应,取决于网络情况):

成功啦!
可能有的同学还是出现错误,没有成功:
█提示“www.google.com…”什么的错误
请确认你的手机能访问互联网,调用google的API是必须联网的。
█提示获取不到基站信息
你确定你是在手机上测试的吗?模拟器可不行哦。或者你的手机使用的CMDA网络?这个例子只支持GSM网络…
█获取不到经纬度
很有可能你中奖了,你所在的基站还没纳入google的数据库…(话说我之前也遇到过,怎么查就是查不出经纬度来,返回数据为空)
█获取到的地理地址不正确
这个可能程序出错了,可能google出错了?
其实google map API返回的数据中还包含了很多其他信息,我们可以用来开发一些更有趣的功能,如制作我们专属的地图软件、足迹记录软件等,充分发挥你的创造力:)
八、总结
这个程序基本实现了基站定位功能,但还有很多问题,如:点击了按钮后界面会卡住(访问网络时阻塞了进程)、未对异常进一步处理、不兼容CMDA网络等。
另外这个程序的精度也不够,获得的位置实际上是基站的物理位置,与人所在的位置还有一定差距。在城市里面,一般采用密集型的小功率基站,精度一般在几百米范围内,而在郊区常为大功率基站,密度很小,精度一般在几千米以上。
想要取得更高的精度需要通过一些其他的算法来实现,如果大家有兴趣的话我们可以一起来研究一下,再专门写篇笔记。
可见写一段程序和做一个实际的产品是有很大差别的。
九、程序代码
这一节完整程序的请点击这里下载。
结尾
这一节基本实现了最简单的基站定位,只是作为学习的例子,远远达不到产品的要求,请大家见谅。
我们进一步熟悉了JAVA编码,之前没怎么接触JAVA看起来有点吃力的同学建议找点JAVA基础的书来看看。
话说我这段代码也是写得乱七八糟,JAVA没系统学习过,不知道JAVA编程的习惯,命名规则等,大家见笑了。
相对前面几节来说这一节没那么详细了,我也很困惑:详细点呢进度很慢,进度提上去了又怕不够详细,看看大家的意见,请留言哈。
下一节我们回归理论知识,一起深入学习Android的Activity组件。
如果你喜欢看到这些文字,请点击右下角的“推荐”支持我一下,谢谢!


相关推荐
Android开发笔记(中文) 希望对你学习Android有所帮助
主要介绍了Android开发笔记之简单基站定位程序的实现,详细的介绍了基站定位其实很简单,具有一定的参考价值,感兴趣的小伙伴们可以参考一下。
android GPS和基站定位程序及源码.rar.rar android GPS和基站定位程序及源码.rar.rar android GPS和基站定位程序及源码.rar.rar
android开发笔记.pdf
Android开发教程笔记.zip
Android 基站定位源码.zip
Android 开发笔记
android 基站定位程序 目前仅支持联通、移动通信商
Android程序开发初级教程.pdfAndroid程序开发初级教程.pdfAndroid程序开发初级教程.pdfAndroid程序开发初级教程.pdfAndroid程序开发初级教程.pdfAndroid程序开发初级教程.pdfAndroid程序开发初级教程.pdfAndroid程序...
Android程序研发源码Android 基站定位源码
Android学习笔记整理.pdf
《Android应用程序开发教程(第2版)》教学课件01Android系统与开发环境.pdf《Android应用程序开发教程(第2版)》教学课件01Android系统与开发环境.pdf《Android应用程序开发教程(第2版)》教学课件01Android系统与开发...
《Android 4.X 应用与开发实战手册:适用Android 4.X-2.X(第2版)》以Android 4.X进行开发示范,通过大量图示与step by step方式,详细介绍了使用Android开发智能手机、平板电脑应用程序的方法,读者无须强记即可...
Android智能电视APP开发笔记(二)Android开发环境搭建.pdf
Android 基站定位源码.rar
android笔记.doc android笔记.pdf 1 系统配置... ..1 1.1 建立SDK开发环境... ...2 1.2 Android源码的编译 ... .6 1.3 编译在G1 上运行的android 2.1(eclair)代码 ... ..9 1.4 编译在G1 上运行的android 2.2(froyo)...